I bucked the trend as a student. I spent the first year of proper student halls life being the designated driver and cooking from scratch. Odd I know. No AfterShock chasers or donor kebabs for me.
I was just so incredibly excited to have a kitchen to call my own (well mine and 20 others) and a budget for food. Second year was spent in a house of 7 people where myself and one of the other greedy inhabitants used to regularly peel a bag of potatoes the size of a small toddler. We’d boil them, mash them to within an inch of their lives and finish with scalded milk, salted butter and lashings of black pepper. Whilst all 7 of us ate well through this devotion, our portion control was a little suspect. I now know that when you need a break mid meal it might be time to put the cutlery down, defeated.
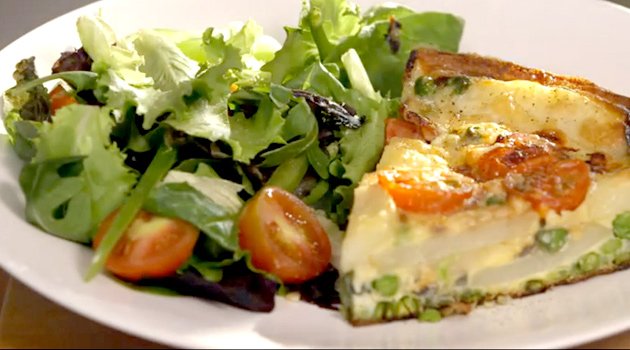
This frittata recipe is great. It’s easy, economical and nutritious. Plus it doesn’t need lots of fancy equipment so it’s perfect for students who I believe are starting their new terms about now. Serves 4 people or two with a great breakfast the day after. There’s even a little video to watch of me making this with the rather lovely, polite and handsome Ed:
Ingredients:
400g Maris Piper potatoes, cut into rounds
6 medium British free-range Woodland eggs by Sainsbury’s
1 red onion, thinly sliced
150g cherry tomatoes, halved
200g frozen petit pois
50g mature cheddar, grated
170g Italian Style Salad, to serve
1 teaspoon olive oil
Boil the sliced potato for 10 minutes until just tender, then drain and set aside.
Meanwhile, beat the eggs in a large bowl. Heat the oil in a 22cm ovenproof frying pan and cook the red onion for 5 minutes, until softened.
Stir the potatoes, tomatoes and frozen peas into the beaten eggs. Season with freshly ground black pepper.
Pour the mixture into the frying pan on top of the cooked onions. Cook over a gentle heat for 15 minutes. After 10 minutes, preheat the grill to hot.
Scatter the cheese over the top of the frittata and place under the grill for 5 minutes, until golden on top, set and cooked through. Cut into wedges and serve with salad.
Sometimes you shouldn’t ask questions in case you get the wrong answers. I once voiced a concern to an ex that I was carrying a good stone too much weight. He went on to agree and tell me in detail about how my back had the potential to look great if it weren’t so fat. That was Fat-Back Gate. Then there’s the time I asked my husband if he liked my semi vegetarian creation ‘Carrot Stew with a hint of Chicken.’ He called for a takeaway. That was and still is Carrot-Stew Gate.
Then I asked the lovely people on my facebook page and on Twitter what kind of brioche they thought I should make for the blog. So many amazing ideas. Many chocolate related. Though here I am posting a lemon recipe. I can only apologise. I somehow think this won’t become Lemon-Brioche Gate. These are that good.
Makes about 12
Ingredients:
1 tbsp castor sugar
3 tbsp water
7g sachet of yeast
1 tbsp castor sugar
Pinch salt
2 eggs
200g plain flour
Zest of 1 lemon
90g soft butter
An egg yolk
I make this in my Kitchenaid but you can make it by hand if you like. It’s very sticky though and hard work. It can be done.
Take the first tbsp of sugar and put in a saucepan with the water on the stove. Heat until dissolved. Then leave to cool a tiny bit until you can dip your finger into it. Then add the yeast and leave for 10 mins until it smells hoppy and beery. It may well be frothy.
Then pour the lot into your stand mixer and add the last tbsp of sugar, give it a mix with the dough hook, then add the salt and eggs, again mix with the dough hook. Then add the flour and mix for about 4 minutes. Lastly add the zest and the mix again – then whilst it’s mixing add the soft butter a teaspoon at a time until it’s all combined. Take the bowl off the Kitchenaid, over in clingfilm and leave on the side for about 1.5 – 2 hours until the dough has doubled in size.
When it has pop back in the mixer and give a 30 second mix to knock the dough back. Then cut into 12 pieces with scissors. It’s very sticky so have a little pot of flour on the side for dipping your fingers into. Then shape the brioche. I do this by taking the piece of dough (ie/ one of the 12) and cutting off a small piece about the size of my thumb nail. This is the bit to go on the top, the kind of ‘nose’ of the brioche. Then I take the rest of the piece of dough, roll in between lightly floured palms into a ball, then put on the work surface and pop a floured finger into the middle and move my finger about in a small circle quite fast to push all the way through until I have a doughnut shape. Then pop this into a buttered mini brioche mould (I use the ones that are about 5cm across from ebay – search under ‘cake moulds) and add the saved ‘nose’ to the top.
When you’ve made all 12, pop on a baking tray and cover loosely with a floured tea towel. (Not a damp one! This lowers the temperature of the air near the brioche as it drys out and makes the rise time too long.) and leave to proof for about another hour or until doubled in size. Paint the brioche with egg yolk and then bake in a preheated 200C oven for 15 – 20 minutes until brown and risen. The kitchen will smell of lemony cake. Eat warm or cold for breakfast. Oh and you can leave the proofed brioche in the fridge overnight, let it come to room temperature and then bake first thing. My boys are rather partial to these as a treat on a Sunday morning.
Forgive me the name. I remember many a cake being called this in the 80s, mostly on chain pub menus. Not sure I ever felt those mass produced, icy cold, spongey (as in sea sponge, not sponge cake) textured cakes lived up to the hype though. I recently tried the choc cake at Nando’s and well, it’s probably one of the best chain restaurant cakes I’ve ever tasted.* I helped my son eat a portion, as in I ate 85% of the slice.
This chocolate cake is light and tender, leading you into a false expectation of a not too chocolately hit. Then the ganache filling and icing hits you and it’s time to sit down, cram the rest into your mouth and maybe have a glass of milk to counter the effects of the richness. I decorated this particular cake rather conservatively as it was a gift for a friend. If I were decorating it for myself I’d cover the entire thing in chopped up chocolate bars and Smarties. Then I’d sit down with a large fork and dive straight in…
*No, Nando’s haven’t paid me to say that, however if they would like to give me a free slice of cake every now and again I’d be very much up for that. I have elasticated trousers ready should such an occasion arise.
Ingredients:
150g castor sugar
175g margarine/butter at room temperature
150g plain flour
3 large eggs at room temperature
1 tsp bicarbonate of soda
2 tsp cream of tartar
30g cocoa powder
1 tbsp vanilla extract
35g Greek yoghurt
————————-
300mls double cream
200g dark and 100g milk chocolate, broken into squares
Chocolate bar(s) of your choice
Preheat the oven to Gas 4/180C. Butter and line two tins with greaseproof paper. I used 8.5 inch wide ones. Cream together the sugar and butter/margarine until light and fluffy. I use an electric hand mixer for this. Scrape down the bowl and add in the flour, eggs, bicarb of soda, cream of tartar, cocoa powder, vanilla extract and Greek yoghurt. Whizz up for about 4 minutes with the handheld mixer until all combined, light and fluffy.
Divide the mixture between the two cake tins and level with the back of a spoon. Bake in the oven for 30 minutes. Once the cakes are ready they should be well risen (one may have cracked a little – worry not) and a toothpick should come out of the centre of the cakes clean. Leave to cool for ten minutes in their tins, then transfer to a wire rack to cool completely.
Make the chocolate ganache, pop the cream into a saucepan and heat until it starts to bubble, remove from the heat, then add the chocolate and stir, stir, stir until the mixture is completely molten and without any chocolate lumps showing. Leave to cool until the mixture has thickened, (this takes a couple of hours at room temp, you can pop in the fridge but the ganache may lose its shine) then spoon about two large tablespoons onto one of the cakes already secured to the cake board with a tiny bit of ganache . Spread evenly, though not all the way to the edges, possibly add a little more if you wish, then place the other cake on top.
Add the rest of the ganache to the top and then decorate with chopped up chocolate bar(s). Leave to set. Eat or give to people you love.
I am sure birthdays were easier when I was a kid. Obviously easier for me as all I did was turn up, (or rather get driven to the location) eat a lot of party food supplied by said venue, blow out the candles to a big chocolate cake and then smile sweetly for the camera. My Mum handed out party bags full of slices of cake wrapped in napkins, white chocolate mice, a pencil, a rubber shaped like a bear and maybe a bouncy ball. I imagine I also had some form of tantrum on the way home but luckily my memory has erased any such incident.
Talking to my Mum about the birthday parties of my youth versus the ones my sons enjoy, we couldn’t help but agree that the stakes have been raised. The last few parties my son has been to saw him leave with an individual cupcake sitting in a little box and instead of party bags full of tat, (is it just me who loves these Christmas cracker style gifts?) each left with a toy or book of almost equivalent value to the pressie bestowed on the birthday boy or girl. Partying and throwing parties is an expensive game.
Yesterday, when I asked what kind of birthday cake my eldest son might like for his fast approaching 4th birthday he replied firmly ‘a pirate ship please’. Slightly horrified at the thought of cake carving I suggested he might like a chocolate cake with some snakes and caterpillars and other bugs on it. He replied ‘yes Mummy and a pirate ship please.’ I should have kept my mouth shut.
Here’s a gorgeous cake both inside and out, impressive enough to get the all important oohs and aahs but easy enough not to result in any tears on your part. And if you have a boy and he’s not into pink then you could easily change the colours. You can watch the how to video here:
Ingredients:
– 375g unsalted butter, softened
– 375g caster sugar
– 2 teaspoons vanilla extract
– 6 medium eggs
– 375g self-raising flour
– a few drops red food colouring
For the filling and icing
– 7 tablespoons strawberry jam
– 200g unsalted butter, softened
– 500g icing sugar
– a few drops red and green food colouring
To decorate
– 1 x pack flower decorations by Sainsbury’s
– 1 x pack Happy Birthday candles
– 1 x pack butterfly cake decorations by Sainsbury’s
Preheat the oven to 180ºC, fan 160º, gas 4. Grease and line 3 x 15cm sandwich cake tins with baking paper.
In a large bowl beat the butter, caster sugar, vanilla extract, eggs and flour together with an electric hand mixer until light and smooth.
Divide 2/3 of the mixture between 2 tins. Add a few drops of red food colouring to the remaining mixture and stir to combine. Spoon the remaining mixture into the third cake tin. Bake the cakes for 35-40 mins or until a skewer comes out clean. Turn out onto a cooling rack and leave to cool.
Trim off the tops of each sponge using a bread knife to create a flat, level surface. Put one of the plain sponges onto a plate and cover the top with strawberry jam. Repeat with the pink sponge in the middle, then top with the third sponge.
To make the icing, whisk together the butter and icing sugar. Place ¼ of the icing mix into a separate bowl and stir in the green food colouring. Add the red food colouring to the remaining icing.
Spread the pink icing over the top and sides of the cake using a palette knife or a normal kitchen knife. Spoon the green icing into a piping bag, then pipe green stalks of the mixture up the sides of the cake.
Arrange the flower decorations on top of each stalk, then top the cake with the Happy Birthday candles. Decorate with the butterfly decorations before serving.
Save: Chocolate flower power cake
Birthdays can be expensive, with presents to buy and food to prepare. Try this chocolate cake recipe using Sainsbury’s chocolate sponge mix, simple buttercream icing and penny sweets to save a little money.
Cheat: Simple flower power cake
Save some time with the birthday preparations with Sainsbury’s ready-covered sponge cake, and simply decorate it how you wish to add that special touch. I wish I’d done this for Charlie’s first birthday, baking past midnight should be banned!
Magic: Flower power fairy cakes
Kids seem to adore cupcakes! Make the mixture as for the large cake, but then bake it in small fairy cake cases. Decorate with pretty coloured buttercream icing and the all important sprinkles.
I am a child of the 80s. I owned a crimper. I even used it. I also owned those strange bendy rods used to curl hair into tight perm style ringlets. My first LP was Care Bears the Movie (The Soundtrack) and I remember the exhausting and expensive transition from records to tapes to mini discs to CDs. In pre Cbeebies days I loved to watch Pigeon Street, Fraggle Rock, Jackanory, Dogtanian, Danger Mouse, the Muppet Babies and Blue Peter. I adored my A La Carte Kitchen, my Get-a-Long Gang lunchbox, my Mr Frosty, my ear muffs, my T shirt that changed colour as I ahem, glowed… and my posters of Tiffany and NKOTB. My favourite things to do were read Look In magazine, eat those little frozen mousses’ that came in stacks of 10 and visit various Leicestershire attractions with my Mum, my Dad and both my Grandmothers. The best bit of these trips was the unveiling of the picnic feast.
There was always a pork pie. We’re from Leicestershire so it’s the law. There was always tuna and salad cream sandwiches, egg and cress sandwiches (home grown cress of course from a scooped out boiled egg filled with cotton wool and with a smiley face drawn on with marker pen), Red Leicester cheese sandwiches (Leicester connection again) and some form of potted meat rolls. There was always cold sausages expertly grilled by my maternal Grandmother and bought from a butchers facing Leicester Market called Walkers. There was always celery that ended up going home untouched. There was smokey bacon Walkers crisps (Leicester again you see) and likely a Wagon Wheel or melted Penguin bar. I would drink a warm Capri-Sun and the adults enjoyed restorative flasks of tea. The perfect 80s picnic complete with Whitney to sing us all the way home. The only thing missing were sausage rolls.
The sausage rolls of my childhood were, if I’m honest, a bit of a disappointment. Shop-bought, more than a little greasy and under seasoned. If you’re still wishing for a few sunny days to end this rained out summer then you cannot go wrong with this recipe from Sainsbury’s. Incredibly easy to make, sweetened with a little grated carrot and apple and likely to disappear in a flash. You could make a huge sausage roll if you’re pushed for time, make little filo versions for a more sophisticated affair and use sausagemeat and dried herbs to cut down the cost. My youngest son prefers the filo versions, in fact it’s a case of blink and you’ll miss them when he’s presented with these.
Ingredients:
– 1 teaspoon olive oil
– ½ onion, finely chopped
– ½ carrot, grated
– 1 small Bramley cooking apple, grated
– 1 teaspoon fresh sage, chopped
– 250g extra lean British pork mince
– 1 pack ready-rolled puff pastry
– 1 medium egg, beaten
– 1 teaspoon poppy seeds
– 1 teaspoon sesame seeds
Preheat the oven to 200ºC, fan 180ºC, gas 6. Heat the oil in a small pan and add the onion. Cook until soft, then add the carrot and apple.
Transfer to a bowl, then mix in the sage and pork mince until well combined.
Unroll the pack of ready-rolled puff pastry, then cut in half lengthways. Divide the mixture in two, and place in the middle of each strip of pastry. Brush all edges of the pastry with the beaten egg, reserving some for the top. Fold the pastry over the filling, and seal by pressing gently on each roll.
Flip the roll so the seal is on the underside of each roll. Cut each strip into 8 rolls.
Brush the tops with the remaining beaten egg, then sprinkle with the poppy and sesame seeds. Place the rolls on a baking tray and bake for 25-30 mins until crisp and golden, and the pork is cooked through.
Make one giant sausage roll by doubling the sausage filling in the above recipe. Place the filling in the centre of a piece of ready-rolled puff pastry. Brush the pastry with the beaten egg, then roll the pastry over the filling. Flip and lay seam-side down on a baking tray. Cut diagonal slits across the top, brush with a little more of the beaten egg and sprinkle with sesame and poppy seeds. Bake for 55 mins, then leave to cool before slicing up and serving.
Use ready-made sausage meat for your filling and season with dried herbs. Make the sausage rolls as usual, then brush the tops with milk rather than egg. Top with freshly ground black pepper.
Use filo pastry and brush one side of one sheet of pastry with melted butter. Fold the pastry in half, then place a portion of the pork filling at the top corner. Fold the pastry over the filling at right angles to make a triangle and continue folding to form a neat triangular parcel. Seal with a little melted butter. Repeat with the remaining pork mixture and pastry. Place the parcels on baking sheets, brush the tops with a little melted butter and sprinkle over poppy and sesame seeds. Bake for 25 mins until golden.
If you’d like step by step pics then you can download them here.
I sneak oats into a lot of the things I bake. Like oaty biscuits or crumble topping, or coating for chicken dippers… obviously they’re included in good old fashioned porridge and well, they’re regular star players in any bread I bake. You could say we like our oats in the Bell household. They are after all very good for you.
So I was very pleased when Ireland’s top producer of oats, Flahavan’s got in touch with me and asked if I’d like to run a baking with kids (using oats of course) competition with them. All you have to do is make something oaty with your child/relative/friend’s kid who are under 18 and then either tweet the picture to both me @HollyBellMummy and @FlahavansUK OR upload a pic to my facebook page and Flahavan’s facebook page. Please don’t forget to tell us what it is!
You must upload to both or tweet to both of us otherwise your entry isn’t valid. You can do both if you like but your entry will still count as one entry only. The prize will be a parent and child apron set, some gorgeous bamboo utensils and the full range of Flahavan’s oaty goodies to try. Not bad for a spot of baking! Here’s the lovely bamboo utensils:
This competition runs for two weeks, one starting today with the closing date and time being midday on Monday 20th August 2012. The next competition starts at 12.01pm on Monday 20th August and runs until the following Monday 27th August 2012 closing at midday again. There will be two prizes each week – one entrant will be chosen at random using a computer. The other will be chosen by myself, the people at Flahavan’s and 4 judges (4 other Mums I know) and we will base our choice very simply on the oaty creation we would most like to make and eat with our families. We will aim to let the winners know by the Friday after the closing day via facebook and/or Twitter.
Can’t wait to see what you come up with!
Rules:
Only open to UK participants. Sorry to anyone from further afield.
There’s no cash alternative to the prize and the prize is not transferable. No part or parts of the prize may be substituted for other benefits, items or additions.
Instructions form part of the terms and conditions. The winners will be contacted by facebook/Twitter. If you win and then don’t respond to this communication within 7 days then another winner will be picked so please keep checking both facebook pages and your Twitter direct messages.
I am running this giveaway on behalf of Flahavan’s who will be responsible for sending the prize to you if you win, which is very kind of them as it saves me queuing up at the Post Office. Their decision is final and binding and no correspondence will be entered into.
I’m not very keen on being judged or competing, which might sound like a huge lie for someone who chose to compete in a televised competition. It’s true. I didn’t like competitive sports as school and exams made me so nervous at uni I had to sit them in a special room for people who freak out and faint. I can only blame the post-natal hormones on my Bake Off application. It’s back on air next Tuesday and whilst I am hugely excited about the prospect of watching the show without wincing at my double chin, I’m also terrified at the thought of the judging.
Every week of the Bake Off I felt the judging ruined what had become a very enjoyable meeting of minds. 12 people hanging out in a tent, baking like crazy and then trying each others food and being awfully complementary about it. Now I know that wouldn’t have made great telly, but the judging felt like a grubby aside. An unnecessary spoiler. Sure, there was the relief when you got to stay in, but losing someone each week was awful. And, well, asking someone to leave what felt like a party isn’t very British. Don’t we just moan about people rather than speak our minds in this country? My how we’ve changed.
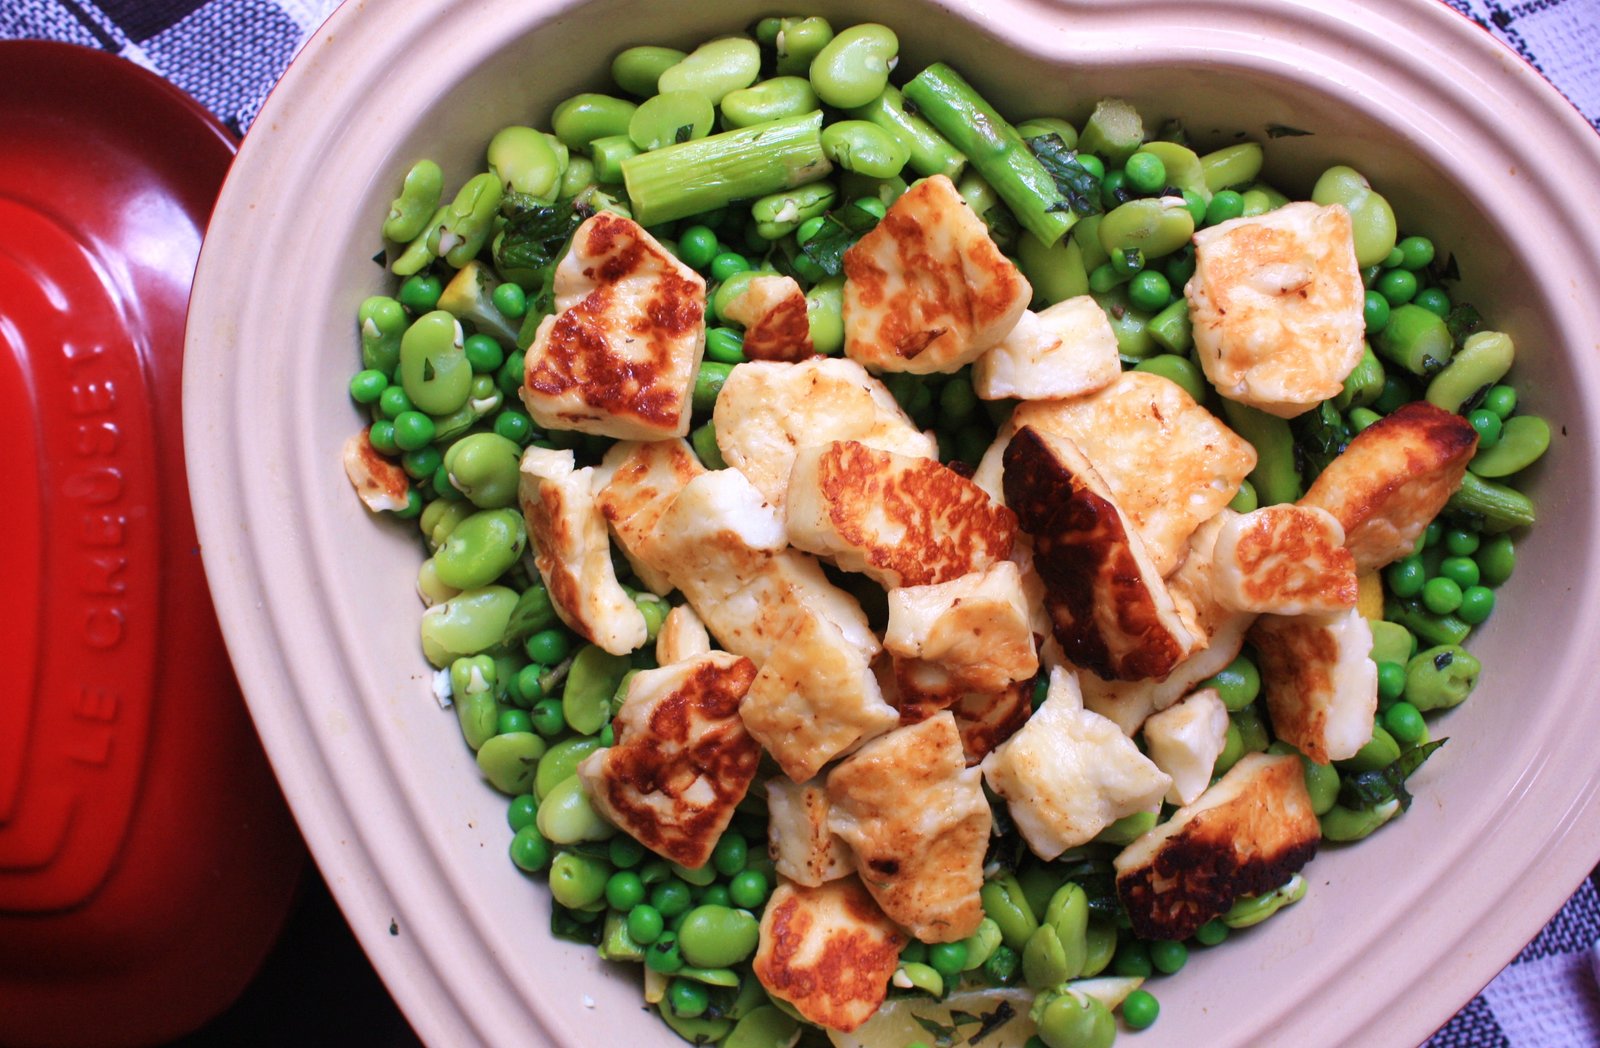
Recently I was invited to a barbecue where foodie types all bring a dish. I had no idea when I accepted the invitation that this was the deal. I may not have said yes; I can smell competitiveness even through the medium of text message. I took a lemony, minty salad full of broad beans, peas, asparagus and grilled halloumi. It’s my kind of salad; full of flavour and bite without relying on a huge chunk of seared fish or grilled chicken. As I removed the lid I couldn’t help but feel disappointment from the foodie folks. No cake. No pastry. No bread. Nothing baked. Just a cold, healthy salad. Well, I wasn’t about to enter another Bake Off…
Ingredients (very rough quantities)
– half a bag of frozen petit pois
– half a bag of frozen broad beans
– 2 bunches of asparagus spears
– 1 pack of halloumi
– 1 lemon, zested and juiced
– 10 mint leaves, finely chopped
– olive oil
– black pepper
This is easy but time consuming if you go the whole hog and shell the beans. Boil the kettle and then pour into a large saucepan to about half way. Pour the broad beans into the pan then boil on the hob as per packet instructions. Just before they are ready add the peas. They only need a couple of mins. You just want to defrost rather than cook them. Drain boiling water away from the beany/pea mountain, swish some cold water over the lot, drain again and leave to cool.
Take a large frying pan and add a glug of olive oil. Heat for 2 minutes then add slices of the halloumi and fry until golden brown. Turn using tongs and fry on the other side, then set aside in a bowl to cool a little. Then chop the asparagus spears into 1 inch chunks and fry in the pan until they are kind of charred and a sharp knife goes through the thickest stem easily. Take off the heat and transfer to the serving dish. Add the zest of your lemon, then the lemon juice, a good glug of olive oil, loads of black pepper and the finely chopped mint leaves.
Now for the boring bit. Start to pick through your beans and peas. Every time you see a bean press it between your thumb and index finger and pop the bean from the tough outer broad bean shell. Then add the bean to the asparagus sitting in all the tasty flavours and throw away the empty shell. Repeat, repeat, repeat until you’re finished. Tip the left-behind peas in. Give it all a good stir and then pop the halloumi on the top. If you can’t be bothered to shell the broad beans you could skip this stage, but be warned that people will most likely judge you for it.
There’s sunshine at last! I can feel a smile spread across my face at the prospect of soaking up some vitamin D. The barbecue has grown dusty with lack of use this year but no longer. This weekend I will endeavour to BBQ everything, well, you never know when the next sunny spell might be. Barbecued bananas for breakfast anyone? Perhaps kedgeree with barbecued sardines on top? Or for dinner my favourite, a juicy burger with all the trimmings.
Sainsbury’s asked me to help Ian, a father of 3, make a family barbecue really special. Sainsbury’s recipe for lemon and coriander turkey burgers really hits the spot; filling, tasty, easy to make, low in fat and they won’t break the bank. My sons gobble these burgers up in no time at all with the youngest shouting out ‘again!’ at the top of his voice. Rare praise from Mr Fussy. If you want you can add a bit of magic by popping cheese into the centres or use turkey steaks for super speedy burgers. And to feed a crowd make the ingredients go a little further and make kebabs. I’ve been using this recipe to make meatballs, but now the sun’s out we’re back to the burgers! Here’s the film:
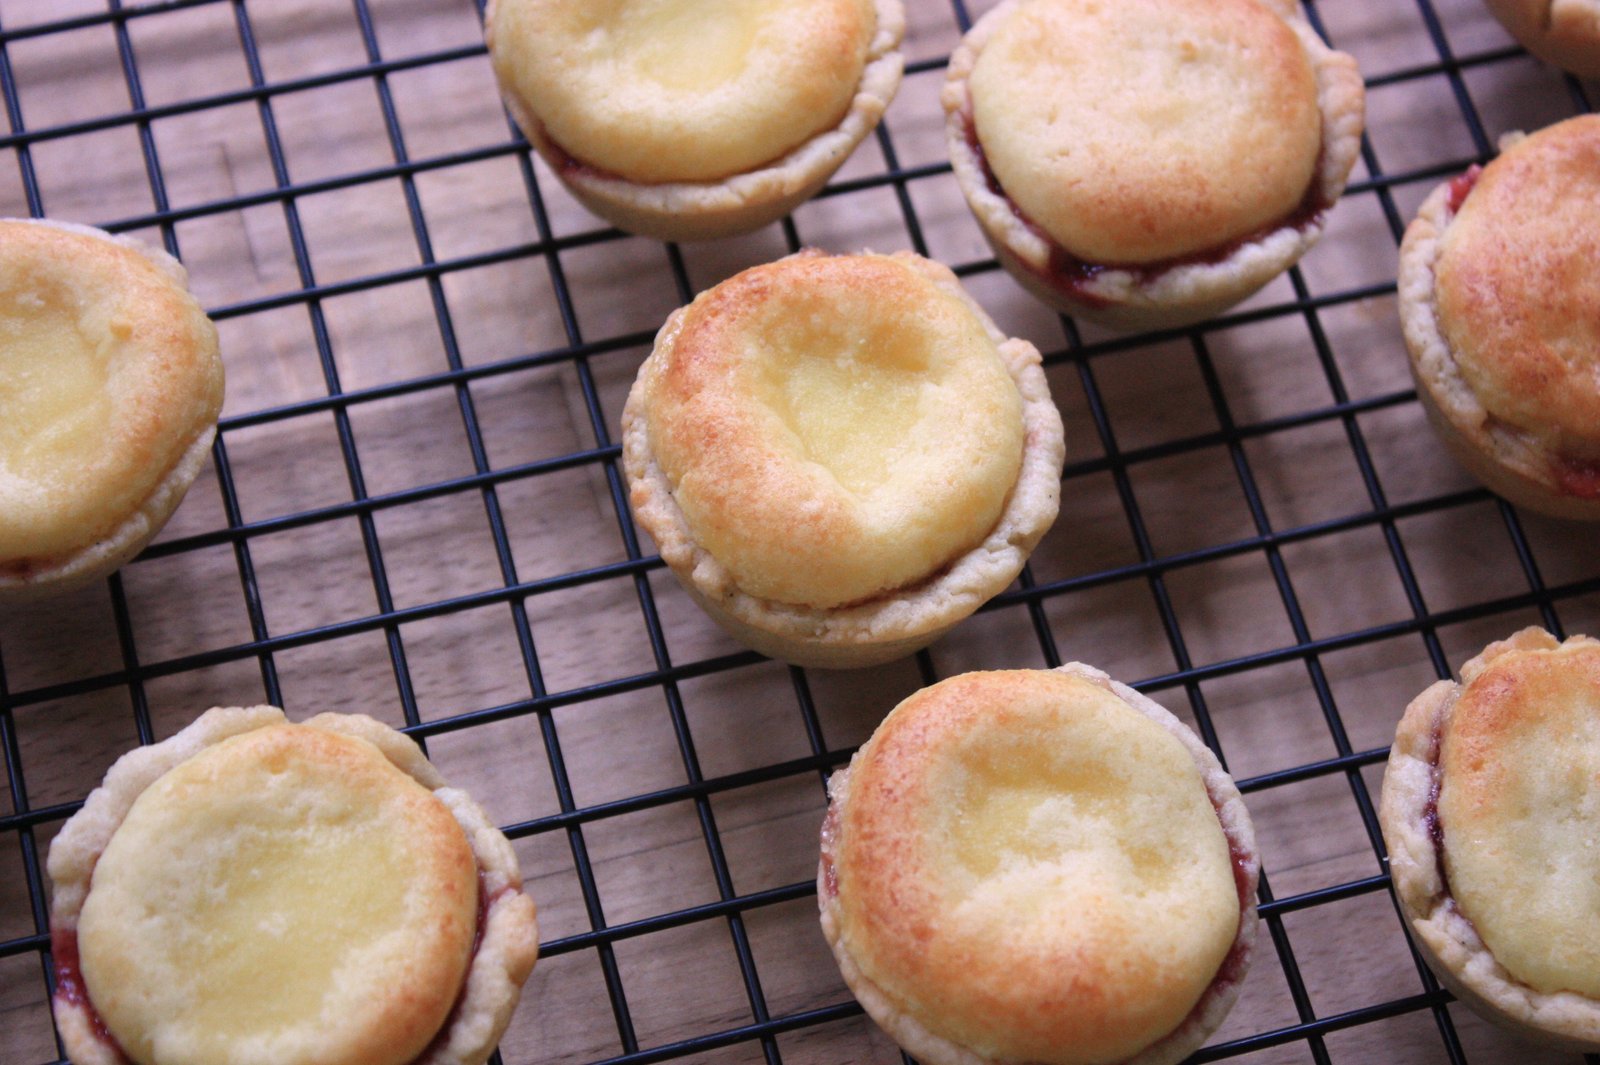
I’m on a diet. I admit it. I don’t want to be, it’s just that the last 6 months I’ve pretty much eaten whatever I wanted in whatever volume I wanted and the outcome of my little experiment is… that I am not one of those people who can do that and still wear skinny jeans. So I am being very careful and my goodness it’s dull. When I was a teenager I could lose half a stone in a week from eating nothing save apples and black coffee, now I need proper food or I find myself shouting at the children, wincing through the hunger pangs.
As I am being very boring the most I can manage at the moment is maybe one of these little morsels. Very easy to make, much appreciated by husbands, small children and close relatives. You could buy the pastry if you wanted too. If I hosted canapé type parties I’d serve these. Alas, I host pirate parties instead.
This makes 24 little morsels, made in my Wilton tin which I have to say is very good indeed and left not one tart stuck in the tin. (Not paid to say that etc etc.)
Ingredients:
– 360g pastry (I used leftover pastry using this recipe but you could make a half fat to flour mixture using 120g cold butter and 240g plain flour, rub in and pull together with a splash of cold water, rest in the fridge for half an hour and off we go)
– 120g jam of your choice, I chose raspberry
– 360g marzipan, any colour will do
Preheat the oven to 180C/Gas 4. Take a blob of pastry, about a tablespoons worth, which for more precise folks is 15g, and form it into a disc. Press into your tin and then use your thumb to push into the sides. Repeat for all 24 holes and then put the tin in your fridge to relax the pastry.
In the meantime make 24 discs of marzipan to eventually seal your little morsels. Again, use about 15g of marzipan. Remove the tin complete with pastry from the fridge, spoon a teaspoon of jam into each pastry lined hole.
Then top off with a disc of marzipan and use your thumb to squash down and seal each morsel. Repeat until the tin is full and then bake for about 20 minutes until the marzipan is starting to brown.
Remove. Leave to cool in the tin a little and then after about 10 minutes use a very sharp knife to eek them out by slipping it between the pastry and the tin. Just a slight poke should do. Cool completely on a wire rack and enjoy as many as you like if you’re not on a bloody diet like me.
I usually don’t care about the weather one bit. I’ve never been great friends with bikinis or short denim skirts after a boy once told me I have fat knees. (He was right, irritatingly.) Cold weather is fine by me. That is, until I had children.
Now cold and especially rainy weather makes me feel a bit claustrophobic and panicked. Today I have played Thomas, Duplo, farms, hiding, read 5 Thomas books, made Play Doh pigs, helped colour in Percy the green Tank Engine and served a snack of sultanas as a half time break whilst watching Show Me, Show Me. That was all before midday. Both sons were unaffected by this exertion. They take it in their stride. I however am exhausted.
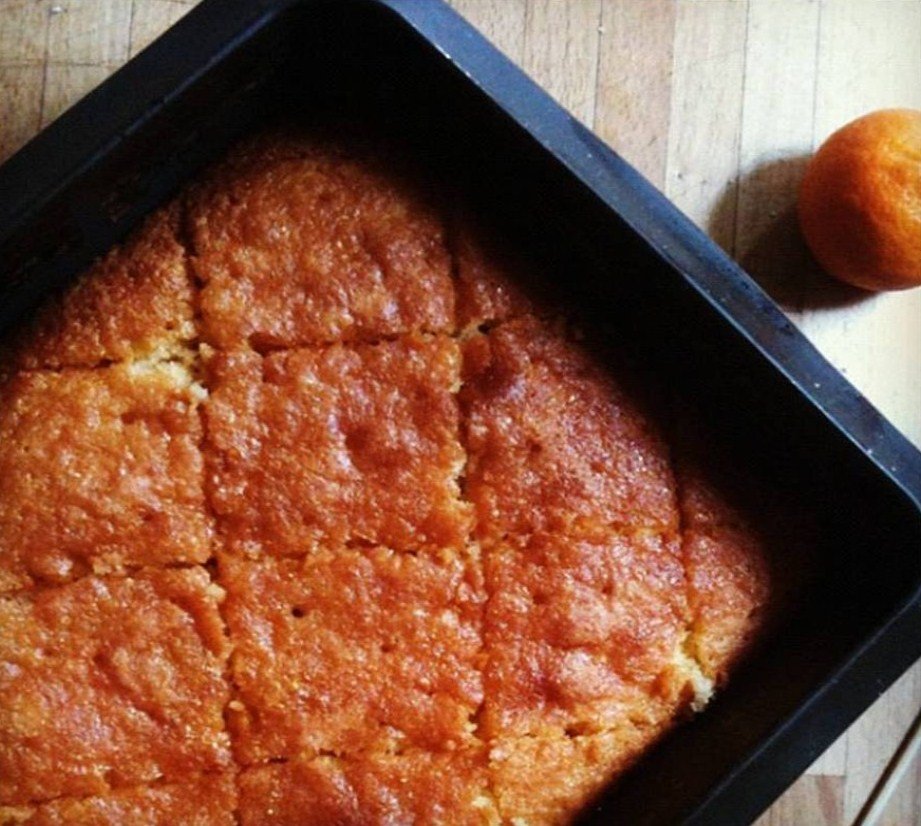
I baked this cake purely to entice the sun out. It’s very light and yet syrupy. It’s my new favourite cake. I may add pistachios next time too.
Ingredients:
175g margarine/soft butter
175g caster sugar
3 eggs beaten
zest of 3 clementines
3 tbsp whole milk
175g self raising flour
juice of 3 clementines
50g caster sugar
Thoughts on tins: I used one of those silicone traybake pans. Purely so I didn’t have to do any greasing or lining. It measured 24cm x 20cm. You could use a traditional tin or a different sized tin. Just be careful that you adjust the baking time. For a larger pan the bake time is usually less as the cake is less thick. For a smaller tin the bake time is usually longer. You’re looking for the edges of the cake to be pulling away from the sides and for a skewer to come out of the centre clean.
Okay, now for the recipe, it’s very easy. Preheat the oven to 170C. Check the rack is in the centre of the oven. Cream the margarine/butter with 175g caster sugar until really light and creamy. Takes about 4 minutes in a stand mixer. Add the beaten egg gradually, dribble by dribble. Then add the zest and the milk. Worry not if the mixture curdles. Fold in the flour with a metal spoon, pour into your tin, level with the back of a spoon and bake for 20 – 25 minutes until golden on the top and a skewer comes out clean from the middle. Leave to cool on a wire rack still in the tin and then make the sugar syrup by boiling the juice of 3 clementines with 50g of caster sugar for about 2 minutes until the sugar dissolves and it’s bubbling away. Poke holes in your cake with a skewer and pour the syrup over the top. Leave to cool before you cut.
I’m a mum of 3 boys, a cookbook writer and also a finalist on the 2011 Great British Bake Off.
I’ve decided to record the recipes I use, partly to save them somewhere and partly in case someone else might like to use them...
[Read more]
Just sign up to receive my latest blog posts straight to your inbox: Simply click here.
P.S. To sign up for my free monthly newsletter just click here. It has a baking SOS, recommendations on bits of kit I can’t live without, my kitchen catastrophe of the month, a sneak preview of a recipe coming up on this blog and a letter from me telling you what I’ve been up to.
Remember to check your inbox for a confirmation email and also to add my email recipesfromanormalmum@gmail.com to your contacts. Otherwise I could go to spam.


 Holly Bell