Essentially a very lazy recipe… just follow the recipe for this to make the pavlovas. Then add 200g whipped double cream, some sliced bananas and if you feel inclined you could make you own toffee sauce. Or you could just buy one. This is a Friday night pudding for when you need maximum gratification and minimum effort. Make the meringues on a Wednesday and you may just fall in love with yourself come Friday dinner time.
I heart toffee sauce. Look at this stuff. If you want to make it then this recipe is very good. Good old Mary.
I’m going to have to hold my hands up in the air and declare a truth. I’m not one of those girls who’s mad on meringue. It’s not that I don’t like it. It’s kind of hard not to like. It’s more that I can always find other things on a menu I prefer. However I have married into, and now given birth to, a family of meringue fiends. So it is very much in my interest to create new meringue based recipes each year. Though let’s be honest, a good old Eton mess always goes down well when the fridge is a little bare.
Makes about 10 but all depends on the size of the nests.
Top tip: make these just before you go to bed so the meringue can cool to room temperature VERY slowly and thus avoid cracking in a volcano like fashion.
Ingredients:
– 120g egg whites (about 4 but depends on size of your eggs)
– 200g castor sugar
– 5g cornflour
– 5mls white wine vinegar
– 1 x tin chestnut puree
– 50g raisins
– 30mls brandy
– 200g double cream
Whisk your egg whites until beginning to hold their peaks. Then whisk in 1 teaspoon of the castor sugar at a time. I know this is laborious but if you rush it and throw the lot in you’re less likely to make sure it all dissolves into the egg and you might end up with weeping meringue. Might.
Once the sugar’s all in, the mixture should look really white and glossy, then add in the cornflour and white wine vinegar. Whisk again. The combination of these ingredients makes for a mallowy chewy middle to your meringue so whilst they’re desirable they’re not a reason to run to the local shops if you don’t have them.
Pop some foil or baking parchment on a baking tray, fixing it down with a little sticky meringue. Then spoon about 2 heaped tablespoons of the meringue onto the foil/parchment to make each nest. You can leave in a big snowy heap or use your fingers and the back of a teaspoon to slightly hollow out the middle for holding double cream later. Up to you. (You can squash the meringues after baking instead to make a pocket for the cream if you prefer, but they will crack as you do this.)
Then bake at the bottom and on the middle shelf of a preheated oven at 140C. (For these are the coolest areas of most ovens and we’re trying to dry these meringues out, not bake them so that they brown.) As soon as they go into the oven turn it down to about 100C, or 90C for a fan. Then after 45 minutes turn the oven off entirely but don’t open it.
About 35 minutes into baking I tend to open the oven door and have a little prod to make sure the oven has worked it’s magic and the outsides of the meringue are hard. If not they need a little longer than the aforementioned 45 minutes. Then I DO NOT OPEN the oven for the last ten minutes of baking. I turn the oven off and then leave the little snowy meringues to slowly come to room temperature for a few hours. Easier to just make these last thing at night and leave them until the morning in your oven.
Once completely cold I fill with whipped cream, pipe a little chestnut puree on top and then crown with raisins I have soaked in brandy by heating them gently on the stove and letting them come to room temperature. But you can top with anything you like. The unadorned meringues last for 3 days or so in a tin at room temperature so you can easily get ahead with this easy pud. Don’t forget to add any broken meringue to vanilla ice cream along with some lemon curd and crunched up digestives. Lemon meringue ice-cream is too much of a joy to be missed.
These mince pies are inspired by my friend Helen’s mother-in-law, who tops her mince pies with Viennese biscuit dough. They are divine! I thought I’d remove the need for a piping bag and add some heavenly Christmas flavours of orange, nutmeg and cinnamon to make these truly special. Don’t forget you can add your favourite tipple to the mincemeat. Brandy is traditional but Amaretto, ginger wine and even Baileys are all delicious. Makes 24.
Ingredients:
Pastry
– 250g plain flour
– 50g icing sugar
– 125g room temperature butter
– zest of one orange
– 1 large egg
Filling
– 411g jar of mincemeat
– 15mls of your favourite tipple (optional)
Pop the flour and icing sugar into your stand mixer and give it a quick mix with the flatbeater. Add the butter and orange zest and mix until it looks like fine breadcrumbs. (Can obviously rub in with hands too.)
Add the egg, mix in short spurts until the pastry dough comes together into a lump. (Use a blunt knife for this stage if making pastry by hand.) Cover in clingfilm and refrigerate for 30 minutes. In the meantime mix the alcohol and the mincemeat in a bowl and make the biscuit dough. Here’s a pic of my little helper. Gratuitous shot of blond toddler alert:
To make the dough mix the very soft butter with the icing sugar in your mixer with the flat beater. Mix until really light and fluffy – about 4 minutes. Then add all of the other biscuit dough ingredients and mix again until combined and fluffy.
Wrap the dough in clingfilm and pop in the fridge. (You can make the biscuit dough with a wooden spoon and sheer willpower if you prefer.)
Roll the pastry onto a floured work surface to about 3mm thick and cut rounds out using a pastry cutter. Pop into your non-stick bun tray then place a teaspoon of the mincemeat into each pastry case.
Roll the biscuit dough to about 1cm thick on a floured surface and cut triangles using a sharp knife. (You can use a mini star cutter or other festive shaped cutter if you have one handy…) If the knife sticks dip in flour between cuts.
Then place on top of the mincemeat and pop the whole tray in the fridge for 10 minutes.
Bake in a preheated oven at 180C/Gas 4 for about 15 – 20 minutes until just starting to brown at the edges.
Eat within 3 days or freeze and use within a month. Defrost at room temperature.
Lemon drizzle is one of my favourite cakes to eat and make. A very good friend of mine doesn’t like lemon related sweet treats and I have to say, when I found out, she went down in my estimations slightly. I just don’t understand.
Lemon drizzle seems to be divided into two camps; those with a crunchy topping and those without. I prefer those without, the drizzle of my dreams is soft, tart and saturated in lemon sugar syrup without leaving crystals of sugar on the top. Here’s how I do it:
Ingredients:
175g margarine/soft butter
175g caster sugar
3 eggs beaten
zest of 3 lemons BUT NOT THE PITH!
3 tbsp whole milk
175g self raising flour
juice of 3 lemons
50g caster sugar
Grease and line a 20 x 20cm tin with greaseproof paper. I line like this. Use whatever size tin you have to hand, for a larger pan the bake time is usually less as the cake is less thick. For a smaller tin the bake time is usually longer. You’re looking for the edges of the cake to be pulling away from the sides and for a skewer to come out of the centre clean.
Preheat the oven to 170C. Check the rack is in the centre of the oven. Cream the margarine/butter with 175g caster sugar until really light and creamy. Takes about 4 minutes in a stand mixer. Add the beaten egg gradually, dribble by dribble. Then add the zest and the milk. Worry not if the mixture curdles. Fold in the flour with a metal spoon, pour into your tin, level with the back of a spoon and bake for 20 – 25 minutes until golden on the top and a skewer comes out clean from the middle.
Leave to cool slightly on a wire rack still in the tin and then make the sugar syrup by heating the juice of 3 lemons with 50g of caster sugar for about 2 minutes until the sugar dissolves and is just starting to bubble away. Poke lots of holes in your cake with a skewer and pour the syrup over the top, being careful not to let it all seep down the sides and drizzle the bottom of your cake only.
Then (now this is the important bit), lay out a large piece of foil, then on top of it a large piece of greaseproof paper – they need to be big enough to use as wrapping paper for your cake. Pick your drizzle cake up by the greaseproof paper it sits on in the tin and move to your wrapping paper. Then wrap your cake carefully, using the foil to fold the edges over. Leave the cake to cool like this. The heat of the cake and the lemon sugar syrup combine to create the most moist, zingy lemon sponge. Just the way I like it.
I know. I’m as bad as all those retailers decking the aisles with tinsel in August. I just can’t help it though and I don’t care who knows it. I love Christmas. I love it! I want to live in a festive schmaltzy film. I want to wake up on the 25th December and find the Santa sack from my childhood nestled at the end of the bed fit to bursting with chocolate coins and maybe even a pink snail Keeper toy. I want flapjack covered with a layer of mincemeat and grated marzipan in October. Well okay then.
Ingredients:
175g butter
75g brown sugar
30g golden syrup
Pinch of salt
175g oats
25g rice crispies
100g sultanas
Half a jar of mincemeat
Half a block of marzipan, cold from the fridge
I basically followed an old faithful flapjack recipe but you should use your favourite. Pop the oven on at 140C or whatever your recipe says. Then I melted the butter, sugar, syrup and salt in a saucepan (careful measuring out too much syrup, your flapjack won’t hold a slice as well) until just about to bubble. Next I added the oats, rice crispies and sultanas and gave the lot a good stir until completely covered.
I tipped into a silicone tray (so I could avoid any lining activity) that measures about 20 x 24cm and flattened with a metal spoon until level. Then I very carefully spread half a jar of mincemeat (I used ready made stuff this time but I will most definitely be making my drunken cherry brandy mincemeat very soon) on the top of the flapjack – just a very fine smear, not huge dollops of the stuff. Careful the knife doesn’t rip through the delicate uncooked oats. On top of that I grated half a block of cold marzipan (grates better when colder, use the course side of the grater) and then baked for 30 minutes until golden brown on top. It looks like a pie topped with grated cheese pre baking. Do not be alarmed.
Leave to cool in the tray and only cut when cold or it all falls apart on you.
I enjoyed mine whilst writing my day dream Christmas list.
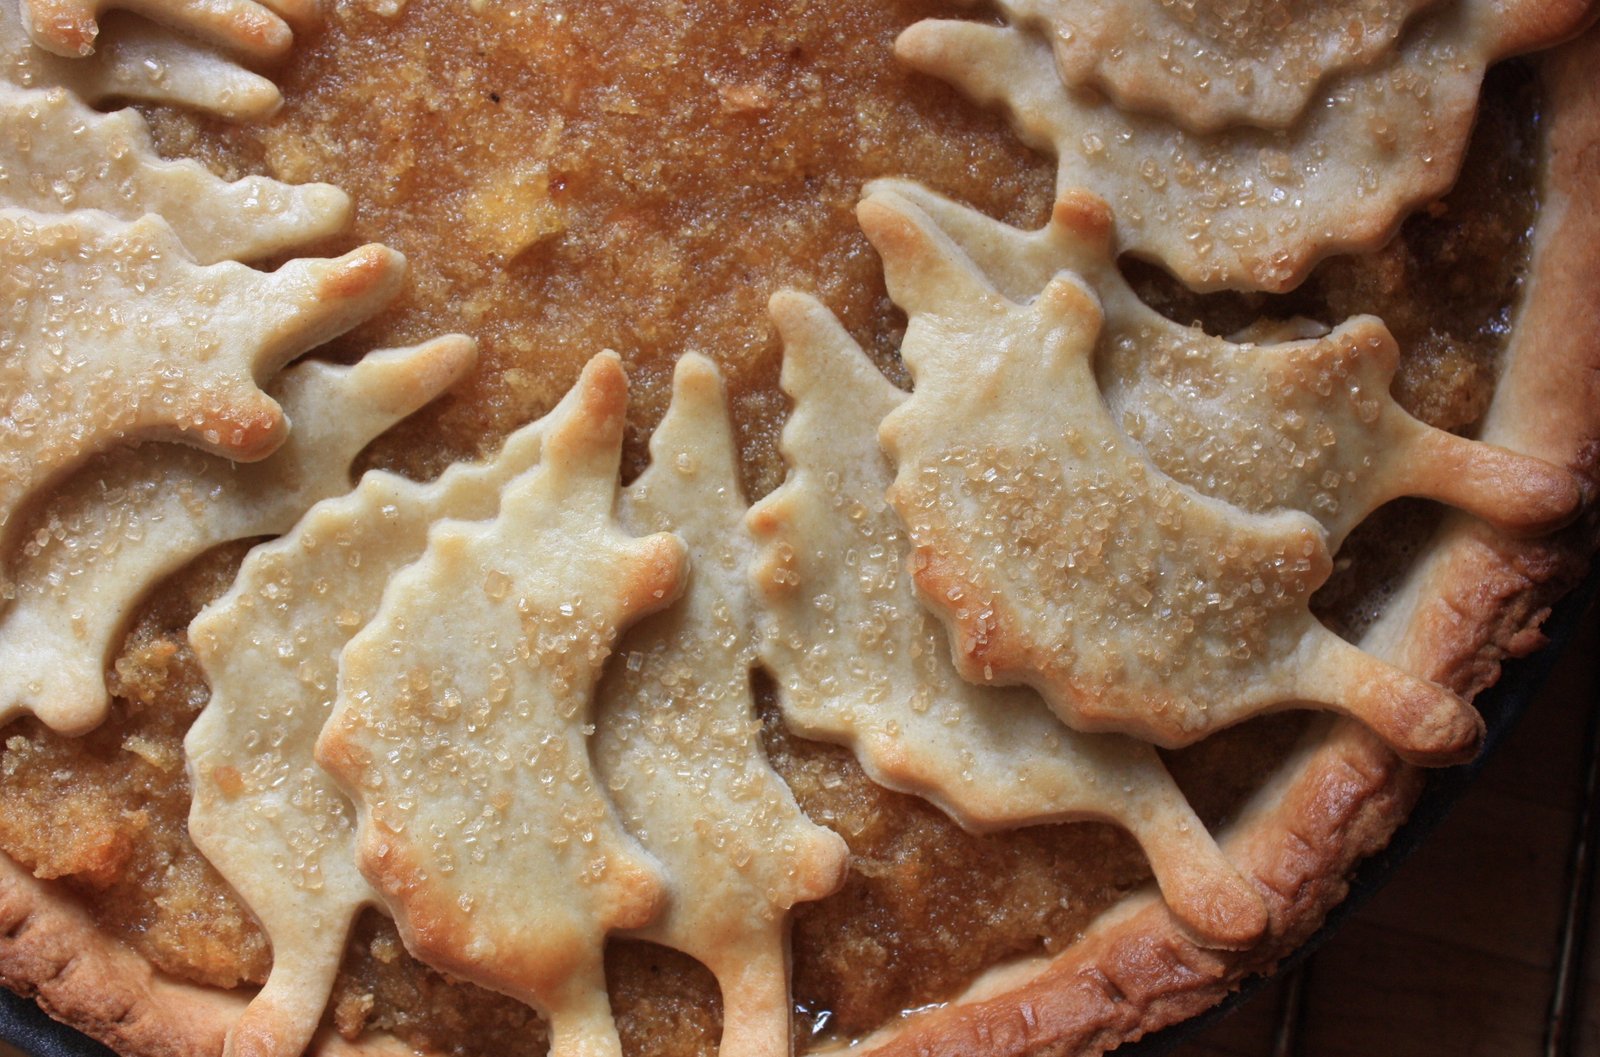
Mr Bell has taken to drinking bourbon late at night. Just the one mind. He calls it a nightcap. I think it’s his 40s gently approaching. I love the smell of bourbon but sadly not the taste, so with that in mind I’ve mixed it up with silky walnuts and sweet syrup to make this Autumn pud. Even non bourbon lovers like me go back for seconds. (And yes, they are dinosaurs on the top… nothing unusual about that in our house. We are pro dinosaur.)
Ingredients:
250g plain flour
50g icing sugar
125g cold butter
1 medium or large egg
400g golden syrup
Juice of one lemon
10mls bourbon
150g fresh breadcrumbs
Zest of 2 lemons
100g walnuts
A little milk
A tablespooon of brown crunchy sugar
Make your pastry by mixing the flour and icing sugar together, rubbing in the butter (or whizzing in a food processor) until it looks like very fine breadcrumbs and then add the whole egg. Use a blunt knife to pull the breadcrumbs together, then use your hand to squidge the pastry up until it forms a ball. Don’t add any more liquid, it will come together in the end. Wrap in clingfilm and rest in the fridge for 1 hour.
Whilst the pastry is resting add the zest of two lemons to the breadcrumbs, mix and set aside. Then pour the golden syrup into a saucepan (I weigh directly into the pan on digital scales and buy the squeezy bottle version of the golden syrup to save mess.) Next add the juice of one lemon (you will have one lemon leftover which has been alleviated of it’s zest. I suggest you either stuff it into a roasting chicken or pour boiling water over it and drink as a breakfast cleanser after a night on the tiles.) Lastly the bourbon and heat on the hob gently for about 4 minutes until it’s more watery in texture than when you started. Then add the breadcrumbs and zest and stir well. Take off the heat and set aside to cool. Preheat the oven to 180C/Gas 4 about 15 minutes before your pastry has rested for an hour.
Roll your pastry on a floured surface working in one direction only (don’t vigorously roll backwards and forwards, this makes for tough as old boots pastry), picking it up and turning it after each few rolls to ensure you end up with a rough circle shape rather than a very long piece of pastry. Once about 3mm thick all over pick it up by placing both hands flattened, fingers apart and palm side up under the pastry circle and move over the top of a loose bottomed flan tin (mine was 24 cm across) – remove your palms and then push gently into the sides of the tin. Use a sharp knife to trim the pastry from the sides and if you like make a pretty pattern on the pastry edge using a fork/knife.
Place a sheet of baking paper over the pastry case, fill with baking beans or uncooked pulses/rice and then bake for about 10 minutes until the edges are just very light brown. Watch like a hawk! In the meantime crunch up the walnuts by placing them in a bag and bashing with a rolling pin and try and cut some nice shapes from the leftover scraps of pastry. Don’t re-roll more than once or it’ll be a bit tough and no-one likes that.
Once the edges of the pastry are brown, remove the baking paper and beans and bake nude for a further 2 – 3 mins. Then place the bashed up walnuts on the bottom and over that spoon the breadcrumby mixture and tease to the edges.
There isn’t loads of this, just enough. Brush a little milk (or egg wash) over the edge of the pastry case then pop your extra pastry shapes over the top of the tart, overlapping the edge slightly if you like.
Brush these with milk and sprinkle brown sugar over the top. Bake for 15 – 20 minutes, again watching like a hawk.
Enjoy warm or cold with cream or custard or bourbon ice-cream. Now there’s a thought.
(This time two years age I was just celebrating the arrival of my second son and munching on these! Ah how time flies when you’re making pastry dinosaurs…)
Healthcliff has stolen Autumn and replaced it with something altogether more misty and mysterious. With him in mind I thought a biscuit with walnuts was in order, a manly nut if ever there was one. Add some Dairy Milk and I may have a biscuit to tame even the wildest moor-roamer.
This made a baker’s dozen though I admit the sizes were rather haphazard.
Ingredients:
115g salted butter
60g icing sugar (plus 2 tbsp extra for rolling the biscuit dough in)
100g plain flour
20g cornflour
80g milk chocolate cut into half cm-ish chunks
60g chopped walnuts, not too fine, about 1cm pieces
Get the oven on to 180C/Gas 4 and find two baking trays. Cream the butter and icing sugar together until really light and fluffy. I used a stand mixer for about 4 minutes. Then add the flour and cornflour and mix again with your stand mixer/handheld mixer or wooden spoon until combined and light and fluffy. Throw in the chocolate and walnuts and mix well.
Pop about 2 tablespoons of icing sugar on a plate, then take about a tablespoon of mixture, roll between your palms to form a ball, then roll the ball in the icing sugar (this doesn’t show once baked but acts as a great non stick layer), place on the tray and squash with your thumb until about 1cm deep. Continue to roll the dough until it’s all gone and don’t forget to put the biscuits about 6cm apart as they do spread a bit, then bake for 10 – 15 minutes until starting to brown at the edges.
Cool on the tray for 5 minutes and then move to a wire rack to cool completely otherwise you’ll end up with soggy centres. These are best eaten from a foil wrapper with a slight snarl and a hipflask of something boozy to keep you warm whilst roaming about.
I’m a bit of a late adopter with some things. I was almost a teenager when I learnt to ride a bike. I only recently got my first iPhone and even then it was a donated one. And I had never eaten, let alone made a cake pop until recently. Unlike the bike riding, I think the cake pop addiction is a habit here to stay. I am ever faithful to all things novelty.
Here are a few good tips I’ve found through trial and error to make perfect (well almost perfect) pops. This makes about 13 pops.
Take your leftover cake. If you are going to eat the cake pops within a couple of days then you can use your own homemade cake. If you want a little longer shelf life then buy one of the value blocks of Madeira cake from a supermarket. Usually has a good few weeks on it. I know, I know, homemade is best, but if I don’t say it someone will ask. As for flavours and types of cakes, I tend to use leftover vanilla cupcakes using a basic sponge recipe, however you can use any flavour you like. I haven’t tried fruit cake yet but I assume it would work okay. Just be careful of the weight of the pop. More on that later.
Use your fingers to break the cake up into breadcrumbs. You need a light touch rather than a squeezing touch. You can also use a food processor or the flatbeater in your stand mixer. I tend to use my hands as I don’t make cake pops in huge quantities. Leave your cake crumbs in a large bowl and then add your buttercream. (If you do make too much cake pop mixture then freeze at the ball stage and you’ll have more pops for a rainy day. A great tip from Jo.)
I use the old fashioned half butter (salted if you’re interested) to icing sugar buttercream recipe with a good tablespoon of vanilla extract, beaten in my stand mixer for 7 minutes until light and fluffy. However, for cake pops you really don’t need light and fluffy buttercream. So if you’re making buttercream especially for cake pop purposes then I would probably use a wooden spoon. You can use any flavour buttercream by the way… much like with the sponge.
Add the buttercream to the cake crumbs one tablespoon at a time and give the mixture a good stir. All cakes bind with buttercream differently. What you’re looking for is the cake to come together with the buttercream into a thick spread like consistency that will hold a shape. Too dry and the cake pop will crack whilst it’s chilling. Too wet and the buttercream will melt when you dip in the Candy Melts. Test it by taking a tablespoon of mixture and scrunching it up with your fingers. It should hold easily and then be happy to be rolled between your palms. Cover the mix with clingfilm and then refrigerate for about 30 minutes. If you haven’t make cake pops before add one teaspoon of buttercream at a time. You can add, but you cannot taketh away.
After 30 minutes you can start to roll your cake truffle mixture into balls about 2.5cm across between the palms of your hands. Any larger and you run the risk of the weight of them dragging them off the stick when dipping. Oh and don’t add oil to your hands or anything else to stop it sticking, just go with it. Once rolled, pop on a plate lined with greaseproof paper or back into the bowl you chilled the cake pop mixture in and either put in the freezer for 20 minutes or if you don’t have room in your freezer (my hand is firmly up) then cover and pop back in the fridge for an hour. You don’t have to shape your cake pops into balls of course, you can instead shape into cones to make Christmas trees or Santa hats. Whatever you fancy really. Here’s a little film to show how:
A few minutes before you’re ready to start to dip and decorate your pops, melt your Candy Melts. I use the microwave in 20 second blasts – the packets have all the instructions. If you do overheat them they seem to lose their shine when dry. Instead you could melt the Candy Melts over a pan of simmering water instead to control the temperature better. Make sure whatever you end up transferring your melts to that the receptacle is small enough in width to allow the Melts to have a little depth. You need to have something to dip into. (I know some of you will prefer to use chocolate to dip your pops into… I have found it less easy as it takes a little longer to dry. You just need a bit more practice I guess.)
Find something to rest your still wet pops in to allow them to dry. I use an upturned meatball griller (!) but you could also use a block of polystyrene with holes poked into it, an egg box with yet more holes poked into it or an upturned colander if the holes are big enough. Dip a lollipop stick about half a centimetre into the melted Candy Melts and then push the stick into the rolled cake pop until it’s just over half way in. Set aside and allow about a minute to dry. This stage is important as it stops the cake balls from falling off the sticks later.
I tend to get all the sticks into the cake balls first. It makes best use of the dry time required. It also makes sure your Candy Melts aren’t so hot that they make the cake expand and crack through the dried Candy Melts shell once you dip the whole cake ball. Using boiling hot Melts to dip cake into ends in cracked pops and possibly tears. (If it does happen just allow the pop to set and then dip again as if starting with a nude cake ball. Just a thicker coating but better than trying to patch the cracked pop up.) Here’s a little film of the whole process from stick dipping to sprinkling: (If you prefer to read instructions then they’re all below the film along with some pop-pics.)
Then take the stick with the nude cake ball now attached to it and dip into the melted Candy Melts. Don’t start to swish it about as it’s likely to fall off. If your receptacle isn’t deep enough to cover all of the cake ball then use a teaspoon to bathe the cake ball in Candy Melts, gently pushing it over the cake ball. Then use the stick to pick the cake pop up and hold the stick against the side of the dish and tap very gently encouraging the excess Candy Melts to fall back into the dish. You can turn the pop as you do this to ensure you don’t end up with a peak drying where the Melts drip into the dish.
Using Candy Melts is very easy but it’s different from chocolate as it dries more quickly. Either allow to dry by carefully placing the stick into your drying rack of choice or take this opportunity to hold the pop over an empty dish and sprinkle anything you fancy over the still wet pop. You can use a toothpick or fork to make a spikey cake pop if you like by pulling at the Candy Melts covering as it dries. You could also allow the pop to dry with one coating and then use an icing bag to dribble another colour over the pop… the possibilities are endless. Oh and you can even melt your Candy Melts into a disposable icing bag in the microwave, just balance in a jug.
P.S. For those who might ask the Reindeer and Santa faces are from Sainsbury’s, as are the red, white and green sprinkles. The holly leaves and berries are by Wilton (though you can get similar from Sainsbos) as are the little white snowmen on top of the Christmas tree pops. The holly leaves were attached using a white icing pen, the type you buy that comes with nozzles to just attach to a toothpaste type tube. Lastly if you have Candy Melts leftover you can allow them to dry, seal in a bag and then re-melt again the next time you need them. They don’t get upset by repeated remelting like chocolate does. (Same goes for if you’re a slow-dipper and they get too solid half way through the process, just re-heat.)
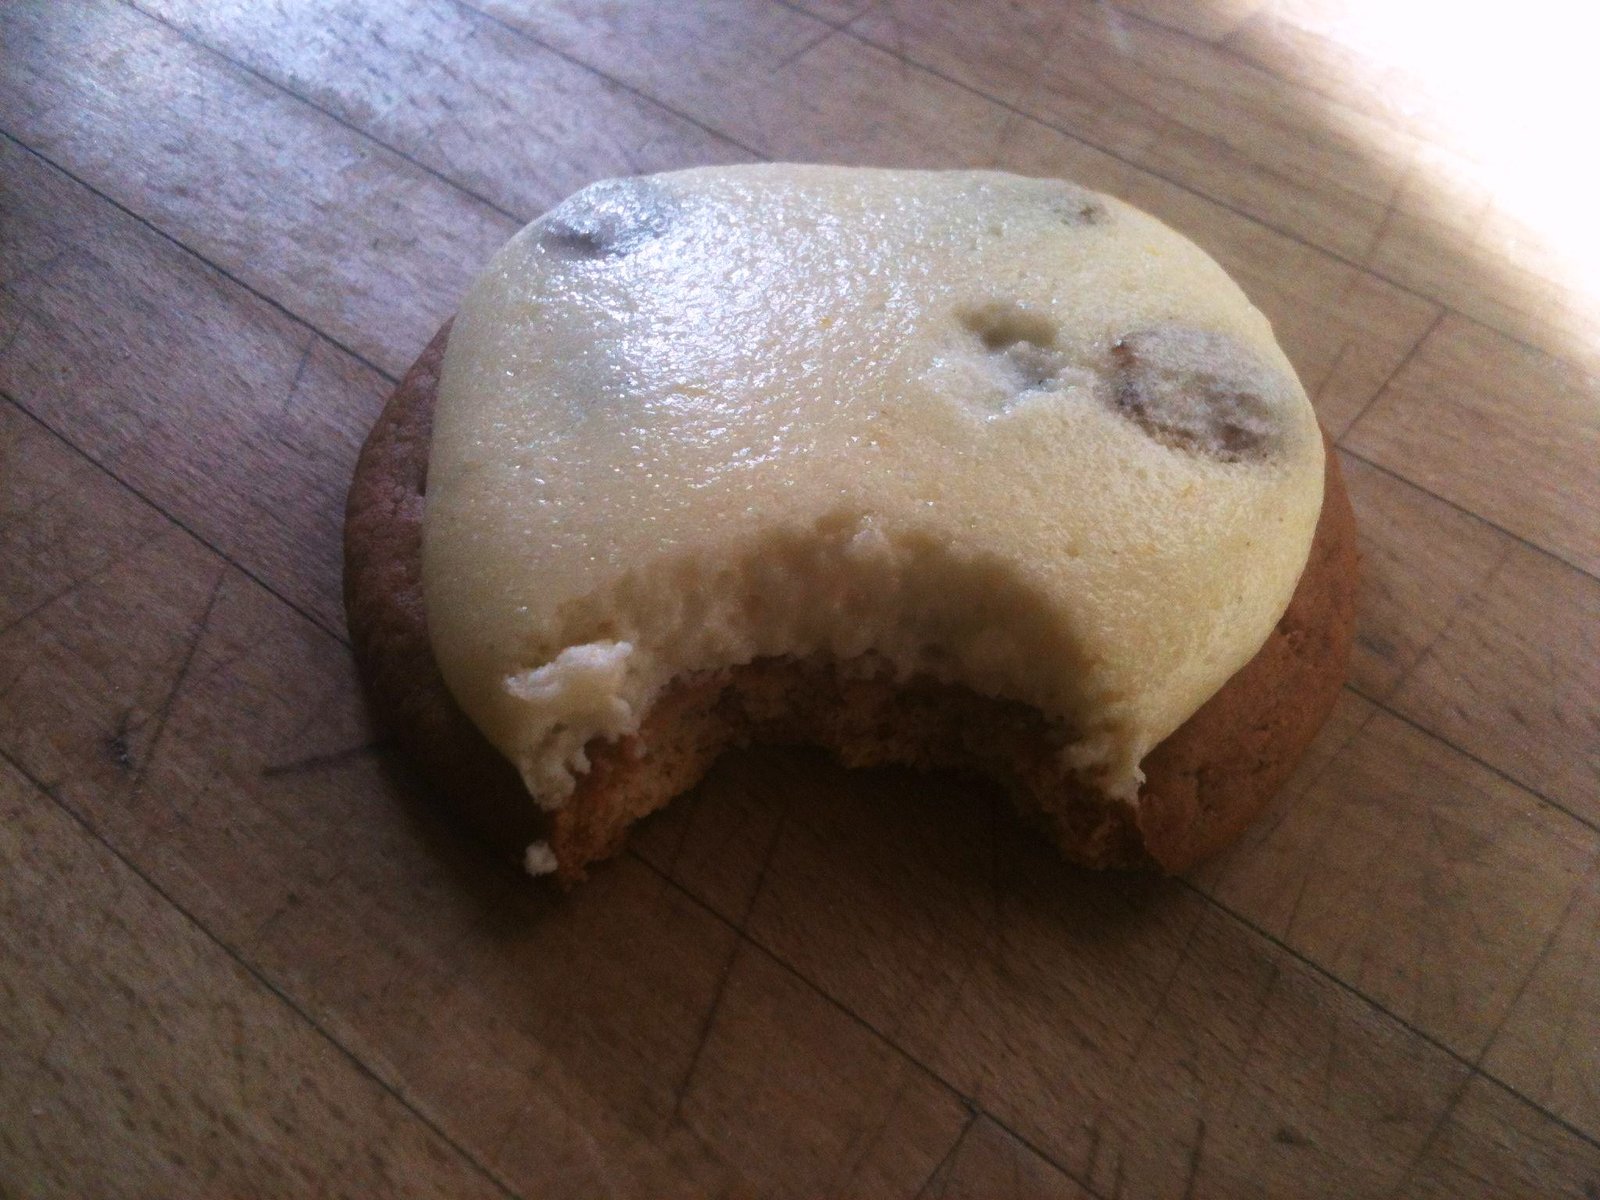
This is easy but oh so satisfying. I always seem to have leftover cheesecake topping. My tins can’t be big enough. In the past I have, shock horror, either thrown it away (!) or made a kind of baseless cheesecake in old Gu pots. Deeply disappointing to find no biscuit under your cheese in my opinion.
Here’s how to use up leftover cheesecake topping like this one. Just chill it in the fridge, covered up, for about 30 minutes. Then spoon onto the top of digestive biscuits and bake at 190C for about 4 minutes until the top has set but there’s no browning. (Mr B and I disagree regarding which way up the biscuit should be. I say writing side up, he says writing side down.)
Then either eat warm or chill and serve to guests. These will be making an appearance at the annual Bell Christmas party along with our veggie samosas. Easy peasy.
I love Autumn, in fact I love Winter too. Spring’s good. Summer I am shy of. It’s the need to bare flesh and drink white wine rather than red that just doesn’t sit too well with me. But Autumn with your ’70s brown and orange colour scheme and your leaving the house cold air slap in the face and your chin skimming scarves and your comfort blanket roast dinners and your warming, lip staining red wine and your scalding crumbles and your crack and crunch toffee apples and your oohs and aahs at the fireworks that last all of 2 minutes. Autumn, I love you.
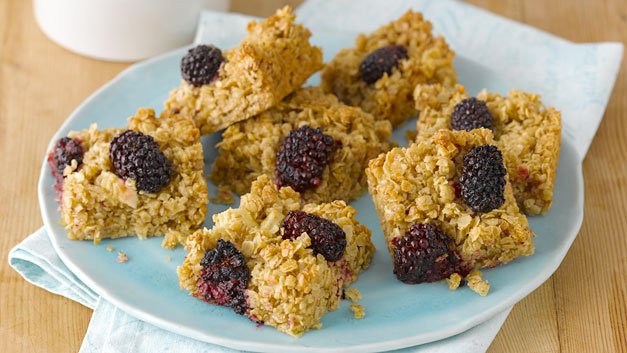
Is there anything more Autumnal than oats, apples and blackberries? Here’s a little video I made with Sainsbury’s of these flapjacks. I *may* have taken two trays home from the shoot. They were that good.
Ingredients:
150g salted butter, cut into cubes
75g demerera sugar
120g golden syrup
300g porridge oats
50g apple, cut into chunks
100g blackberries (fresh or frozen)
Preheat the oven to 180°C, fan 160°C, gas 4. Grease a 20cm square baking tin and line with baking parchment.
Melt the butter, sugar and golden syrup together in a large saucepan. Stir in the porridge oats and fold through the apple and blackberries.
Pour into the baking tin and bake for 25 mins until golden. Cut into 16 squares while hot and then leave to cool in the tray.
If you like flapjacks but want to make your mix go a bit further you can save money by making these flapjack balls. (Also loved by kids, it might be their miniature nature.) Or if you want to make your flapjacks a little bit different adding jam to the middle is delicious. And my favourite alternative to regular flapjacks has to be this no bake version using muesli, butter and toffees. It’s very easy and very moreish. Dangerous!
I’m a mum of 3 boys, a cookbook writer and also a finalist on the 2011 Great British Bake Off.
I’ve decided to record the recipes I use, partly to save them somewhere and partly in case someone else might like to use them...
[Read more]
Just sign up to receive my latest blog posts straight to your inbox: Simply click here.
P.S. To sign up for my free monthly newsletter just click here. It has a baking SOS, recommendations on bits of kit I can’t live without, my kitchen catastrophe of the month, a sneak preview of a recipe coming up on this blog and a letter from me telling you what I’ve been up to.
Remember to check your inbox for a confirmation email and also to add my email recipesfromanormalmum@gmail.com to your contacts. Otherwise I could go to spam.


 Holly Bell