The ultimate thrifty canape. An austerity-canape if you will. Bread cleverly toasted into cups to hold whatever your heart desires. Brie and cranberry is an old favourite of course but really the contents of your fridge and cupboard are the only limitation.
Makes about 12 but really depends how many people you need to feed and how full your fridge is with leftovers. Here’s a video if you prefer to watch rather than read:
Get your oven onto a really high temperature; 220 C. Roll your bread out thinly using a rolling pin and using a small cutter to fit a mini muffin tin, cut as many circles as you can from it. Take each little circle and brush with melted butter then press into a mini muffin tin, butter side down. Bake for 5 – 10 minutes. You’ll know they’re done when they’re crisp and golden and they look like little toast cups.
Once they’ve cooled, line up your little toast cups and then whatever you’ve got in the fridge you can pop into these. I often have odds and ends of cheese leftover at Christmas time and I always have half a jar of cranberry sauce in the fridge, so this is a great way to use it up. I finished with some parsley here mainly to add a bit of colour.
I don’t think I’m a natural canapé maker. They always seem like a good idea, and then, a bit like making your own Christmas cards, after 5 or so, boredom sets in and I’m wishing I’d let the shops do the hard work for me.
Not so with these little beauties. They’re easy peasy, can be made in advance (hurrah for no last minute stress) and even tick the manly box. Because even in miniature form, roast beef and Yorkshire pudding is a fully respectable canapé for even the most manly man. The full recipe, courtesy of Sainsbury’s is here. But if you prefer to watch it rather than read it you can see me and the lovely Nicola making them together.
Makes about 12
Ingredients:
2 tablespoons vegetable oil
40g plain flour
1 medium egg, beaten
50ml semi-skimmed milk
1 tablespoon horseradish
2 slices beef, torn into pieces
Watercress to garnish
Preheat the oven to 220ºC, fan 200ºC, gas 7. Pour ½ teaspoon oil into each hole of a 12-hole non-stick mini muffin tin and place in the oven to heat through
Meanwhile, sift the flour and a pinch of salt into a medium bowl and make a well in the centre. Beat in the eggs until smooth, then gradually add the milk, beating until the mixture has no lumps.
Remove the mini muffin tin from the oven and carefully add ½ tablespoon of the batter into the compartments. Cook in the oven for 15 minutes, until the puddings have risen and are golden in colour. Leave to cool on a wire rack.
Fill each mini Yorkshire pudding with a couple of pieces beef and a little horseradish. Season with black pepper and garnish each with a small sprig of watercress.
I’m a bit of a late adopter with some things. I was almost a teenager when I learnt to ride a bike. I only recently got my first iPhone and even then it was a donated one. And I had never eaten, let alone made a cake pop until recently. Unlike the bike riding, I think the cake pop addiction is a habit here to stay. I am ever faithful to all things novelty.
Here are a few good tips I’ve found through trial and error to make perfect (well almost perfect) pops. This makes about 13 pops.
Take your leftover cake. If you are going to eat the cake pops within a couple of days then you can use your own homemade cake. If you want a little longer shelf life then buy one of the value blocks of Madeira cake from a supermarket. Usually has a good few weeks on it. I know, I know, homemade is best, but if I don’t say it someone will ask. As for flavours and types of cakes, I tend to use leftover vanilla cupcakes using a basic sponge recipe, however you can use any flavour you like. I haven’t tried fruit cake yet but I assume it would work okay. Just be careful of the weight of the pop. More on that later.
Use your fingers to break the cake up into breadcrumbs. You need a light touch rather than a squeezing touch. You can also use a food processor or the flatbeater in your stand mixer. I tend to use my hands as I don’t make cake pops in huge quantities. Leave your cake crumbs in a large bowl and then add your buttercream. (If you do make too much cake pop mixture then freeze at the ball stage and you’ll have more pops for a rainy day. A great tip from Jo.)
I use the old fashioned half butter (salted if you’re interested) to icing sugar buttercream recipe with a good tablespoon of vanilla extract, beaten in my stand mixer for 7 minutes until light and fluffy. However, for cake pops you really don’t need light and fluffy buttercream. So if you’re making buttercream especially for cake pop purposes then I would probably use a wooden spoon. You can use any flavour buttercream by the way… much like with the sponge.
Add the buttercream to the cake crumbs one tablespoon at a time and give the mixture a good stir. All cakes bind with buttercream differently. What you’re looking for is the cake to come together with the buttercream into a thick spread like consistency that will hold a shape. Too dry and the cake pop will crack whilst it’s chilling. Too wet and the buttercream will melt when you dip in the Candy Melts. Test it by taking a tablespoon of mixture and scrunching it up with your fingers. It should hold easily and then be happy to be rolled between your palms. Cover the mix with clingfilm and then refrigerate for about 30 minutes. If you haven’t make cake pops before add one teaspoon of buttercream at a time. You can add, but you cannot taketh away.
After 30 minutes you can start to roll your cake truffle mixture into balls about 2.5cm across between the palms of your hands. Any larger and you run the risk of the weight of them dragging them off the stick when dipping. Oh and don’t add oil to your hands or anything else to stop it sticking, just go with it. Once rolled, pop on a plate lined with greaseproof paper or back into the bowl you chilled the cake pop mixture in and either put in the freezer for 20 minutes or if you don’t have room in your freezer (my hand is firmly up) then cover and pop back in the fridge for an hour. You don’t have to shape your cake pops into balls of course, you can instead shape into cones to make Christmas trees or Santa hats. Whatever you fancy really. Here’s a little film to show how:
A few minutes before you’re ready to start to dip and decorate your pops, melt your Candy Melts. I use the microwave in 20 second blasts – the packets have all the instructions. If you do overheat them they seem to lose their shine when dry. Instead you could melt the Candy Melts over a pan of simmering water instead to control the temperature better. Make sure whatever you end up transferring your melts to that the receptacle is small enough in width to allow the Melts to have a little depth. You need to have something to dip into. (I know some of you will prefer to use chocolate to dip your pops into… I have found it less easy as it takes a little longer to dry. You just need a bit more practice I guess.)
Find something to rest your still wet pops in to allow them to dry. I use an upturned meatball griller (!) but you could also use a block of polystyrene with holes poked into it, an egg box with yet more holes poked into it or an upturned colander if the holes are big enough. Dip a lollipop stick about half a centimetre into the melted Candy Melts and then push the stick into the rolled cake pop until it’s just over half way in. Set aside and allow about a minute to dry. This stage is important as it stops the cake balls from falling off the sticks later.
I tend to get all the sticks into the cake balls first. It makes best use of the dry time required. It also makes sure your Candy Melts aren’t so hot that they make the cake expand and crack through the dried Candy Melts shell once you dip the whole cake ball. Using boiling hot Melts to dip cake into ends in cracked pops and possibly tears. (If it does happen just allow the pop to set and then dip again as if starting with a nude cake ball. Just a thicker coating but better than trying to patch the cracked pop up.) Here’s a little film of the whole process from stick dipping to sprinkling: (If you prefer to read instructions then they’re all below the film along with some pop-pics.)
Then take the stick with the nude cake ball now attached to it and dip into the melted Candy Melts. Don’t start to swish it about as it’s likely to fall off. If your receptacle isn’t deep enough to cover all of the cake ball then use a teaspoon to bathe the cake ball in Candy Melts, gently pushing it over the cake ball. Then use the stick to pick the cake pop up and hold the stick against the side of the dish and tap very gently encouraging the excess Candy Melts to fall back into the dish. You can turn the pop as you do this to ensure you don’t end up with a peak drying where the Melts drip into the dish.
Using Candy Melts is very easy but it’s different from chocolate as it dries more quickly. Either allow to dry by carefully placing the stick into your drying rack of choice or take this opportunity to hold the pop over an empty dish and sprinkle anything you fancy over the still wet pop. You can use a toothpick or fork to make a spikey cake pop if you like by pulling at the Candy Melts covering as it dries. You could also allow the pop to dry with one coating and then use an icing bag to dribble another colour over the pop… the possibilities are endless. Oh and you can even melt your Candy Melts into a disposable icing bag in the microwave, just balance in a jug.
P.S. For those who might ask the Reindeer and Santa faces are from Sainsbury’s, as are the red, white and green sprinkles. The holly leaves and berries are by Wilton (though you can get similar from Sainsbos) as are the little white snowmen on top of the Christmas tree pops. The holly leaves were attached using a white icing pen, the type you buy that comes with nozzles to just attach to a toothpaste type tube. Lastly if you have Candy Melts leftover you can allow them to dry, seal in a bag and then re-melt again the next time you need them. They don’t get upset by repeated remelting like chocolate does. (Same goes for if you’re a slow-dipper and they get too solid half way through the process, just re-heat.)
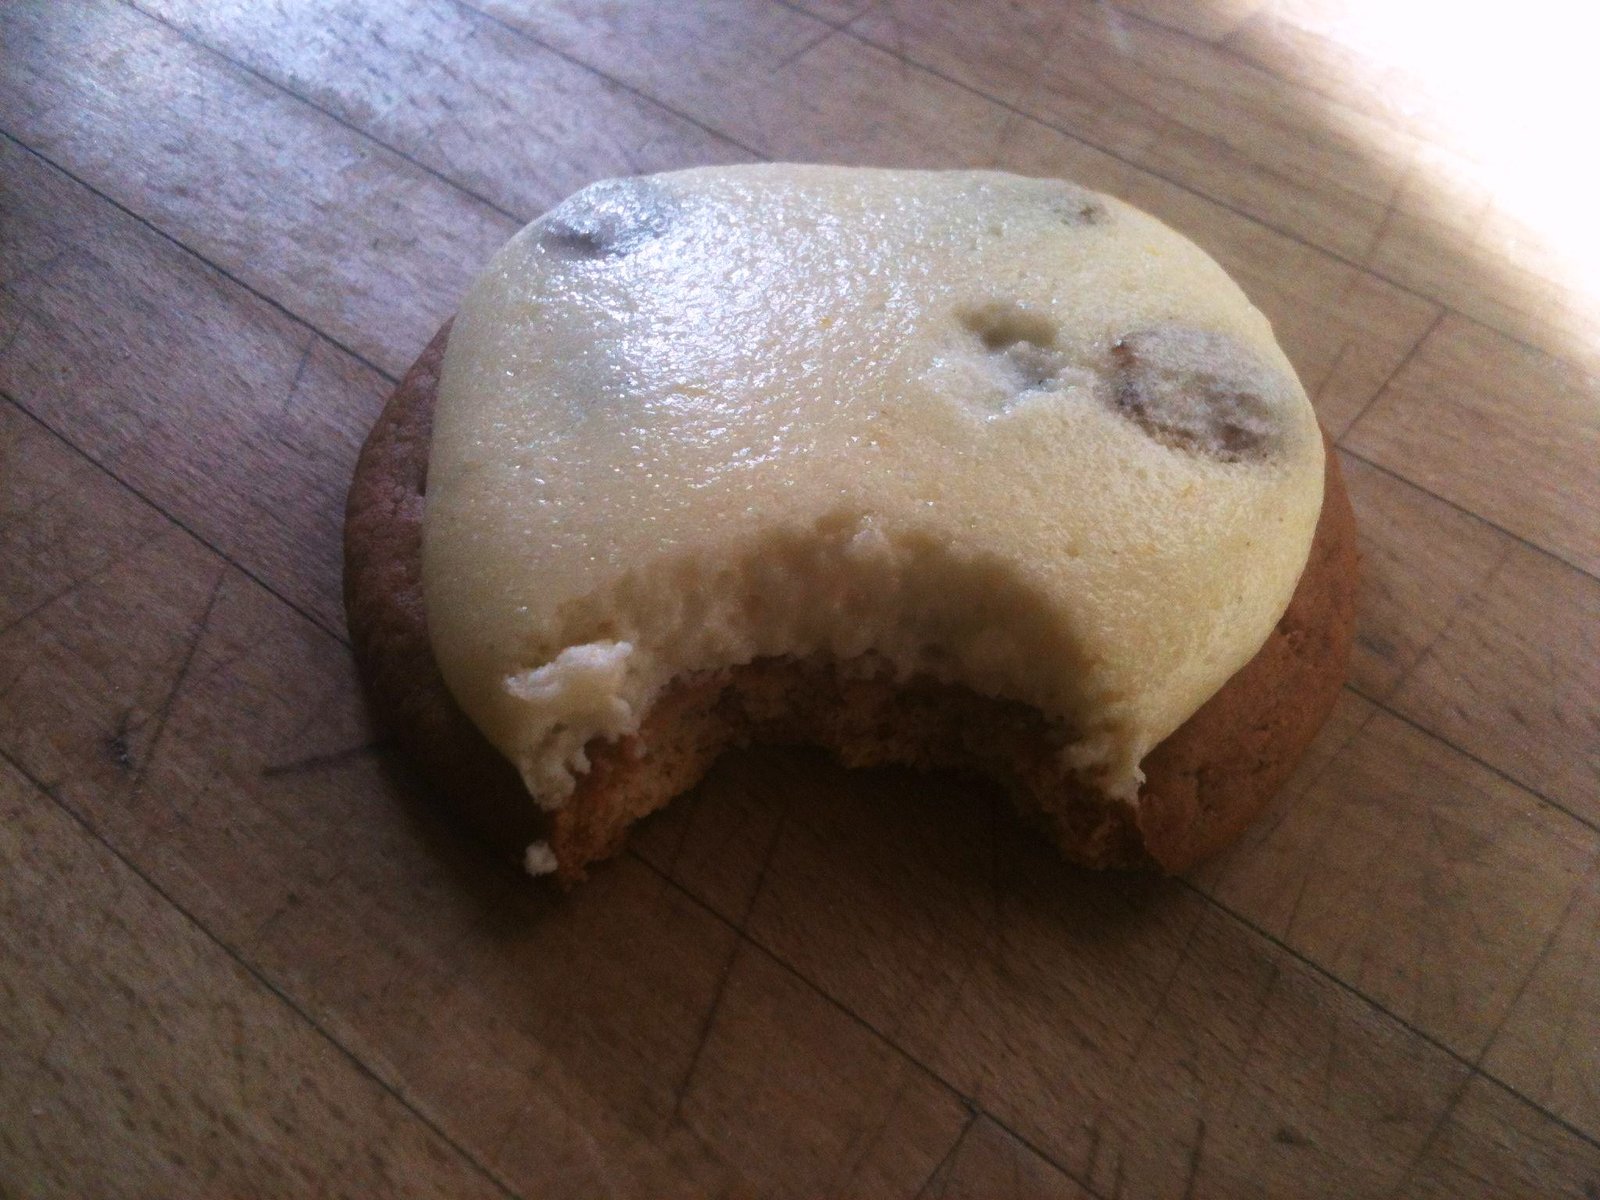
This is easy but oh so satisfying. I always seem to have leftover cheesecake topping. My tins can’t be big enough. In the past I have, shock horror, either thrown it away (!) or made a kind of baseless cheesecake in old Gu pots. Deeply disappointing to find no biscuit under your cheese in my opinion.
Here’s how to use up leftover cheesecake topping like this one. Just chill it in the fridge, covered up, for about 30 minutes. Then spoon onto the top of digestive biscuits and bake at 190C for about 4 minutes until the top has set but there’s no browning. (Mr B and I disagree regarding which way up the biscuit should be. I say writing side up, he says writing side down.)
Then either eat warm or chill and serve to guests. These will be making an appearance at the annual Bell Christmas party along with our veggie samosas. Easy peasy.
I love Autumn, in fact I love Winter too. Spring’s good. Summer I am shy of. It’s the need to bare flesh and drink white wine rather than red that just doesn’t sit too well with me. But Autumn with your ’70s brown and orange colour scheme and your leaving the house cold air slap in the face and your chin skimming scarves and your comfort blanket roast dinners and your warming, lip staining red wine and your scalding crumbles and your crack and crunch toffee apples and your oohs and aahs at the fireworks that last all of 2 minutes. Autumn, I love you.
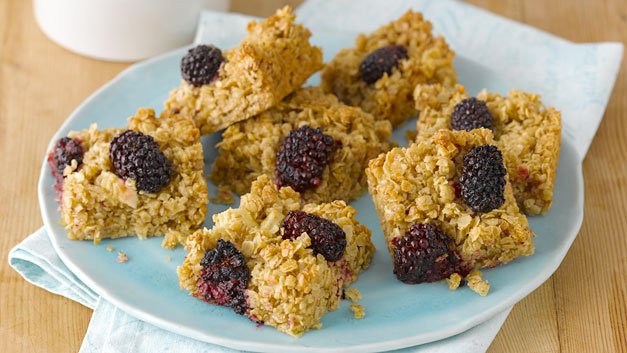
Is there anything more Autumnal than oats, apples and blackberries? Here’s a little video I made with Sainsbury’s of these flapjacks. I *may* have taken two trays home from the shoot. They were that good.
Ingredients:
150g salted butter, cut into cubes
75g demerera sugar
120g golden syrup
300g porridge oats
50g apple, cut into chunks
100g blackberries (fresh or frozen)
Preheat the oven to 180°C, fan 160°C, gas 4. Grease a 20cm square baking tin and line with baking parchment.
Melt the butter, sugar and golden syrup together in a large saucepan. Stir in the porridge oats and fold through the apple and blackberries.
Pour into the baking tin and bake for 25 mins until golden. Cut into 16 squares while hot and then leave to cool in the tray.
If you like flapjacks but want to make your mix go a bit further you can save money by making these flapjack balls. (Also loved by kids, it might be their miniature nature.) Or if you want to make your flapjacks a little bit different adding jam to the middle is delicious. And my favourite alternative to regular flapjacks has to be this no bake version using muesli, butter and toffees. It’s very easy and very moreish. Dangerous!
I bucked the trend as a student. I spent the first year of proper student halls life being the designated driver and cooking from scratch. Odd I know. No AfterShock chasers or donor kebabs for me.
I was just so incredibly excited to have a kitchen to call my own (well mine and 20 others) and a budget for food. Second year was spent in a house of 7 people where myself and one of the other greedy inhabitants used to regularly peel a bag of potatoes the size of a small toddler. We’d boil them, mash them to within an inch of their lives and finish with scalded milk, salted butter and lashings of black pepper. Whilst all 7 of us ate well through this devotion, our portion control was a little suspect. I now know that when you need a break mid meal it might be time to put the cutlery down, defeated.
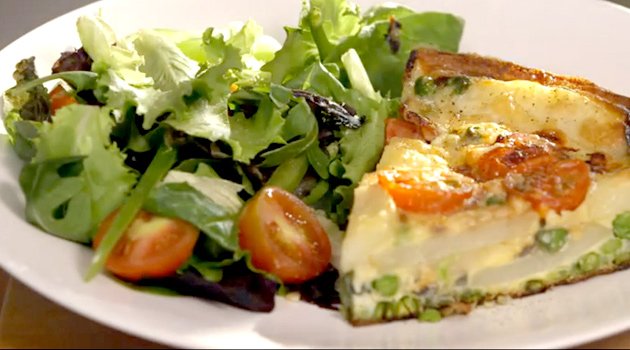
This frittata recipe is great. It’s easy, economical and nutritious. Plus it doesn’t need lots of fancy equipment so it’s perfect for students who I believe are starting their new terms about now. Serves 4 people or two with a great breakfast the day after. There’s even a little video to watch of me making this with the rather lovely, polite and handsome Ed:
Ingredients:
400g Maris Piper potatoes, cut into rounds
6 medium British free-range Woodland eggs by Sainsbury’s
1 red onion, thinly sliced
150g cherry tomatoes, halved
200g frozen petit pois
50g mature cheddar, grated
170g Italian Style Salad, to serve
1 teaspoon olive oil
Boil the sliced potato for 10 minutes until just tender, then drain and set aside.
Meanwhile, beat the eggs in a large bowl. Heat the oil in a 22cm ovenproof frying pan and cook the red onion for 5 minutes, until softened.
Stir the potatoes, tomatoes and frozen peas into the beaten eggs. Season with freshly ground black pepper.
Pour the mixture into the frying pan on top of the cooked onions. Cook over a gentle heat for 15 minutes. After 10 minutes, preheat the grill to hot.
Scatter the cheese over the top of the frittata and place under the grill for 5 minutes, until golden on top, set and cooked through. Cut into wedges and serve with salad.
I am a child of the 80s. I owned a crimper. I even used it. I also owned those strange bendy rods used to curl hair into tight perm style ringlets. My first LP was Care Bears the Movie (The Soundtrack) and I remember the exhausting and expensive transition from records to tapes to mini discs to CDs. In pre Cbeebies days I loved to watch Pigeon Street, Fraggle Rock, Jackanory, Dogtanian, Danger Mouse, the Muppet Babies and Blue Peter. I adored my A La Carte Kitchen, my Get-a-Long Gang lunchbox, my Mr Frosty, my ear muffs, my T shirt that changed colour as I ahem, glowed… and my posters of Tiffany and NKOTB. My favourite things to do were read Look In magazine, eat those little frozen mousses’ that came in stacks of 10 and visit various Leicestershire attractions with my Mum, my Dad and both my Grandmothers. The best bit of these trips was the unveiling of the picnic feast.
There was always a pork pie. We’re from Leicestershire so it’s the law. There was always tuna and salad cream sandwiches, egg and cress sandwiches (home grown cress of course from a scooped out boiled egg filled with cotton wool and with a smiley face drawn on with marker pen), Red Leicester cheese sandwiches (Leicester connection again) and some form of potted meat rolls. There was always cold sausages expertly grilled by my maternal Grandmother and bought from a butchers facing Leicester Market called Walkers. There was always celery that ended up going home untouched. There was smokey bacon Walkers crisps (Leicester again you see) and likely a Wagon Wheel or melted Penguin bar. I would drink a warm Capri-Sun and the adults enjoyed restorative flasks of tea. The perfect 80s picnic complete with Whitney to sing us all the way home. The only thing missing were sausage rolls.
The sausage rolls of my childhood were, if I’m honest, a bit of a disappointment. Shop-bought, more than a little greasy and under seasoned. If you’re still wishing for a few sunny days to end this rained out summer then you cannot go wrong with this recipe from Sainsbury’s. Incredibly easy to make, sweetened with a little grated carrot and apple and likely to disappear in a flash. You could make a huge sausage roll if you’re pushed for time, make little filo versions for a more sophisticated affair and use sausagemeat and dried herbs to cut down the cost. My youngest son prefers the filo versions, in fact it’s a case of blink and you’ll miss them when he’s presented with these.
Ingredients:
– 1 teaspoon olive oil
– ½ onion, finely chopped
– ½ carrot, grated
– 1 small Bramley cooking apple, grated
– 1 teaspoon fresh sage, chopped
– 250g extra lean British pork mince
– 1 pack ready-rolled puff pastry
– 1 medium egg, beaten
– 1 teaspoon poppy seeds
– 1 teaspoon sesame seeds
Preheat the oven to 200ºC, fan 180ºC, gas 6. Heat the oil in a small pan and add the onion. Cook until soft, then add the carrot and apple.
Transfer to a bowl, then mix in the sage and pork mince until well combined.
Unroll the pack of ready-rolled puff pastry, then cut in half lengthways. Divide the mixture in two, and place in the middle of each strip of pastry. Brush all edges of the pastry with the beaten egg, reserving some for the top. Fold the pastry over the filling, and seal by pressing gently on each roll.
Flip the roll so the seal is on the underside of each roll. Cut each strip into 8 rolls.
Brush the tops with the remaining beaten egg, then sprinkle with the poppy and sesame seeds. Place the rolls on a baking tray and bake for 25-30 mins until crisp and golden, and the pork is cooked through.
Make one giant sausage roll by doubling the sausage filling in the above recipe. Place the filling in the centre of a piece of ready-rolled puff pastry. Brush the pastry with the beaten egg, then roll the pastry over the filling. Flip and lay seam-side down on a baking tray. Cut diagonal slits across the top, brush with a little more of the beaten egg and sprinkle with sesame and poppy seeds. Bake for 55 mins, then leave to cool before slicing up and serving.
Use ready-made sausage meat for your filling and season with dried herbs. Make the sausage rolls as usual, then brush the tops with milk rather than egg. Top with freshly ground black pepper.
Use filo pastry and brush one side of one sheet of pastry with melted butter. Fold the pastry in half, then place a portion of the pork filling at the top corner. Fold the pastry over the filling at right angles to make a triangle and continue folding to form a neat triangular parcel. Seal with a little melted butter. Repeat with the remaining pork mixture and pastry. Place the parcels on baking sheets, brush the tops with a little melted butter and sprinkle over poppy and sesame seeds. Bake for 25 mins until golden.
If you’d like step by step pics then you can download them here.
I recently visited my old school to give talks on working in advertising, starting a business and baking pastry. That classic educational trio. Back in the 90s my school had a rule about never being within 1 metre of the opposite sex, though we weren’t sure if it was an actual rule or if the 6th formers made it up. We didn’t care. That coupled with the gender segregation in assembly, an awful lot of prayers and hymns, plus a summer uniform involving white cotton ankle socks made for an awful lot of teenage lust. It was fabulous.
The school no longer segregates members of the opposite sex in quite such a centimetre by centimetre way, and whilst the results have improved since my day, I couldn’t help but feel sorry for the students. Longing and clandestine trysts are a teenage right.
As I left this fine establishment I was handed a bag of goodies including a recipe book. What a gem this A4 bound beauty is. I found a shortbread recipe by a chap called Josh Melen. It’s a fine recipe that I have messed with a little. Feel free to un-mess it and return it to naked shortbread form.
Makes 24 small squares but depends on the size of your tray.
Ingredients:
– 175g plain flour
– 100g cold salted butter
– 50g caster sugar
– 50g macadamia nuts
– 24 squares of white chocolate
Preheat the oven to 150C/Gas 2. Grease a 24 x 24cm tin (or something smaller would work too, for thicker shortbread) with a little butter. Blitz the flour and butter in a food processor with the blade attachment until you have a breadcrumb type mixture. Add the sugar and blitz again. Tip the lot out into a large bowl. Then blitz the nuts until ground up into half centimetre chunks. Tip the nuts into the big bowl too. Use your hand to distribute them evenly amongst the breadcrumby mixture and then use your hand to bring the shortbread dough together. Basically the warmth of your hand will massage the dough a little into sticking together.
Once it looks like a blob of biscuit dough, pop it into the tin and use the back of a spoon to push it evenly into all the corners. If you use a 24 x 24 cm tin then you will have very thin dainty shortbread. Bake for about 20 – 30 minutes until the shortbread has browned a little, remove from the oven and score whilst still warm using a blunt knife. After 5 minutes cooling in the tin, take the white chocolate squares and place in the middle of each square/rectangle you have scored, but don’t push the chocolate down as it may melt a little too much. Leave to cool, then cut and serve.
I like to think these shortbread are lucky. Especially if you make 22 pieces and eat the rest before they’re cool.
I did a bad thing this morning. I threw away a Thomas the Tank Engine bowl. I was trying to prove a point. It was the age old ‘there are children dying in the world and you won’t even eat your Cheerios’ speech when some strange urge came over me and I found myself throwing the uneaten cereal and the bowl into the bin. I didn’t actually mean to throw both away but given the flourish with which I executed the manoeuvre I felt I had to follow through. Like I meant to do it. So now my sons think their mother is crazy. Not crazy-good, crazy-bad.
To make everything better I took them to the zoo in the afternoon and spent £3 each on plastic crocodiles. The plastic Thomas bowl is forgotten and all is well in the world.
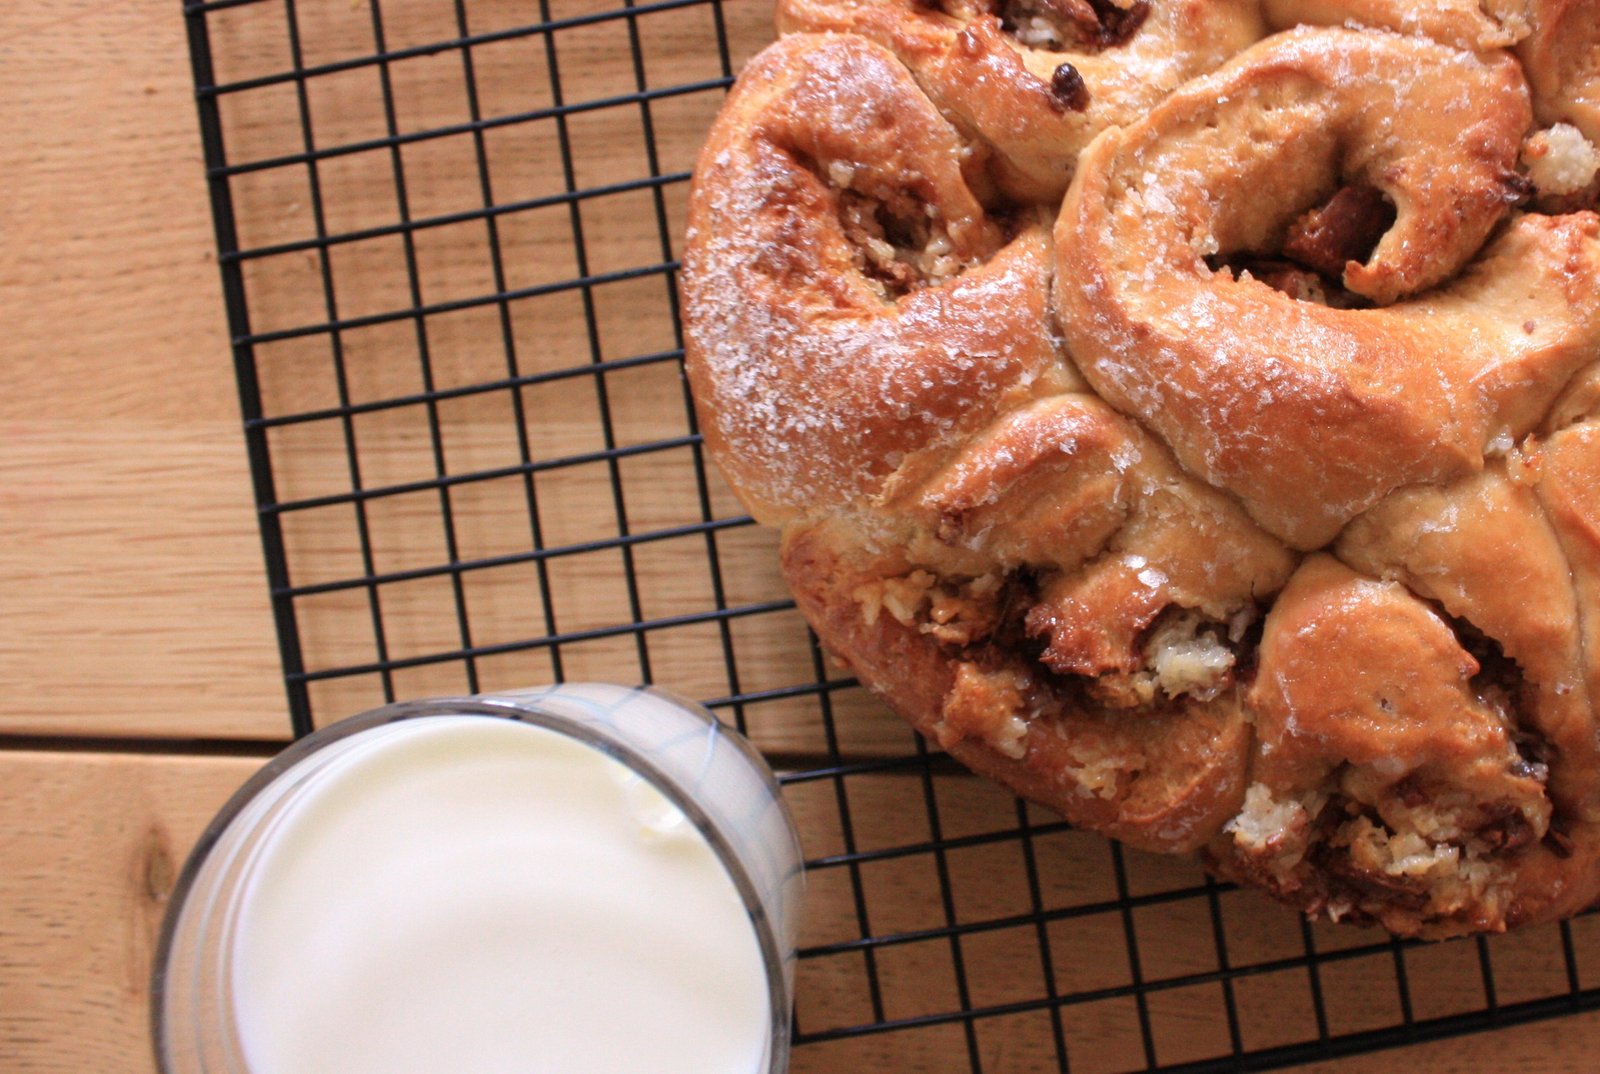
These Bounty bread rolls are possibly one of my favourite creations ever. Charlie prefers these over Cheerios for breakfast any day. They take ages though. I warn you now, they proof at their rate and nothing is going to speed them up. Weekend breakfast perhaps?
Makes 1 cake tin of rolls – about 8 individual rolls when pulled apart
Ingredients
Dough:
30g butter, cold
125g full fat or semi skimmed milk
250g strong white flour
1 tsp fast action dried yeast
1 tsp salt
20g muscavado sugar
1 large egg, beaten, at room temperature
Filling and topping:
20g melted butter
25g demerara sugar
100g finely chopped Bounty bars (I used cheapo version from Aldi)
2 tsp icing sugar
tiny dot of boiling water
Make the enriched dough first (for it has an egg in it and butter too – so it’s enriched and therefore rises a bit slower and is also a bit sticky) by heating the butter in a saucepan/microwave until it’s melted, then adding the milk and heating until the whole lot is the temperature of a baby’s bath – ie/ lukewarm. If it overheats this is fine – just let it cool down before you add it to the dry ingredients.
Mix the flour, yeast, salt and sugar together. If the sugar has clumped up in storage then make sure you break it up finely before adding to the other dry ingredients. Use your fingers or a knife to get it back to it’s usual fine self. Then add the lukewarm butter and sugar mixture, knead together a little, then add the room temperature beaten egg. Knead by hand or in a machine until the dough is elastic, though beware it will still be sticky. Don’t add flour to aid the kneading – the bread will end up brick-like. Just go with the stickiness and remove jewellery beforehand if it really bothers you. (A scraper is very useful for kneading sticky doughs… or a machine.)
Pop the dough into a large bowl and cover with clingfilm. Let it proof until a finger pushed in about 3cm leaves a firm indent. It should be about double the size and take about 1.5 hours. In that time you need to line a cake tin (approx 20cm) with greaseproof paper as these rolls go all sticky upon baking. So sticky they can get stuck in a tin.
After the first proof knock the dough back and then roll with a rolling pin into a rectangle about 25 x 18cm, between two pieces of greaseproof paper (like I said, it’s very sticky dough so I wouldn’t attempt without the greaseproof paper trick.) With the rectangle length-ways in front of you, peel back the top layer of the greaseproof paper and then use a pastry brush to paint with the melted butter. Sprinkle the demerara sugar and chopped up Bounty over the top, evenly, then roll into a spiral, length ways.
With your roll of dough resting on the bottom piece of greaseproof paper as a disposable cutting board, use a serrated knife to cut slices of the dough about 2cm thick. Carefully lift the spirals (which are prone to dropping filling, beware) and place in your lined cake tin. Cover loosely with clingfilm and leave to proof for a second time. Mine took 2 hours to double in size.
Bake at 200C for about 20 – 25 minutes until golden brown on the top and looking thoroughly well baked, chocolatey and with toasted Bounty coconut having splurged onto the top. Mix the icing sugar with a dot of boiling water and paint the still warm rolls for a nicely frosted when cold appearance.
So you know how I pimped those 29p waffle cones from Aldi? If you didn’t then you can check them out here. They’re the classy sister to these wafers.
The principle is exactly the same, just more about sweets and less about nuts and praline and other tip-top delights. These wafers are the grubbier version, the one you secretly eat, alone. A bit like when you smuggle-buy a Malibu and coke but ask for it in a long glass to pass it off as a plain Diet Coke. Or when you buy expensive rear facing car seats (not the baby ones, I’m talking the next stage up for talking children) so you can buy McDonalds cheeseburgers at the drive-thru without the kids telling Daddy. Just me then?
Ingredients:
1 wafer
About 25g chocolate (dark, milk, whatever takes yours of your toddlers fancy)
Sweets, various
Take the chocolate, break into pieces and then melt in the microwave in short blasts. Mine took a minute to get to the almost molten stage, then a few stirs with a teaspoon to get it all the way there. Pop your wafer onto a plate.
Let the chocolate sit in the bowl/cup/whatever you melted it in, until it starts to harden a little. Once it’s at the still-mixable but visibly-thicker stage, spoon it onto your wafer with a teaspoon being careful to get a good covering but not to let it spill over the sides. (Only because it’s easier to let it set this way without getting it soldered to the plate.)
Then decorate with sweets. Maybe just gummy bears, maybe dolly mixture too. Perhaps chocolate coins. Strawberry laces for sure. I raided our treat tin. All houses should have a treat tin in my opinion.
Let it set and then serve alone or with ice-cream.
This is Charlie pointing in glee and delight. I don’t think I could have earnt more Mothering points if I tried.
I’m a mum of 3 boys, a cookbook writer and also a finalist on the 2011 Great British Bake Off.
I’ve decided to record the recipes I use, partly to save them somewhere and partly in case someone else might like to use them...
[Read more]
Just sign up to receive my latest blog posts straight to your inbox: Simply click here.
P.S. To sign up for my free monthly newsletter just click here. It has a baking SOS, recommendations on bits of kit I can’t live without, my kitchen catastrophe of the month, a sneak preview of a recipe coming up on this blog and a letter from me telling you what I’ve been up to.
Remember to check your inbox for a confirmation email and also to add my email recipesfromanormalmum@gmail.com to your contacts. Otherwise I could go to spam.


 Holly Bell