Summer is coming so it’s time for a lemon and coconut cake. If coconut isn’t your thing then make a simple buttercream filling instead. I’ve kept the coconut away from the main cake as I know some folks aren’t keen on it. I however am a coconut fiend.
This recipe first appeared on ITV’s This Morning. You can find a video of the recipe being made here as well as the full recipe.
So Lawrence could barely sit unaided until recently and now all of a sudden it’s action stations. Yesterday I rescued 2 remote controls, a Lego helicopter, a calculator, two mobile phones, a box of tissues, a nappy (unused), another baby, 3 plastic Octonaut toys, a laptop, a Hot Wheels track, a whisk, a rolling pin, 2 wooden spoons and some post from Lawrence. He’s one of ‘those’ babies. He’s wonderfully exhausting.
So what with all this racing about, I need Jaffa Cakes. Homemade ones. With a LOT of dark chocolate. Here we go…
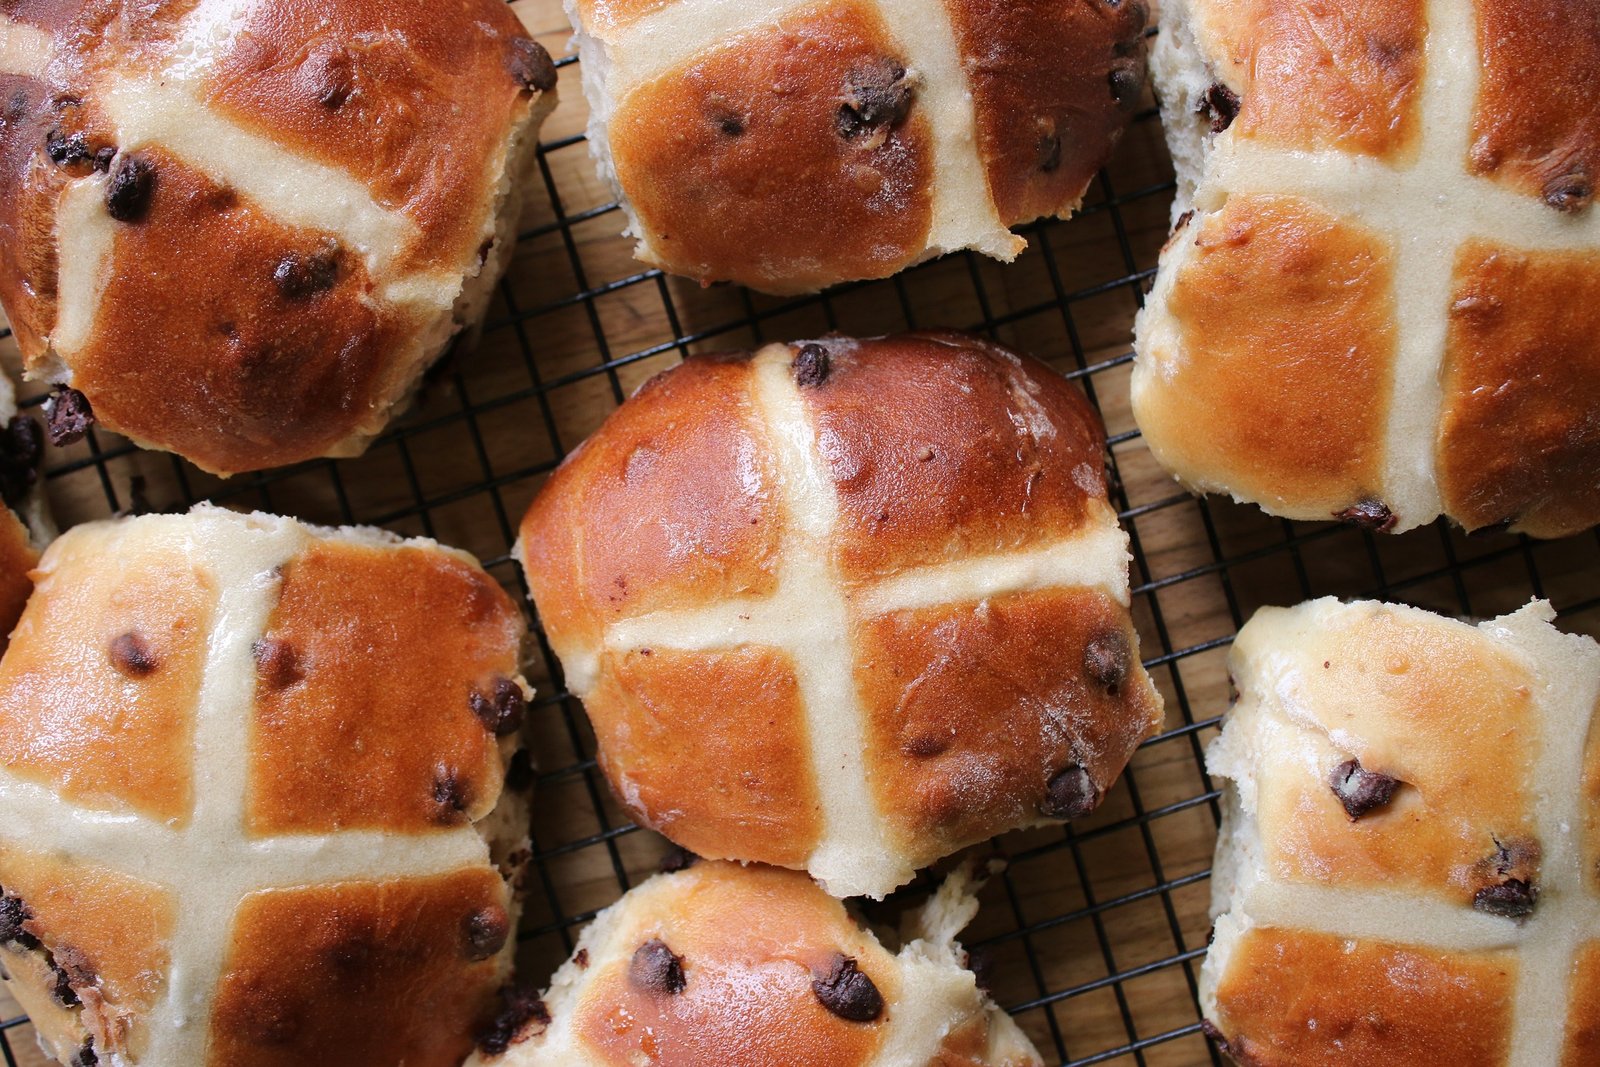
I really wanted to post something hugely traditional like a Simnel cake, some regular hot cross buns or even some kind of lamb dish.
But I couldn’t. I opened the larder door and the chocolate chips called to me. I had some yeast sachets that needed using up, plus some strong white flour that’s almost done for. And I really don’t like waste you see. It bothers me hugely.
The rest is history. But look! They’re very pretty. See:
Well it wouldn’t be Easter without a Cadbury Crème Egg recipe. I’ve given you Cadbury Crème Egg mess and of course Cadbury Crème Egg chocolate flapjack in the past, but this time it’s the turn of the unbaked cheesecake. This is easy, assemble ahead stuff. It’s all the better for longer chilling in the fridge so make the day before if you can.
Have a wonderful Easter!
I made a lovely video with the Scoff folks to show how to make this Crème Egg cheesecake. You can see the vid on my YouTube channel and also the Scoff one. You can watch it below too.
Grease and line a 20cm springform tin with clingfilm – this is important as it makes it much easier to remove later. Mix the biscuits, melted butter and sugar together (you can use a food processor if you wish), stir in the chocolate chips and press into the tin using the back of a metal spoon. Chill in the fridge for 10 minutes.
To make the cheesecake layer, beat the cream cheese, icing sugar and vanilla extract in a stand mixer, with an electric handheld mixer or with a wooden spoon until combined. Then gently fold through the whipped double cream with a large metal spoon. Spoon a third onto your chilled biscuit base, then add half of the crème egg pieces, add another third, then the rest of the crème egg pieces and then the last third of the cheesecake mixture. Smooth until flatish and pop back in the fridge for 1 hour.
Melt the chocolate in short bursts in the microwave or over a bain marie then add the oil, stirring well. Pour over the top of the cheesecake and add the mini crème eggs to the top. Chill for another 2 hours.
To serve gently remove the springform tin and unpeel from the clingfilm. Cut into slices using a knife dipped in hot water for clean cuts, though beware this dessert is messy when served. Gobble it up quickly!
I’ve been meaning to put all my weaning recipes in one place, but, well I’ve been busy weaning. Lawrence is now 9 months old and eats pretty much what we eat. I have been asked many times since he was born whether I follow baby led weaning or the purée method and quite honestly I’ve mostly been avoiding the question. It’s just so political.
But here’s the answer; I do a bit of both. Or, strictly speaking, I offer purées with finger foods before quickly progressing to very lumpy purées with finger foods and then just finger foods. So Lawrence has always had a bit of what we’ve had. Unless we’re eating salty, honeyed food doused in booze. (For current guidelines on what you can and can’t feed babies take a look here).
Here are a few of Lawrence’s favourite things:
Sugar free flapjacks
I think these may be my favourite creation since I began weaning my babies. My youngest son (and his mates) really like them. But please manage your expectations if you’re planning on having a bite. These are refined sugar free. Powered by dried fruit and banana only. So if you’re used to cupcakes, Mars bars and/or ice cream then these will taste decidedly un-treat like. But then you don’t have the unsullied palate of a baby. Recipe here.
Garlicky roasted squash, sweet potato and carrot purée
This is one of those purées that makes the house smell divine. Lawrence loved it as a first food but now he won’t go near it. He’s not into purées now he’s a big boy don’t you know. So the little bag of ice cubes I had left in the freezer made a delicious courgette layered bake along with a grating of parmesean for Mummy and Daddy. Recipe for the purée is here.
Cheesy bread sticks
We all enjoy a homemade bread stick in this house, not least when they’ve been coated in grated cheese before baking. I reduced the salt by half in these before making them for Lawrence to eat. If you do this remember that salt inhibits rising. As in, your bread sticks will rise super fast with less salt. Recipe here.
Cauliflower and broccoli cheese
We all love this. It’s tasty, cheesy, veggie rich comfort food. It makes an excellent spread/dip when blended as well as being really good in it’s non mushed up format. Recipe here.
Frittata
Lawrence finds this easy to hold and is a big pea fan. I personally love a Spanish omelette for the fact they help clear the fridge of odds and ends of vegetables. Recipe here.
Salmon and sweet potato fishcakes
I fashion these into croquettes as they’re easier for Lawrence to hold. Recipe here.
Pancakes
All the boys love pancakes, Lawrence especially. They’re very easy for him to shove into his mouth. They’re also very easy to spread with various nutritious dips and spreads. Hummus is a fave. Recipe here.
Veggie rostis
Anything with parsnip is a big yes here. So these are popular. I serve them with scrambled egg. Recipe here.
Roasting tray ragu
This is NOT authentic. I repeat, this is NOT authentic. But it is tasty and it is easy, so it’s a favourite in our house. Recipe here.
Sweet potato chips
Great for the family, especially loved by babies. I like any recipe where I get to bung it in the oven and forget about it. Recipe here.
Carrot fritters
Remove the salt and off you go. Add any other flavourings you (or your baby) fancy. Recipe here.
Pork and coriander meatballs
Easy to hold, easy to chew on and incredibly moreish. I dare you not to try and snaffle one off your little one’s plate. Recipe here.
Apple and pear puree
I like to think of this as a baby version of apple pie. Without the sugary pie crust. It fills the kitchen with a sweet orchard smell and is loved by Lawrence. Also good mixed with natural yoghurt. Recipe here.
Carrot, courgette and cheese fritters
Call them fritters, call them pancakes. Whatever you want to call them, they’re a big hit with babies. They freeze well too. Recipe here.
Take a look here for advice and tips on weaning including a little video I made with Organix.
I struggled with what to call these. Sugar free flapjack? Refined sugar free flapjack? Baby flapjack? Or just plain old flapjack? I went for weaning flapjack in the end, but frankly anyone can enjoy these whether they’re 6 months old of 106 years old.
Manage your expectations though if you’re a sugar addict. These are not syrupy sweet like regular flapjack. But they’re still delicious.
Makes about 16, but depends how large you cut them
Ingredients:
1 ripe banana
150g dates
70mls boiling water
85g dried figs
40g dried apricots
160g oats
Preheat the oven to 160C/gas mark 2 and pop the kettle on. Grease and line a 20cm x 20cm tin.
Peel the banana and break into pieces. Place in a jug with the dates and boiling water. Leave for 5 minutes and in the meantime chop the figs and apricots into 1/2 cm chunks using scissors. Use a stick blender to blitz the banana mixture to a fine purée, being careful not to spray yourself with boiling water.
Combine the puree, oats and chopped fruit in a bowl until well mixed then press into the prepared tin. Bake for 30 minutes until the edges are starting to brown and the top feel firm. Remove from the tin and cool on a wire rack then cut with a very sharp knife once cool. Store in a tin for up to 5 days. Freeze, well wrapped for up to a month. Defrost at room temperature before serving.
Failure can be a good thing. Take London for example. The first time I took a solo trip to London it was a disaster.
In 1999 I was a fresher at Liverpool University, studying for a degree in English Language & Literature. One day I bought a copy of Vogue. Now given I was a chunky size 14 this was ill advised. However this copy did feature a writing competition. Which I of course, being full of arrogant youthfulness, entered.
Months later I received a very proper looking embossed letter telling me I hadn’t won, but I was a runner up. How exciting! Imagine! A girl from Leicester, via Liverpool, being invited to London! All the L’s and all the exclamations. At this point I should have been happy in my triumph, left it there and declined. But I didn’t.
I bought a pashmina. Because that’s what I imagined women in London who were invited to Vogue House might wear. It was beige. I also bought a pair of pedal pushers in a kind of gold colour. They fit badly and made my already reasonable sized backside look gargantuan. I also wore a white loose fitting peasant style T shirt. And heels. A pair of heels that barely fit, were again beige, and hurt considerably. Oh and a beige handbag that didn’t fit much in. Not an umbrella for instance.
But wait! The horror wasn’t complete! I decided, the night before I caught the train to London, from my teenage bedroom in Leicester, to fake tan my whole body.
Reader, I don’t think I need to tell you how bad I looked. A beige monstrosity, streaked in orange. It rained in London, as it often does, and I, being a girl from up North, had no idea that carrying an umbrella in the heat of the capital’s summer might be a good idea. I arrived; wet, streaked, stressed and beige.
I managed to sit through the lunch, in a panelled board room, with Alexandra Shulman (Editor), Miranda Sawyer (Journo) and Nick Hornby (Author), the latter whose work I bought days before to swot up on.
Shulman and I didn’t speak. I imagine she was concerned the beige horror might be a contagious disease. Sawyer chatted kindly, though clearly not engaged in anything a 19 year old student might have to say. (I don’t blame her). Nick was lovely. So interested in everyone. A real gent.
I took the Midland Mainline back to Leicester on the to pick up my Fiat Panda, feeling London was so very unattainable to me. I had embarrassed myself and done a disservice to every girl from the Midlands trying desperately to reinvent herself.
Just 3 years later I moved to London, again, solo. And it was anything but a disaster. I loved it. And I never wore a beige pashmina again. Or gold pedal pushers. (The same can’t be said for my love affair with ‘Holiday Skin’ fake tan).
I made a lovely video with the Scoff folks to show how to make these very easy white chocolate mousse eggs. You can see the vid on my YouTube channel and also the Scoff one. You can watch it below too.
Makes about 9 though depends on the size of your chocolate eggs
Ingredients:
For the curd:
35g butter
70g castor sugar
1 lemon
1 large egg + 1 egg yolk
For the mousse:
2 large eggs, separated
125g white chocolate
To finish:
9 hollow milk chocolate eggs (though how many you fill will depend on the size of your eggs of course)
Melt the white chocolate in the microwave, allow to cool a little. Locate something to stand the finished eggs in – an empty egg box would be perfect.
Make the curd by placing a pan of simmering water over a medium heat and placing a heat proof bowl over the top, being careful that the water doesn’t touch the bowl. Place the butter, sugar, lemon zest and juice into the bowl and whisk. Stir until completely dissolved.
Then add the eggs and whisk intermittently for 10 minutes until the curd has thickened. Chill in the fridge.
To make the mousse, whisk the egg yolks until pale and creamy then add in the melted chocolate and whisk well.
In a very clean bowl whisk the egg whites until you have stiff peaks then add 1 tbsp into the mousse to loosen it a little – simply beat it in with a wooden spoon.
Then add in the rest of the whisked egg whites and fold into the mousse with a metal spoon using a slicing action. Place the mousse in the fridge.
Take the hollow chocolate eggs and gently saw off the top of the egg with a sharp knife, just to reveal the inside enough to spoon mousse into. (Don’t worry if some of the chocolate falls into the chocolate egg).
Spoon white chocolate mousse into the hollow eggs and place in the egg box. Spoon a tiny bit of cooled lemon curd into the middle of the mousse before serving.
NB: These hollow eggs must be kept in the fridge until serving. It is advised not to serve raw eggs to young children, pregnant women or the elderly.
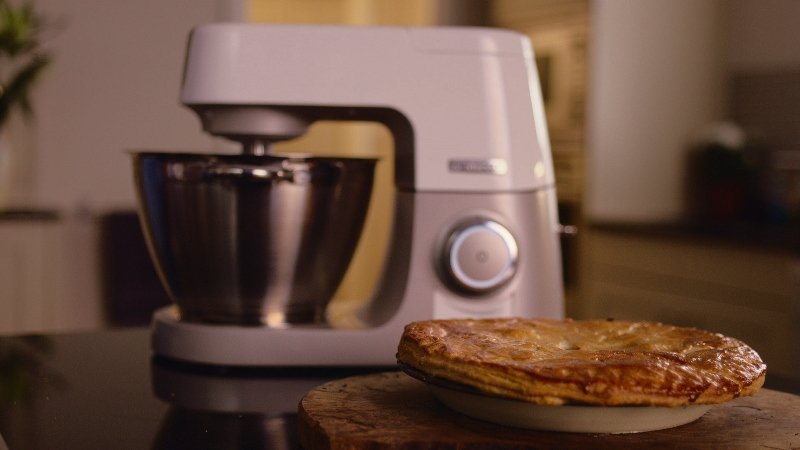
Now I made a similar pie to this on This Morning and it was easy, oh so easy. You just stirred it on the hob, covered it in raw sliced potatoes, covered it and left it in the oven until your stomach couldn’t stand waiting any longer. It was a week night pie that everyone likes. My 9 month old son especially loved it and started to jump in his high chair when faced with a plate of lamby potatoey pea based goodness.
But I know you lot. I know that although you like fuss free recipes, you’re also the types to like a bit more of a challenge. I know you do buy puff pastry, but also reserve the right to make your own pie coverings when the mood takes you. So this is the weekend version of the one I made on This Morning. The lamb is stewed that little bit longer for depth of flavour. The pie lid isn’t potato, it’s flaky homemade rough puff. The stuff I made on the Bake Off that made Paul Hollywood say something vaguely positive about one of my bakes. I urge you to make it. Go on…
I made this pie using the Kenwood Chef Sense which is available here. The full video of the recipe is below and can also be viewed here, plus some top tips on getting really crisp pastry without a soggy bottom in sight here.
Place the butter (apart from 50g of it) and lard into the freezer an hour before you start making the pastry.
Preheat the oven to 160C/gas mark 3. To make the pie filling toss the lamb in the flour, black pepper and salt. Heat the oil in a pan on a medium heat and fry the lamb in 3 batches to brown, being careful not to overcrowd the pan. Remove from the pan and add to a casserole dish with a fitted lid.
Dice the onion using the Kenwood and fry in the remaining oil until just starting to soften, about 2 minutes. Add the stock, mint, thyme and nutmeg and allow to simmer for 2 minutes before pouring into the casserole dish. Add the lid and oven bake for 2 hours, stirring every 20 minutes or so.
Put your flour into the mixer bowl and add the 50g of room temperature butter , using the K beater, mix the butter into the flour for a couple of minutes until you have a breadcrumb consistency. Remove the frozen butter and lard from the fridge and grate it using the grating attachment into the floury butter mixture. Using the K beater mix again until all the strands of frozen butter and lard are coated in flour – this should only take a few turns. Next add the vinegar and the water very slowly with the K beater at the lowest setting. Just as the pastry comes together into clumps stop.
Flour your work surface well and pull the pastry together with your hands forming a square flat shape. Then flour the top of it and roll into a long rectangle about 4mm thick. Mentally divide the pastry into thirds, then fold the right side over to meet the first third and the left side over to do the same so you have a piece of pastry with three layers. Wrap in clingfilm and chill for 30 minutes. Repeat this step three more times using flour each time, then chill for an hour before rolling to use on the pie.
When the lamb is tender and the sauce has reduced down remove from the oven and add the frozen peas. Stir and leave to cool. Place into a 22cm pie dish (metal preferably) at least 3cm high and chill the pie dish complete with filling.
Roll the pastry out to about 2mm thick onto a well floured work surface and then cut a circle about 2cm larger than the pie dish. Use any off cuts to cut into strips to stick to the pie rim with egg wash. Then egg wash these strips and attach the pie lid to the top of the pie. Cut a cross in the middle for steam to escape and egg wash the top of the pie. Then bake in a preheated oven at 200C/gas mark 7 for about 50 minutes until the pastry is golden brown, puffed up and the pie filling is piping hot.
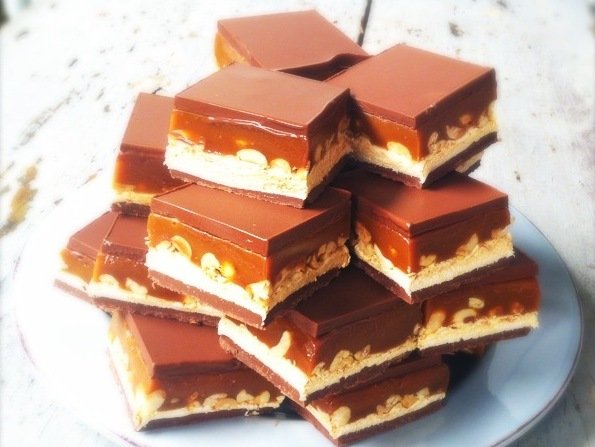
So really, all in all, I’m trying to manage your expectations. It’s not that I don’t want you to make them. I do. These are good. Oh my, they are GOOD. You could make yourself sick eating the whole lot and still want to go back for more. However, they’re a bit of a pain in the backside.
But like my good friend Kitty says about women – all the best ones are a bit of a pain in the backside. In my opinion, the same applies to chocolate-peanut snacks.
P.S. Please, please, please don’t sub the dry roasted peanuts for salted peanuts, or, heaven forbid, unsalted peanuts. They need to be dry roasted. I know it seems wrong, but just trust me on this one.
I made a lovely video with the Scoff folks to show how to make these homemade Snickers. You can see the vid on my YouTube channel and also the Scoff one. You can watch it below too.
Oil a tray size 30 x 40cm (ish) with a little olive oil and cut a piece of non-stick baking parchment to fit the bottom. Melt half the milk chocolate with 1 tbsp olive oil in the microwave until molten. Tip into the tray and level out by tapping the tin on the work surface. Leave to set in the fridge.
Once the chocolate has set, make the nougat by placing the granulated sugar, honey, liquid glucose and 230mls cold water into a saucepan over a low heat until the sugar dissolves. Turn up the heat and boil until it reaches 150°C (use a sugar thermometer).
Whisk the egg whites in a stand mixer with the whisk attachment until you achieve soft peaks, then when the sugar thermometer is at 160°C slowly pour the boiling sugar into the egg white mixture with the whisk rotating at a medium speed. Try and aim the sugar at the egg whites rather than at the edge of the bowl.
Let the mixer whisk for about 3 – 4 minutes at a high speed until the mixture is very thick, starts to pull away from the side of the bowl and the stand mixer feels like it might be struggling. Stop the mixer then add the peanut butter and stir with a spatula or spoon then tip onto the chocolate layer. Straight away, tip the dry roasted peanuts over the top evenly and then press down with a piece of oiled non-stick baking parchment. Leave to set.
Make the caramel by heating the cream in a pan until boiling point. At the same time heat the golden syrup and the granulated sugar in a large pan until 155°C (use a jam thermometer), then remove from the heat and stir in the just boiled cream with a wooden spoon. Be careful as it can spit. Leave off the heat for 5 minutes. Then put back on the hob and heat until 127°C. Once this temperature is achieved remove from the heat and stir in the butter – be careful as it bubbles up a fair amount. Leave to cool in the pan for 20 minutes.
When cool but still spreadable, pour over the peanut layer of the snickers bar and allow to set in the fridge. Use a knife to eek it over the peanut layer if you need to. When the caramel has set (give it at least an hour) melt the other half of the chocolate with 1 tbsp oil (as before) and pour over the caramel layer. Leave to set.
Once completely set use a knife to cut into squares/bars. You can dip the knife into hot water before cutting to achieve cleaner cuts.
Leicester is in a state of high excitement; practically a frenzy. The last time this happened was when Sam Bailey won the X Factor. This time it’s an altogether more regal affair. Richard III is being properly buried. The correct name for this is ‘reinterment,’ but no one knows how to say that or indeed exactly what it means. Anyway, I thought I’d make something that good old King Richard might have eaten at a banquet whilst entertaining young ladies.
Now then, the recipe. I have removed the sandalwood and pepper to suit modern tastes a little more, but feel free to add 1/4 tsp of each if you wish. I do not know where you can find sandalwood, I have too many children and a husband who’s rarely here to be searching for it, so you’ll have to be your own google if sandalwood interests you. Oh, I also swapped mace for nutmeg. Mainly because it’s what I had to hand and it’s that bit stronger in flavour.
I have gone for an oven baked option rather than deep frying, however do fry if you can handle the calories and indeed, the stress of dealing with bubbling oil. (Bubbling oil… now that does sound medieval). I often have young children with me in the kitchen, so anything involving deep frying scares the hell out of me. I’ve read too many stories in the Daily Mail to allow me to deep fry without evacuating the house first.
20mls vegetable oil (or other oil you have to hand)
For the filling:
75g chopped dried figs (use scissors to chop)
75g chopped dried dates (use scissors to chop)
25g pine nuts
20g currants/sultanas
2 cloves, ground
1/4 tsp ground nutmeg
1/4 tsp ground cinnamon
pinch salt
pinch saffron, ground
Preheat the oven to 220°C/gas mark 8 and line a baking tray with non stick baking parchment. Start by infusing the saffron in the cold water (for the pastry) and setting it aside for 10 minutes. In the meanwhile measure out the flour, sugar and salt into a bowl, mix and set aside.
Mix together all of the filling ingredients and divide into 9 roughly equal amounts and set aside. Make the pastry by adding the water (including saffron bits) to the dry ingredients until it just forms a soft dough, using your hand to pull it together – you will likely not need all the water, though it depends on the brand of flour you use – some flours absorb water more than others. Roll the dough into a sausage, wrap in clingfilm and chill for 1 hour. The chilling makes it much easier to handle, you can miss it out if you wish, but it’s a sticky dough.
Divide the dough sausage into thirds, then cut each third into 3 equal pieces. You should have 9 pieces of dough all of the same size. Roll each piece into a ball, squash the dough to flatten it and then place a heaped teaspoon of the filling in the centre. Fold the dough edges into the centre to completely cover the filling and pinch together, then roll between your palms to ensure the fruit parcel is a sphere shape. Repeat until all the dough is used up. (If the dough is very hard for you to handle then oil your hands first).
Now strictly these should be deep fried but as I am making these for more modern tastes and calorie controlled diets I suggest you place them on your lined baking sheet, brush liberally with oil and bake for 25 minutes until lightly browned. You can of course deep fry them in oil if you feel medievally inclined.
The original recipe says to eat these warm but I prefer them cold with port and cheese.
I’m a mum of 3 boys, a cookbook writer and also a finalist on the 2011 Great British Bake Off.
I’ve decided to record the recipes I use, partly to save them somewhere and partly in case someone else might like to use them...
[Read more]
Just sign up to receive my latest blog posts straight to your inbox: Simply click here.
P.S. To sign up for my free monthly newsletter just click here. It has a baking SOS, recommendations on bits of kit I can’t live without, my kitchen catastrophe of the month, a sneak preview of a recipe coming up on this blog and a letter from me telling you what I’ve been up to.
Remember to check your inbox for a confirmation email and also to add my email recipesfromanormalmum@gmail.com to your contacts. Otherwise I could go to spam.


 Holly Bell