I own a lot of cookbooks. I’m talking over a hundred. Actually that’s a conservative estimate. That was at last count, months ago, before the last spree.
Here’s the thing -I rarely cook from them. I use them as some form of relaxation reading. They sit in stubby piles by my bed and in precarious tottering piles on the dining room table. I guess you could say I have a habit and it’s one I’m in no rush to quell.
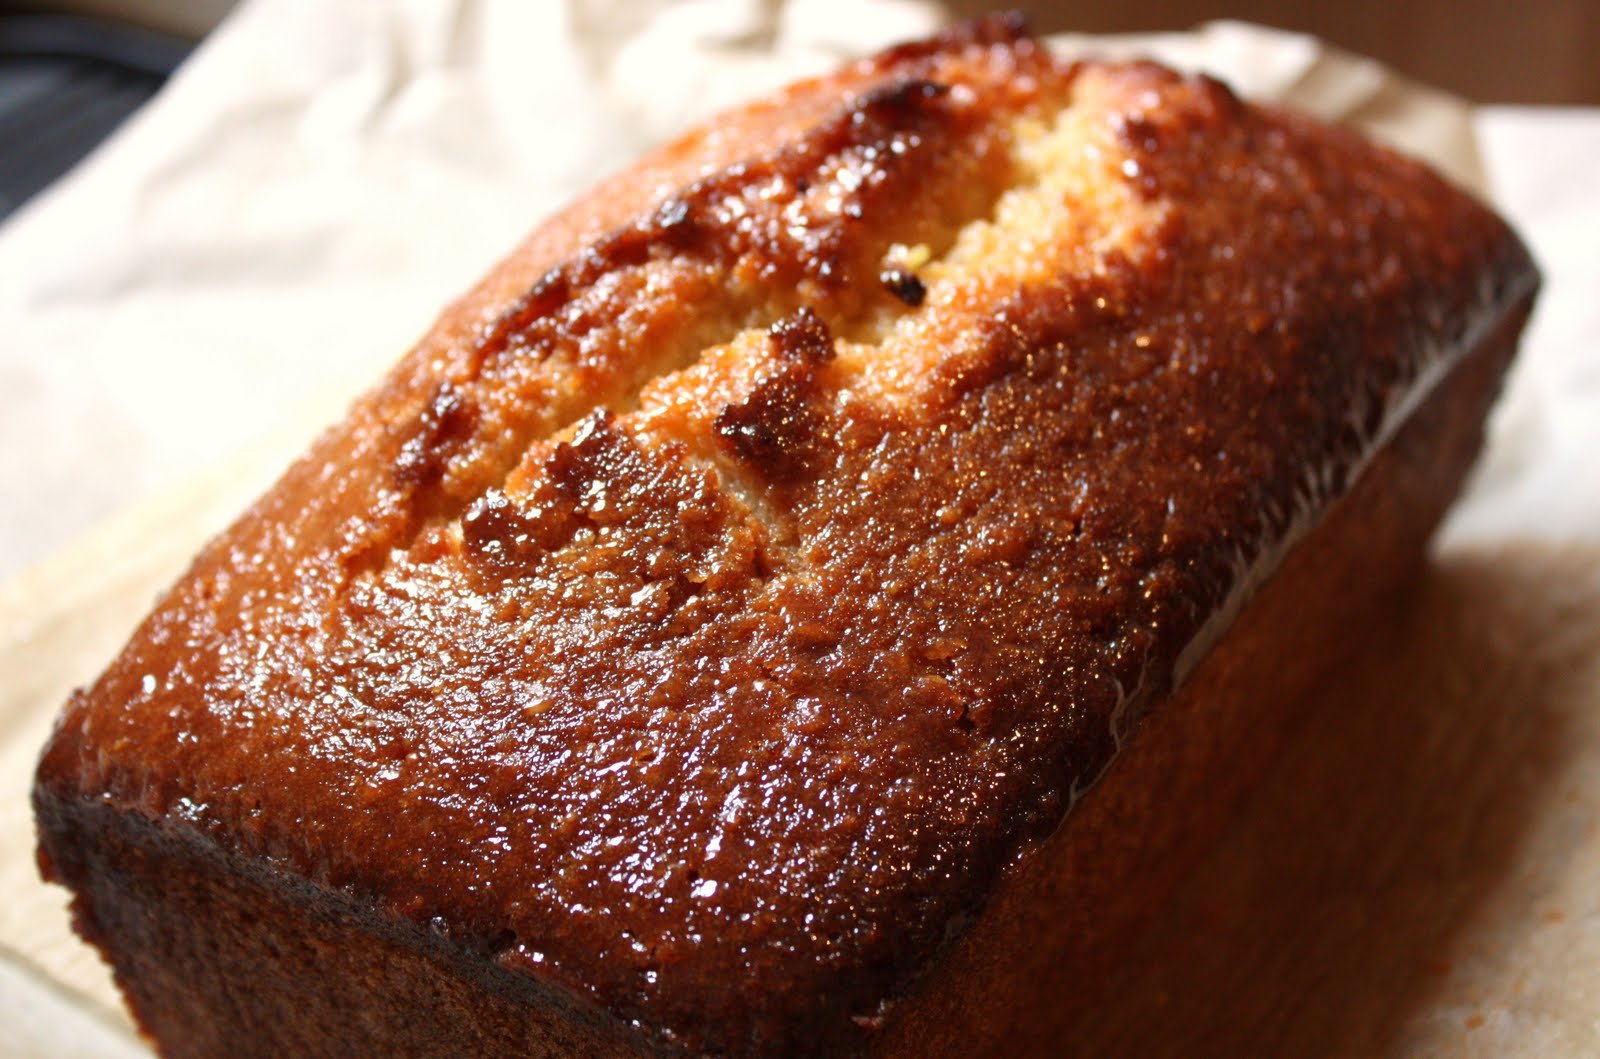
Here’s a rare recipe I have actually tried from a beautiful book. I can’t vouch for the recipes in the rest of the book as it’s all just food porn to me. I can vouch for the zingy cover, the typeface and the injection of Anglo-French lifestyle chatter.
From Breakfast, Lunch and Tea: The Many Little Meals of Rose Bakery
Ingredients:
250g soft, unsalted butter
200g caster sugar
4 large eggs
1 tsp vanilla extract
juice of 1 lemon
grated zest of 2 lemons
1 rounded tsp baking powder
1/2 tsp salt
50g ground almonds
280g plain flour
And for the glaze:
juice of 1 lemon and about 150g icing sugar
Preheat the oven to Gas 4 and line a loaf tin with greaseproof paper. Cream the butter and caster sugar in a large bowl until very light and creamy. I use a handheld electric mixer to do this. Add the eggs, one at a time, beating well after each addition. Then add the vanilla extract and do the same. Then the lemon juice and zest. If the mixture curdles, worry not. Just carry on regardless.
Mix the baking powder, flour, almonds and salt and then fold this into the buttery egg mixture. Pour into the tin and bake for, well the book says 35 ish minutes. Mine took longer until a skewer came out clean but I suspect my oven is crap. The buttons on it have melted. A classic sign of a crap oven.
Cool the cake in the tin on a wire rack. Once cool, remove from the tin, mix the glaze ingredients together and pour over the cake. It makes you feel most like a Brit living the Gallic dream if you let the glaze drip down the sides in a carefree fashion.
Get the monthly newsletter...
and subscribe to get all recipes straight to your inbox!
How many things scare you? Lots of things scare me.
I never used to be this way. I used to go cage diving with sharks and para gliding with odd men and holiday alone in far flung mosquito ridden places. I even drank my coffee with sugar and drove on an empty petrol light, such was my fearlessness.
Then I had children and the fear set in. Now I see danger everywhere. I wish I didn’t but I think it’s irreversible. The world seems like a much more dangerous place now I love this much.
Now bread has always scared me. Too many variables to get wrong. It never really behaved itself for me. Well, after extensive bread baking of late I think I’ve hit upon a recipe that works every single time. I want to share it with all you other fearful types out there. Enjoy, albeit in a safe manner.
Makes 1 large loaf or 2 small ones
Ingredients:
200g white spelt flour (I use Doves Farm)
300g strong white flour plus a handful for shaping
10g table salt
5g caster sugar
7g sachet of easy blend dried yeast
350mls water the temperature of a baby’s bath
Take a large bowl and measure all the ingredients into it. Mix with a metal spoon until it comes together into a sludgy mess. Leave for ten minutes. Have a cup of tea or a quick tidy up of the toy boxes.
Tip the sludgy mess out onto a clean work top. Remove your rings and any bracelets that might not benefit from being covered in dough. Then start to knead. Do it whichever way you want to. Kneading is personal. I push the centre down with one hand and use the heel of the other hand to push the dough to the 1pm position. Then I turn the dough 180 degrees and do it again. And so on and so forth. But do it any which way you choose. The dough should take about 10 minutes of kneading by hand to get to that elastic consistency that means the gluten has done its thing.
A word on the work surface. Some people use a little flour, some use oil. I use nothing other than a dough scraper. You can buy them on eBay for a couple of quid. Once the dough is at the right consistency it should start to pick up all the little bits it’s leaving behind resulting in an almost clean enough to eat your dinner off work surface, hence making oil/flour redundant for the first knead. But really, do what feels best. Beware adding too much flour though as it changes the ratios of the flour:water. You basically get a heavier, denser loaf if you add too much flour.
When the dough looks silky and feels elastic pop it back in the bowl (some people wash and oil their bowl but I just can’t be bothered most of the time) and cover completely with clingfilm. Make sure the clingfilm is tight and there are no holes. This helps the little yeasty beasts do their magic as the environment stays warmer. Leave on the side until the dough has doubled in size. Took about 40 minutes in my cold kitchen but beware spelt flour decreases the proving time so don’t bugger off and forget about it as you might have an escaping dough situation.
Flour your work surface with a handful of flour then tip the doubled in size dough onto it. Flour your hands and push down the dough to release air bubbles. Do not knead vigorously! There’s no need. (Ahem.) Just gently push down a few times and then start to shape your dough. For a long baton like the one in the picture I roll the dough into a rectangle and then start to push the long ends into the middle, as if closing a book. I do this a few times to create a backbone and then turn the baton over and place on a baking tray. Cover with clingfilm and leave to double.
Just as you notice the bread has doubled (another 30 ish minutes) turn the oven on to Gas 7 with a rack in the middle and one at the top. After 10 minutes (to allow for a little extra proving as most people do under prove in my humble opinion) slash the bread about half a centimetre deep with a sharp knife. Work quickly for the best slashes. Then place the bread on the baking tray on the top rack of the oven. Set the timer for 15 minutes.
After 15 minutes move the bread to the middle of the oven and then bake for another 20 minutes or so. (Depends on the size of your loaf/ves.) You will know the bread is done when it’s golden brown on top and sounds hollow when you knock the underneath with your hand. I often pop it back in without the tray (so direct onto the oven rack) for an extra five minutes just to ensure it’s really well done and crusty.
Leave to cool on a wire rack and enjoy with salty butter in a fearless I-don’t-care-about-my-blood-pressure fashion.
Get the monthly newsletter...
and subscribe to get all recipes straight to your inbox!
Here’s my theory on teenage boys and how to attract teenage girls. If they want girls to like them they need one of the following:
incredible good looks
the comedic value of Peter Kay/Michael McIntyre/the funny person of your persuasion
a super cool mother or sister
to be a great listener
These were the things that attracted me to boys at school, closely followed by mothers who could cook. I prolonged a relationship with one boy just to enjoy the smell of his mothers garlic infused roast chicken. It helped that she also fed us warm low alcohol lager too.
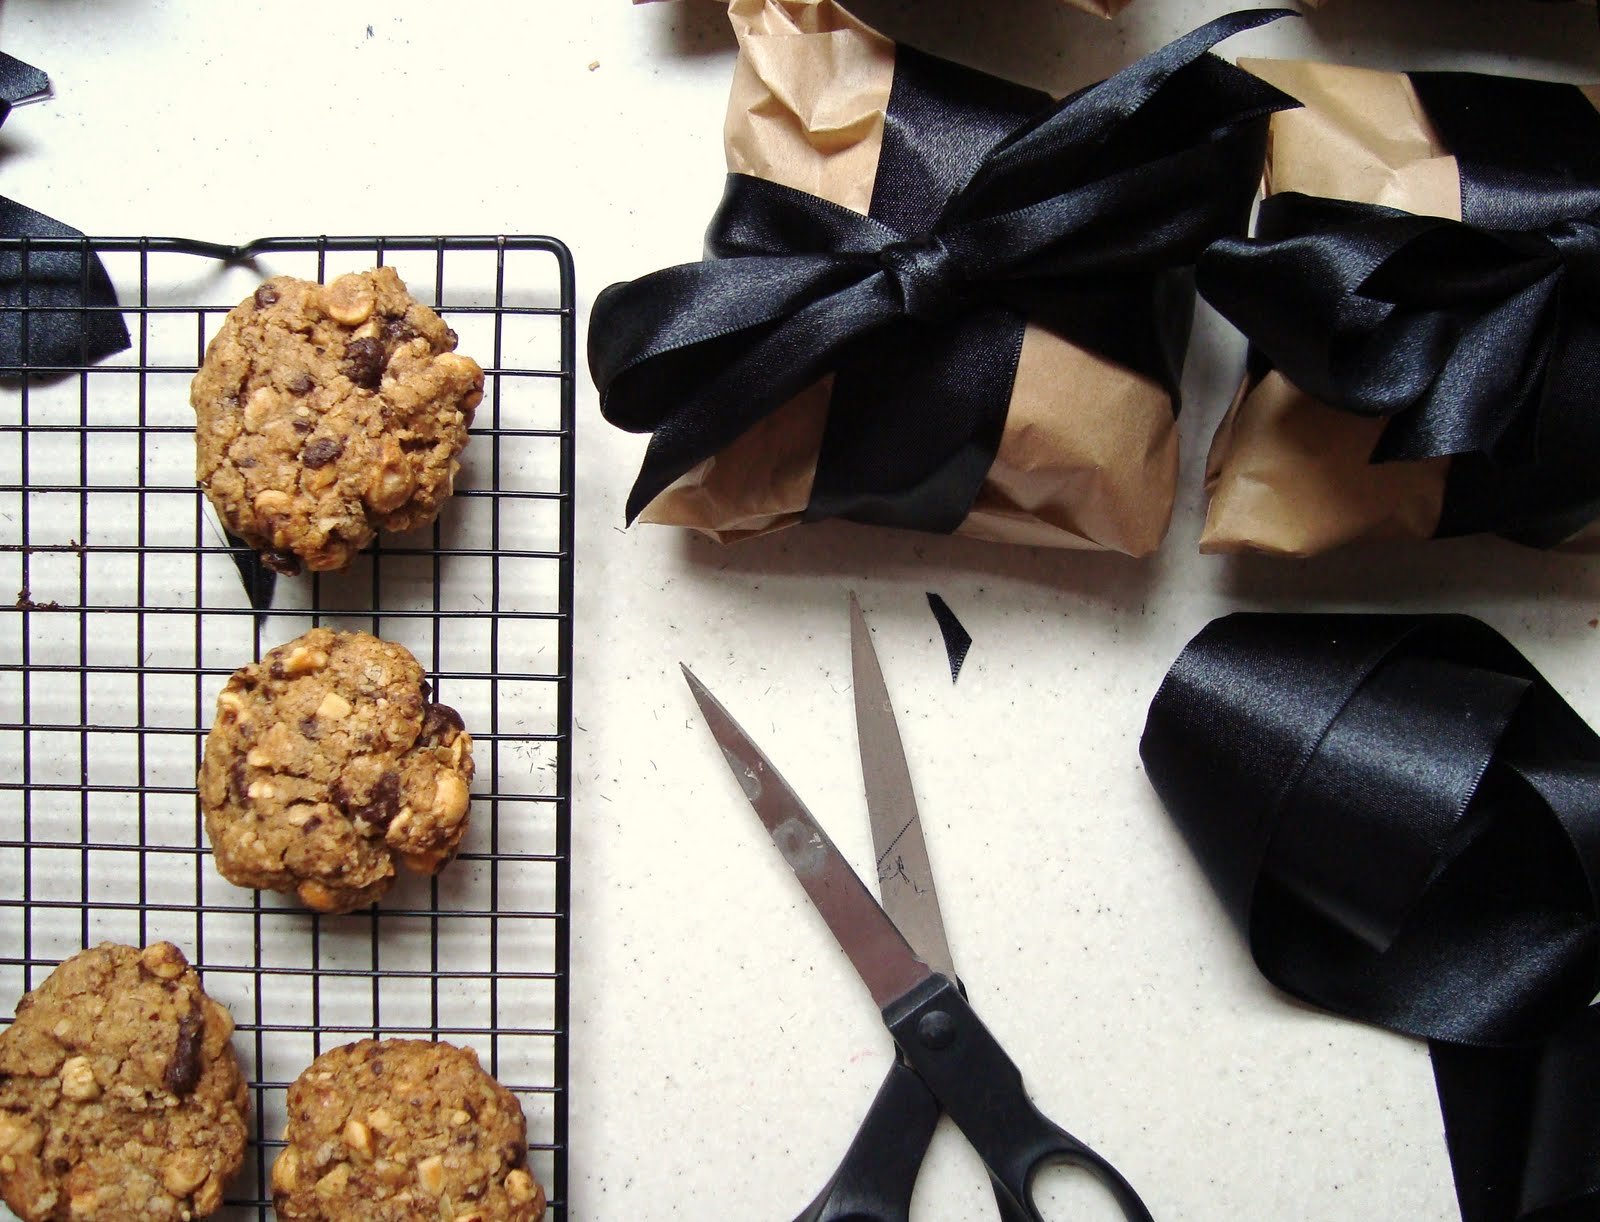
Obviously when your son is only 2 and a half you just don’t know which of the above list he might possess. One thing’s for sure, he’ll never have a super cool mother. My first car was a white Fiat Panda called Henry for goodness sake. If that doesn’t say Not Very Cool, I don’t know what does. What I can hopefully help him out with is biscuits and roast dinners and other nice smelling things to entice girls with. These biscuits were conjured as a gift for his playschool teachers. I was going to give them each a bottle of wine but that seemed wrong somehow.
Made about 37 but it really depends on the size of the dough balls
Ingredients:
250g salted butter
150g soft dark brown sugar
150g self raising flour
230g porridge oats
200g cheap dark chocolate
100g skinned, blanched hazelnuts
These are easy and very satisfying to make. Preheat the oven to Gas 4 and make sure the racks are in the middle of the oven. Then find some baking sheets. I used four I think. Prep the chocolate and hazelnuts. I chop both by whizzing the nuts in a food processor in 10 second blasts and then adding the chocolate in pieces and whizzing again. Totally up to you how fine or course you like your biscuit adornments. I like mine in about half centimetre pieces in case you’re interested.
Take the butter and soften it in the microwave in 10 second blasts on defrost until it’s soft and almost starting to melt. Then put in a large bowl and add the sugar. Use an electric hand mixer to cream until it’s smooth looking – takes about 4 minutes starting on low and finishing on high. I like to mix the butter and sugar together for about 30 seconds first with the mixer not even switched on, but that’s me. Just to stop the mixture flying out the bowl when you do switch it on.
Once mixed add the flour and oats and use your hands to combine. Then add your nuts and chocolate and again use your hands to ensure all the dough has an equalish amount of the good stuff. Then take pieces about the size of a plum and form into a ball using your hands. Place on the baking tray and squash down a little until your ball is about 1cm high. Continue until the dough is all used up and remember to space the biscuits about a biscuits width apart.
Bake in the middle of the oven, one tray at a time (so get a production line going) for around 20 minutes until the edges are starting to go a little golden but the middles will still look uncooked and soft and puffy. This is how you want them. Leave to harden on the tray and when you’re happy they won’t fall apart – about 20 minutes later, transfer to a wire rack to cool. Beware the loss of molten chocolate as you move them.
These are moreish. I can eat 6 in one sitting. Keep for a few days though if you’re less of a pig than me.
Get the monthly newsletter...
and subscribe to get all recipes straight to your inbox!
My friend Paul is special to me for a few reasons. He introduced me to torta dolcelatte cheese and red wine – from a recreational point of view I have never looked back. He introduced me to the Rolling Stones and as such, on a musical level I have never looked back. He introduced me to my husband and what can I say? I owe him one.
Paul is a bit of an American-o-phile. Now I know that’s not a word, but you get what I mean. He loves San Francisco in particular. I think it suits his teachery, coffee drinking, sitting in a cafe, reading books and listening to cool new music ways. So I thought I’d make him some cupcakes to celebrate him moving into a lovely new home and also to celebrate that it’s almost the 4th of July. American cupcakes for my friend Paul and his lady. Enjoy dudes! (The dude bit was my nod to American culture though I may have failed miserably and offended a nation.)
Ingredients:
115g Stork margarine
115g caster sugar
115g self raising flour
2 large eggs
5mls vanilla extract
50g red white and blue sprinkles (or just a dot of blue and red food colouring)
And for the icing:
175g soft soft butter
350g icing sugar
5mls vanilla extract
50g red, white and blue spinkles
50g white chocolate mini stars
Oh you know the drill. I tend to make throw it all together cakes so, quite simply, do that. Preheat the oven to Gas 5, make sure two of the racks are placed towards the middle of the oven and line two cake tins with paper cases to total 14 – I leave the sides of my tins without cakes as that’s where my oven hot spots are. Oh and you could use the big muffin cases but I didn’t; I wanted something a little more dainty to counteract the stark primary colours.
Next take the Stork, sugar, flour, eggs and extract and beat for about 4 minutes with a handheld mixer until the mixture has gone a little lighter in colour and looks fluffier than when you started. Then spoon 1 teaspoon into each of the cases, add a few of the sprinkles or dots of food colouring, then top with another teaspoon of cake mixture. Use your finger to swirl the top until it’s flattish and bake in the oven for about 20 minutes or until the tops are golden and the peaks bounce back a little when pressed. Bigger cases = longer cooking, for obvious reasons.
In the meantime make the buttercream icing. I use my trusty Kenwood as it has a shield that stops that annoying spray of icing sugar that so often adorns my kitchen (and me) in a snowy fashion after I use the handheld mixer. Now I leave my butter out overnight to get that softer than soft texture but if you give it short blasts in the microwave that has the same effect. Just don’t be an impatient fool like me, blast it at full power and end up with liquid butter. Not good.
Okay – the buttercream. Put the butter, icing sugar and extract into the mixer and beat until it’s light and fluffy. Scrape down the sides if escaping butter has managed to creep upwards. Then spoon into a piping bag with a star nozzle ready for icing. When the cakes are ready, remove them carefully from the tins and let cool in the paper cases on a wire rack. Once completely cool the best and most satisfying bit begins – the decoration.
Now piping swirly icing is easy peasy but looks impressive so for anyone who has the equipment but hasn’t had a go yet, do it. Twist the top of the icing bag and place one hand at this end, to squeeze as you go. Then use your other hand to hold the icing bag at the bottom gently and just start from the outside of each cake, piping slowly and keeping the icing bag upright. Always pipe slightly more over the edge of the case than you think you need to. I don’t know why but I tend to pipe naturally towards the centre and I’ve heard others say the same. Then as you work towards the centre push a little more buttercream out than usual and press the nozzle down slightly to get a star point in the middle. To finish add sprinkles and stars and make sure you wear your cheer leading outfit to serve. Or at the very least your majorette one.
NB: If this icing description isn’t as clear as mud either watch a youtube clip or adorn your cupcakes with dollops of icing and smooth with a knife. It all tastes the same after all.
Get the monthly newsletter...
and subscribe to get all recipes straight to your inbox!
I reject the idea that certain foods are fit for certain times of year. I know some folks give up on stews, curries and roasts just because it’s hot. Well I love a curry when the weather is good, but that’s just me. The more heat the better, whether from the sun or little red chillis. And a cup of steaming hot tea on the beach? Bliss. Though it does out me as British quicker than my 5 Minutes In The Sun Lobster Skin.
So gingerbread men are traditionally made at Christmas time. Well not in this house. In case you’re bored of your regular recipe then try this one. It’s fiery, but not so much it puts the kids off. More’s the shame.
This recipe makes a biscuit tin full.
Ingredients:
150g butter
100g dark soft brown sugar
45g golden syrup
360g plain white flour
5g bicarbonate of soda
1 tsp ground ginger
5g ground cinnamon
a pinch of very finely ground black pepper
water
50g icing sugar or a white icing tube thingy
sweeties and silver balls to decorate
Oh so easy. I like to weigh my ingredients in the pan to save on washing up. So pan onto the scales, adjust to zero then add the butter, sugar and golden syrup and put on a medium heat until dissolved. Don’t boil the hell out of it! It will mean some of the liquid evaporates and you’ll have a much less easy to roll dough. And of course the dough will also be super hot and scald little hands that might want to help. At this point pop the oven onto Gas 6 and locate a couple of baking trays.
Once the mixture is molten add the flour, bicarb, ginger, cinnamon and black pepper. Then mix with a wooden spoon until the mixture is all combined and has formed a blob of dough. Now when I made this in the humid summer it formed a dough easily and was a dream to roll out. I and some blog pals have made it in winter and it crumbles. So… if it’s crumbly please add warm water until you have a pliable dough that doesn’t crack when you flatten and roll it. It will still get little lines in it as you roll though. It’s that kind of dough.
Roll out onto a smooth work surface. I don’t use flour on the work surface or the rolling pin but do a quick roll of a small blob to check your work surface is similarly non stick. Then cut away! I roll my dough to about the thickness of a pound coin but it’s really all about how thick you like your men (!)
Move your little men, or whatever other shape you fancied making, onto baking sheets – I don’t use greaseproof paper to line the trays but if you’re nervous about your trays then it’ll do no harm. Bake for 10 – 15 minutes depending on your oven, until browning at the edges. Leave to cool on the tray for a few minutes and then move to a wire rack. When cool make your icing up. Put a tablespoon of boiling water into a bowl and add the icing sugar until you get a thick consistency. Then either pipe onto the men, or spoon on, or use one of those marvellous little white icing tube pens you get from the supermarket. Add sweets of your choice.
Try to let the icing set before you eat them as picking it off is deeply satisfying.
Get the monthly newsletter...
and subscribe to get all recipes straight to your inbox!
This is not a recreation of a chicken dish one might buy from the takeaway. This is in fact chicken that is made using leftover takeaway. Blergh I hear you sound. Not bleurgh. And not a health hazard. All will become clear.
I have an aversion to throwing ANYTHING away. I mean anything. Things I do to avoid waste:
whizz fruit up with natural yogurt that’s about to go off and freeze it
store the rinds of parmasean in the freezer to add to rissottos at a later date
make parnsip chutney with my father in law’s annual glut
stock the freezer with ready peeled and cut parsnip chips
freeze the ends of stale bread no-one will eat and later whizz into breadcrumbs
freeze egg whites to make into macarons/meringues
freeze excess crumble topping for a later date
freeze double cream dregs into ice cube trays for stirring into soup
make a lot of soup
turn any evening meal into a lunch box by adding cous cous and lemon juice
the list goes on. I will stop now. It’s boring and repetitive on the freezer theme.
Anyway, make this when you have zero time and want masses of taste. It’s zingy and fiery and could possibly ward off colds.
Ingredients:
1 whole chicken with murderous slashes across its whole body
1 tbsp dried chilli seeds and bits (not powder)
1 tbsp soy sauce
1 jar of mango chutney (or rather 4 small pots as delivered by our local takeaway and saved by me)
1 knob of ginger, chopped finely
4 cloves of garlic, crushed
2 onions, peeled, chopped in half and then sliced but still left in their halves
A good handful of basmati rice or however much you trough through
Preheat the oven to Gas 5/190C and take a lidded casserole dish big enough to easily fit your chicken into. Pop the onions onto the bottom of the casserole dish and place the chicken breast side down on the top. They act as a kind of rack for at least some of the cooking. Then mix the other ingredients (except the rice) together in a bowl and pour over the chicken. You could massage with your hands but I decided against this move for fear of chilli hands. Put the lid on the casserole dish and place in the oven for about 90 minutes. Give the chicken a prod and a stir every 30 minutes to make sure the mango marinade works its magic.
Once the juices are running clear turn the heat down to keep warm level and then put the basmati rice on to boil. Once it’s done, drain and put back into the saucepan. Then add a load of the oniony-mangoey-chilli mixture from the casserole dish, put a tea towel over the saucepan, then the lid and leave for 7 minutes. Take the lid off, fork through the rice gently and serve with the chicken. If you have fresh coriander then chop and scatter to add some healthy green colour.
Get the monthly newsletter...
and subscribe to get all recipes straight to your inbox!
It is my humble opinion that certain cakes are not manly. Dear Mr B has often taste tested a cupcake or two for me but I don’t like to watch. It’s not right to see the father of my children eat cupcakes adorned with swirly icing and glitter. It’s just not what I want from him. Call me old fashioned.
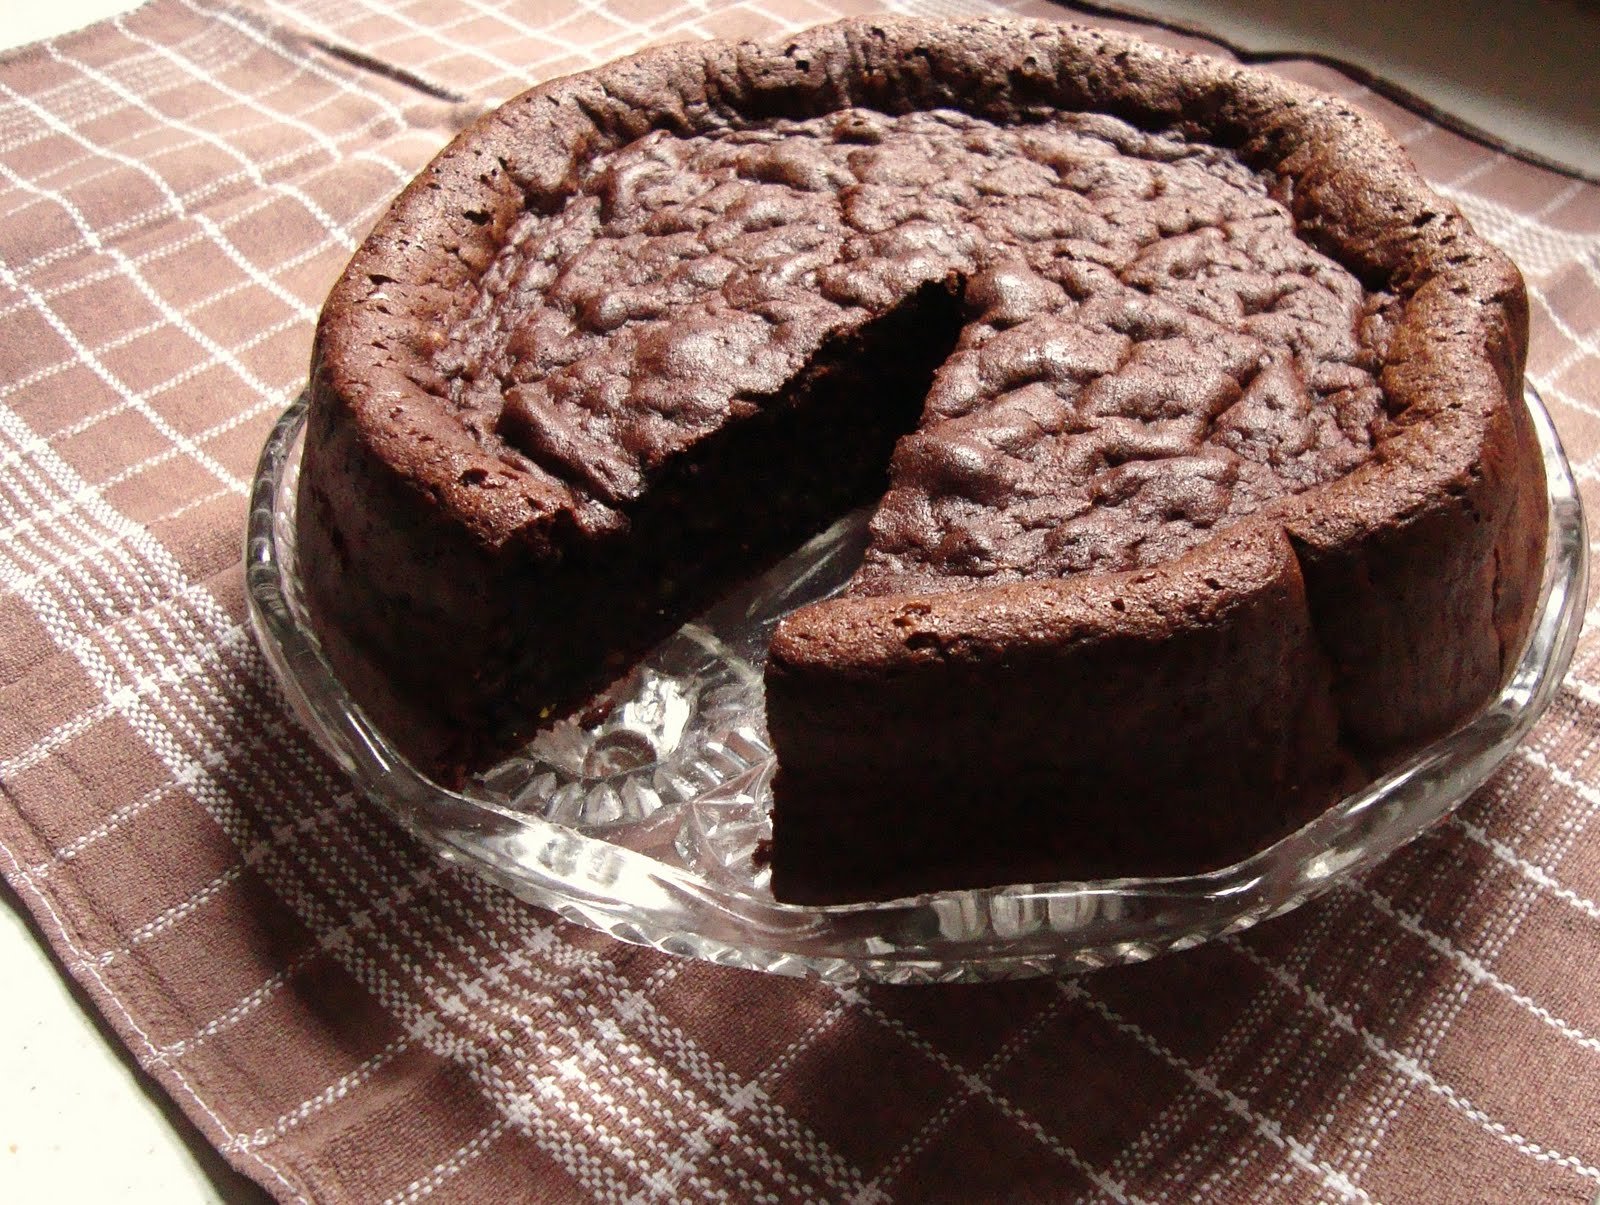
It’s Father’s Day this weekend so I think it only fitting that I make him a little something that’s both sweet and indicative of my appreciation of his wonderful fathering, but also manly and not in the least likely to induce a snigger from his mates. This is the beast.
NB: It’s also flour free, keeps for a good few days and according to Mr B is best eaten with cream or homemade (yes, he is that fussy) ice-cream. But if you can’t be arsed to bake a cake for Father’s Day then entice your man to bake instead by buying him My Daddy Cooks – an excellent recipe book if ever I saw one.
Ingredients:
65g cocoa powder
120ml boiling water with 30g of instant coffee added
225g unsalted butter, very soft
230g caster sugar
6 large eggs, separated
a dot of salt
170g finely ground pistachios (I buy the pre shelled ones from Asda and pulse in the food processor – careful not to pulse for too long and make pistachio butter though.)
Preheat the oven to Gas 4. Grease and line a 23 cm springform tin. Whizz up your pistchios if they’re not already ground.
Take a bowl and pour the coffee into it then add the cocoa and mix until completely smooth – it will be quite thick. Leave the mocha mixture on the side to cool.
Take a bowl and using a handheld mixer/freestanding mixer cream the butter with 195g of the caster sugar until it’s lighter than when you started and fluffy looking. Beat in the egg yolks in little dribbles and make sure you scrape the sides to incorporate the lot. Beat in the mocha mixture followed by the ground pistachios until the mixture looks creamy and smooth and like a slightly knobbly looking chocolate mousse.
Place the whites in a very clean bowl, (you can wipe with lemon juice if you’re uncertain how good your washer upper is) with the dot of salt. Beat the egg whites using the very very clean handheld electric mixer/freestanding mixer you have just washed and beat until you have soft peaks. Then add the remaining 30g caster sugar and beat until you have stiff meringue that sits in peaks.
Take a spatula and mix in two large tablespoons of meringue to the chocolate moussey mixture to loosen it, then fold the rest of the mixture in a third at a time. Pop into the tin and smooth the top with the back of a metal spoon. Bake in the oven for about an hour. It’s ready when the centre has puffed up and a skewer comes out clean. (If you notice the cake browning too much, too early, feel free to fashion a hat for your cake out of foil but please don’t open the oven door until at least 40 minutes has passed.)
Let the cake cool in the tin for about 5 minutes on a wire rack, then unlock the springform thingy and let cool completely. It will sink. It’s supposed to. Fret not. It should have a ridge around the outside and be lower in the middle. Texture is kind of mousse like and close and fudgey. It’s manly, see.
Serve in wedges with strong black manly coffee. Try not to add glitter and pink icing if you can at all help it. Green icing is just about acceptable if you sling it on top of the cake in a Jackson Pollock style manly fashion.
Get the monthly newsletter...
and subscribe to get all recipes straight to your inbox!
My friend gave birth to a boy recently. He’s cute as the cutest newborn you ever did see. Everytime I visit I make a mental note to discuss with Mr B when baby number 3 should make their appearance. Then I remember all the reasons not to grace our house with another small wailing person:
Loss of sleep
More stretch marks
Possible future incontinence on my part
(More) guilt over incompetence at breast feeding
Alcoholism on Mr Bs part
More plastic crap strewn across the house
Wearing snot/vomit as a shoulder adornment for another few years
Continuing to think Hush Puppies are acceptable foot attire for evening drinks with glamorous friends (with each child my shoe choices have grown comfier)
Even with this damning list I can’t help but think it might be fun too. Or is that just a vicious lie parents of 3+ children tell you in the hope you’ll join their sleep deprived club?
What tenuous link does all this have to a bakewell tart with a vanilla crust? None at all. I could say this feeds a very large family but that would be weak. It does however make enough pastry for two tarts as I really don’t see the point of making pastry if your efforts don’t furnish the freezer for a rainy day. This tart feeds 8 if you serve with ice cream. Or a regular, boring sized family of 4 with leftovers for lunch boxes.
Don’t be put off by the in depth instructions. I just think it’s often the seemingly simplest things that are easiest to mess up so thought verbose was better than scant.
Makes 1 x 20ish cm tart and enough pastry for making another tart on a rainy day. Just wrap well and freeze.
Ingredients:
For the pastry:
500g plain flour
100g icing sugar
250g cold butter cut into cubes
1 vanilla pod
2 large eggs
For the frangipane topping:
150g soft butter
150g caster sugar
150g ground almonds
3 eggs + 1 egg yolk
1 jar of jam (I used gooseberry and strawberry made by Mr B but you really can use anything. This isn’t about authenticity. Apricot is nice for instance.)
A handful of flaked untoasted almonds
Icing sugar – about 200g
The juice of one fresh lemon
First make the pastry. Whizz the flour and icing sugar in a food processor (this is my method of sieving) then add the cubes of cold butter and pulse until you have a fine breadcrumb appearance. I always open up the top of the food processor and have a dig about with a knife to make sure there are no lumps of fat hiding near the blade. Then tip the lot into a large bowl and add both eggs and the seeds scraped from a vanilla pod. (I know you know this but I feel the need to write it just in case… don’t throw the vanilla pod away, pop it into your sugar pot and you’ll have fragrant tea forever.) No need to whisk the eggs first.
Take a normal table knife and use to stir the pastry mix. Then use your hand to pull the mixture together. Don’t add water or milk or anything. As long as you’ve used large eggs there’s enough liquid to pull the pastry together. Don’t overwork the pastry – by this I mean don’t madly knead the pastry – just pull it together with your hands until you have a yellow mass, all the same colour and with no bits of flour etc hanging about.) Put the pastry into a plastic bag, wrap tightly and then put in the fridge for a minimum of 30 minutes – but I often leave it overnight. Lazy old pastry liking a rest and all that.
When you’re ready to bake the bakewell, roll out the pastry onto a floured work surface (this pastry is pretty well behaved and only needs a little flour for rolling) – I would roll to about 3mm thick as I like a good crust but roll as thick as you like. I can’t bear pastry thickness snobbery. Take your 20ish cm tart tin and line with pastry. Trim the edges with a knife or, even easier, a pair of scissors. Push the pastry into all the nooks and crannies before you do this to make sure you get an even finish. Pop the tins in the freezer for 15 minutes, preheat the oven to Gas 4 and make the frangipane whilst you’re waiting.
Take the soft butter and sugar and cream using a handheld electric mixer/a wooden spoon/a freestanding mixer until lighter in colour than when you started and fluffy. Then take your eggs (and extra yolk) and whisk with a fork – then dribble into the creamed mixture a teaspoon at a time and beat after each addition. I use a freestanding mixer to make my frangipane as it’s so so much easier. Once all the egg has been incorporated then turn the mixer off and add the ground almonds. Then mix the lot with a metal spoon. You don’t need to be gentle but don’t beat the hell out of it either.
Take the pastry out of the freezer and spread jam on the bottom of the pastry – about 5mm thick. Then spoon the frangipane over the top being sure to cover all the jam. Don’t put frangipane all the way to the top of the pastry sides or it’ll spill out of the top and your tart will look slovenly. This does not affect the taste in any way of course so no matter if it does spill.
Pop in the oven on the middle shelf and bake for 20 minutes, then remove from the oven and scatter some flaked almonds over the top. Pop back in the oven for another 20 ish minutes. You’re looking for a golden brown top and pastry that’s neither yellow looking nor dark brown. Watch it like a hawk for the last ten minutes. Remove from the oven and cool on a wire rack. If you want you can decorate with drizzles of glace icing once it’s cool. So much nicer made with fresh lemon juice… Just take the juice and add icing sugar until you have a good, thick consistency. A freezer bag is perfect for drizzling icing without getting an icing bag out. Put the icing into one, squeeze into the corner and then snip a tiny bit of said corner off and away you go. Just make sure you snip near the tart to avoid decorating your work top.
Get the monthly newsletter...
and subscribe to get all recipes straight to your inbox!
Have you ever been disappointed? There’s a list that swims around in my head of things that just should have been better. Here’s a few:
A la carte kitchens. Or rather the ad for this children’s toy manna from the ’80s. I was fully prepared to use a naked flame and serve warm beans on toast to my parents in bed. What did I get? Plastic beans. Plastic toast. No flame.
Leaving school. I couldn’t wait to get away from the blue kilt, strict teachers and PE knickers. Suddenly without anything to rebel against rebellion was futile. And rebellion is of course nothing but fun.
Labour and my rubbish pain threshold. Pre labour: “I want to feel the pain and give birth naturally.” Post birth: speechless. And that was with an epidural.
McDonalds milkshake. I nagged and nagged. I was 8. They gave in. Imagine my shock and horror when I needed a spoon to eat a banana milkshake. It wasn’t meant to be that way. Not in my head.
So I’m over some of these things. Okay, I’m only over the last one. And that’s ’cause I’ve found a way to encapsulate my idea of the perfect banana milkshake flavour in biscuit form. Yum. Makes 12 ish.
Ingredients:
For the biscuits:
117g unsalted butter, very soft
27g icing sugar
100g plain flour
17g custard powder
For the filling:
100g icing sugar
50g butter
15g custard powder
15g banana Nesquick powder
The butter has has has to be very soft. I leave mine out overnight. If you don’t, you can’t pipe these little beauties.
Preheat the oven to Gas 4. Use an electric hand mixer to cream the butter until it turns lighter in colour, then add the icing sugar and beat again. Then add the flour and custard powder and carefully combine with the mixer. Might be worth mixing with a wooden spoon first to make sure you don’t splay flour and custard powder everywhere.
Next take a large star tip and a piping bag and pop the biscuit gloop into it. Then pipe stars straight onto a baking tray (The high butter content means you don’t need to line unless you enjoy lining trays that is) about 1 inch across and about 1.5 inches apart. You need to pipe 24 to make 12 biscuits but just pipe as many as you can. If you don’t have a piping bag then just use teaspoons to pop blobs of the mixture onto the tray. They won’t look as pretty but frankly this is about recreating banana milkshake/custard flavours, not a beauty contest.
Put into the oven on the middle/top shelf and watch like a hawk. These turn from uncooked to dark brown in the blink of an eye. Usually 10 mins from start to finish to cook but watch towards the end. Once cooked remove from the oven and place tray on a rack. Don’t poke, lift or prod the biscuits until they are completely cool. They are fragile little things.
Make the filling – just cream all the ingredients together. Once the biscuits are dry, pair them into equal sizes and then either pipe the filling onto one half of each biscuit or spoon on. Then gently press the biscuits together and leave to set. Eat with milk like it’s 1988.
(Oh and if you fancy a strawberry milkshake flavour then strawberry Nesquick does a wonderful job…)
Get the monthly newsletter...
and subscribe to get all recipes straight to your inbox!
I’m a mum of 3 boys, a cookbook writer and also a finalist on the 2011 Great British Bake Off.
I’ve decided to record the recipes I use, partly to save them somewhere and partly in case someone else might like to use them...
[Read more]
Just sign up to receive my latest blog posts straight to your inbox: Simply click here.
P.S. To sign up for my free monthly newsletter just click here. It has a baking SOS, recommendations on bits of kit I can’t live without, my kitchen catastrophe of the month, a sneak preview of a recipe coming up on this blog and a letter from me telling you what I’ve been up to.
Remember to check your inbox for a confirmation email and also to add my email recipesfromanormalmum@gmail.com to your contacts. Otherwise I could go to spam.


 Holly Bell