I was a late developer on a few fronts. I didn’t kiss a boy until about a year after all my friends. I was terrified of kissing boys. It didn’t matter how many times I practised on my hand or on my Jason Donavon poster, I still didn’t feel properly prepared.
I also believed in the Tooth Fairy (note the capitals please; it’s a mark of respect) until 1988. Which is late compared to my more savvy classmates. As for Father Christmas, well, I think I was 9 when the dreadful news was delivered by my twin buddies. They had an older brother who knew about these things. It was a sad day.
When will I stop being a late developer? I think it’s a perpetual state. As soon as I catch up on one front, another area lets me down. For example, recently I stayed in a hotel with Mr B and found myself, on the morning of check out, stuffing the free biscuits and soap into our suitcase. I actually hid them under some clothes in case I might fall as I left the hotel and expose my booty. We don’t need free biscuits. We especially don’t need free soap as we already have a huge basket of hotel soaps at home. I think I’m stuck in my student years where I used to rejoice in freebies.
This tart is an alternative Christmassy pudding you could serve to guests hot or cold. It’s very filling according to Mr B so he suggests you slice it very thinly. This tart is also a fine alternative offering to Father Christmas if you feel he might be a bit, well, bored of mince pies this year.
This is an enhanced and slightly messed about with version of my regular Bakewell. And I know it’s not really a Bakewell, you can call it a frangipane tart instead if the inproper use of Bakewell offends.
Makes 1 x 20ish cm tart with maybe some pastry scraps to bake separately and munch on.
For the pastry:
250g plain flour
50g icing sugar
125g cold butter cut into cubes
1 large egg
For the frangipane topping:
150g soft butter
150g caster sugar
150g ground almonds
3 eggs + 1 egg yolk
320g mince meat, that’s just shy of a regular jar – add the rest to ice-cream
Icing sugar – about 200g
The juice of one fresh lemon
The zest of one tangerine
First make the pastry. Whizz the flour and icing sugar in a food processor (this is my method of sieving) then add the cubes of cold butter and pulse until you have a fine breadcrumb appearance. I always open up the top of the food processor and have a dig about with a knife to make sure there are no lumps of fat hiding near the blade. Then tip the lot into a large bowl and the egg. No need to whisk the egg first.
Take a normal table knife and use to stir the pastry mix until it forms large blobby crumbs. Then use your hand to pull the mixture together. Don’t add water or milk or anything. As long as you’ve used a large egg there’s enough liquid to pull the pastry together. Don’t overwork the pastry – by this I mean don’t madly knead the pastry – just pull it together with your hands until you have a yellow mass, all the same colour and with no bits of flour etc hanging about.) Put the pastry into a plastic bag, wrap tightly and then put in the fridge for a minimum of 30 minutes – but I often leave it overnight. Lazy old pastry liking a rest and all that.
When you’re ready to bake the tart, roll the pastry out onto a floured work surface (this pastry is pretty well behaved and only needs a little flour for rolling) – I would roll to about 3mm thick as I like a good crust but roll as thick as you like. I can’t bear pastry thickness snobbery. Take your 20ish cm tart tin (mine is loose bottomed for easy removal later) and slip it under the pastry by pulling the pastry up from the work surface. (Of course feel free to transfer the pastry to your tin whichever way you prefer but this is mine.) Push the pastry into the edges of the tin and into the sides then run a rolling pin over the top of the tin. A very quick and easy way to trim the pastry. Pop the tin into the freezer for 15 minutes, preheat the oven to Gas 4, with one shelf in the middle of the oven and make the frangipane whilst you’re waiting.
Take the soft butter and sugar and cream together using a handheld electric mixer/a wooden spoon/a freestanding mixer until lighter in colour than when you started and fluffy. Then take your eggs (and extra yolk) and whisk with a fork – then dribble into the creamed mixture a teaspoon at a time and beat after each addition. I use a freestanding mixer to make my frangipane as it’s so so much easier. Once all the egg has been incorporated then turn the mixer off and add the ground almonds. Then mix the lot with a metal spoon. You don’t need to be gentle but don’t beat the hell out of it either.
Take the pastry out of the freezer and spread a layer of mincemeat on the bottom of the pastry – about 5mm thick. Mine was hard to spread so I gave it a quick blast in the microwave to loosen it a little. Then spoon the frangipane over the top being sure to cover the mincemeat and reach the sides of the tart. If you are using a smaller tart tin you ‘ll find you have too much frangipane – don’t fill the tart all the way to the top of the pastry sides or it’ll spill out over the top during baking. This does not affect the taste in any way of course.
Pop in the oven on the middle shelf (not on a baking sheet please) and bake for 40ish minutes. You’re looking for a golden brown top and pastry that’s neither yellow looking nor dark brown. Watch it like a hawk for the last ten minutes. Remove from the oven and cool on a wire rack.
To decorate, just take the lemon juice and add icing sugar until you have a good, thick consistency then grate tangerine zest into it. Stir well and ice your tart when it’s completely cool. (If you are impatient like me and ice when still warm be sure to put straight in the freezer or all the icing will run off the sides.)
A freezer bag is perfect for drizzling icing without getting an icing bag out. Place the bag over a pint glass with one corner pointing down, spoon the icing into it, squeeze into the corner, remove from glass and then snip a tiny bit of said corner off and away you go. Just make sure you snip near the tart to avoid decorating your work top.
I added white chocolate stars to my Bakewell too, because I thought Father Christmas would appreciate this extra festive gesture.
Get the monthly newsletter...
and subscribe to get all recipes straight to your inbox!
Recently I took my sons shopping. Now I’m not a great clothes shopper. I don’t enjoy it as a pastime. I want to, but I get bored and start dreaming of little coffee shops where you get free melty biscuits with your hot chocolate. I just can’t keep my mind on the shopping-job.
My lovely sons accompanied me to the changing room. Eldest son was looking pensive, which is not unusual for him. He squinted a bit and announced, ‘you look lovely Mummy’ which of course made me swoon and bask in motherly love. He then slightly ruined his compliment. He took it further with, ‘you look like an animal’ and then when quizzed as to which one: ‘a cow.’
I wasn’t wearing black and white. I wasn’t wearing anything furry. He was just trying to add more when really he should have stopped at the first compliment. Unfortunately in his world looking like an animal is something to aspire to. Looking like a cow is, well, almost God like.
The moral of all this – know when to quit. Often less is indeed more. Like with this pudding. Sometimes you really can just leave it at a mousse for pudding. Don’t try and do anything else with it. Just serve it with some coffee and wait for the non cow related compliments.
This serves four but it all depends on the size of your glasses/cups. As always with raw eggs don’t give to kiddies, pregnant people or Great Aunt Hilda.
Ingredients:
200g good quality white chocolate cut into small pieces
1 sheet leaf gelatine
300mls double cream
2 egg whites
170 raspberries, setting aside 4 for the top of the mousses.
A smear of Nutella for each mousse
Okay, this really is easy but you do need to make it about an hour before you need it. So maybe make as you’re cooking your main course. Or make at breakfast and leave in the fridge for later. You won’t regret it. Apologies about the washing up though. This does use a fair few bowls.
Bowl one: Put the gelatine into a bowl of cold water and leave to soften. Make sure it’s entirely covered.
Bowl two: Break the white chocolate into pieces and put in a glass bowl. Melt in the microwave for 1 minute. Stir, then if it’s not entirely melted pop back in the microwave in 10 second bursts. When it’s all melty and smooth, set aside to cool slightly.
Bowl three: Whisk the egg whites using a handheld electric mixer/freestanding mixer/a hand whisk. Once you have firm peaks set aside.
Bowl four: Okay, not a bowl but instead a saucepan. Take a small saucepan and pop 6 tbsp of the double cream into it, you’re looking to make sure you cover the bottom of the pan. Warm gently until hot but not boiling, then take off the heat. Squeeze the water from the gelatine and then stir it into the cream until completely smooth. Set aside in fridge to cool.
Bowl five: Place the rest of the double cream into a bowl and whisk until stiff. Fold the white chocolate into the whisked cream with a metal spoon. (If the white choc has started to re-set then give it a little 10 second blast in the microwave.) Then give this mixture a little whisk again to make sure it’s combined. Then add the gelatine/cream mixture. Whisk again. Then fold in the egg whites gently, again with a metal spoon so as not to knock air out of it. Make sure it’s all incorporated though. You don’t want streaks of egg white visible. The mixture will look kind of bubbly and a little like slightly curdled cake mixture. This is right. Cover the bowl and place in fridge to set.
Bowl six: Take your raspberries, wash if you’re so inclined, and pop into a bowl. Inspect for beauty and then remove the 4 best looking ones. These are for decorating the top. Then squash the less pretty raspberries using a fork. You want them mushed up so they’re releasing juice. Set aside.
Assembly time. Take some small coffee cups/tea cups/glasses (I like a glass so you can see the layers but that’s just me), take a tablespoon of Nutella, pop on a plate and then dip your finger into it. Smear some of the Nutella on the bottom of the glass/coffee cup. I have made this mousse with more Nutella (see pic) but it does somewhat overpower the white chocolate.
Then take a tablespoon of squashed raspberries and place over the Nutella. Squash down just a little so that there aren’t any pockets of tasteless air. Then gently spoon the white chocolate mousse over the top and smooth down. Leave in the fridge and when they’re ready to be unleashed to your family/guests simply adorn the top with the fresh raspberries set aside earlier.
P.S. If you happen to have any Frangelico liqueur knocking about, (and frankly, why would you considering it’s a beast to get hold of in the Shires) I’d recommend either having a little tipple with the mousse or adding a tbsp to the mousse as you’re folding it all in. It’s lovely and boozy and tastes of hazelnuts which makes you feel less of a lush when drinking straight alcohol.
Get the monthly newsletter...
and subscribe to get all recipes straight to your inbox!
I think my kids are spoilt. They eat out all the time. They don’t even think it’s an event anymore. You see whenever I can’t be bothered to cook or, more to the point, deal with the mess afterwards, I take them out somewhere. Since I’ve been a stay at home Mum we’ve scaled this habit back a fair amount. It was getting expensive.
Anyway, the point I was trying to make was that when I was a kid, eating out was an event. We all started to get ready at least an hour in advance. We all had a bath, blow dried our hair (not Dad obviously), put on our best clothes and our specially polished shoes and sprayed Aramis (Dad) and Tresor (me) about liberally. I would always wear my black party tights, flecked with rainbow glitter. They were epic tights, from British Home Stores I seem to recall.
I always ordered the same thing. As did Dad, as did Mum. For me it was prawn cocktail followed by chicken in sauce and chips, finished with either profiteroles or tiramisu. Heaven would have been a combination of both puds. This is my attempt at a little piece of 80s heaven.
Ingredients:
For the choux pastry:
150mls cold water
50g cold, unsalted butter
65g strong white flour
5g castor sugar
2 large eggs
Margarine type spread for greasing. I used Flora Buttery. Needs a water content.
For the coffee cream filling:
200mls double cream
100g marscapone
1 tbsp boiling water
1.5 tsp instant coffee
25g icing sugar
For the chocolate sauce:
200g dark chocolate
60mls double cream
Get your oven on first to Gas 6/200C. Making choux pastry is surprisingly quick and the oven needs to be hot or you’ll have rubbery pastry. Find two good solid baking trays. They need to be the type that don’t buckle in the oven. If they’re flimsy, they may not stay flat and your poor little choux buns will run the risk of scooting off the edges. And that wouldn’t do at all. At this point, you’d also better check the racks are in the middle of the oven too.
Grease your baking trays with the margarine spread. Even the low fat stuff is fine. In fact it works better as it has more water and creates more steam. You see, you want to create steam to make your buns rise in a fluffy and light fashion. After greasing the trays run them under the cold tap, then let the water trickle off them. There should be little lines of water left running across the grease. You could use a fine misty spray of cold water straight onto the trays instead but I never seem to have such useful implements to hand.
Let’s make the pastry. Weigh out the flour and the caster sugar into a jug. Crack your eggs into a mug and give them a good whisk. Find a medium sized saucepan and put it directly onto your scales (if they allow that) and pour in the water. Then add the butter in small cubes – about 1cm by 1cm. Adding the liquid first means you won’t find yourself fishing butter out of cold water should you add too much, too quickly. And please don’t get bored of cutting the butter and whack a great lump in. The small pieces are important as a large lump would mean it’d take longer to dissolve on the hob, meaning more water from the mixture would have evaporated, meaning doughy pastry. Not good.
Locate your hand held electric mixer and plug it in. You can use a wooden spoon for beating the mixture later, but I am too much of a weakling. Also locate a tea towel or two to protect your work surface for when you need to put your hot saucepan down.
Now we’re all systems go. Put the saucepan, with the water and butter in, onto a high heat. You will notice the little slithers of butter dissolving and then, all of a sudden, you’ll notice it boiling. Take it off the heat now! Don’t leave it a second longer. You need that moisture to stay in the mixture.
Pop the pan onto your tea towel and place the whisks (attached to the hand held mixer) into the liquid filled saucepan. Turn onto a low setting then with your other hand add the jug of flour and sugar. Mix for 60 seconds. It will look a bit like overworked mashed potato at this point. This is fine and right.
Next add the beaten egg in tablespoons, mixing well with the electric mixer between additions. Once you’ve added the lot, the resulting mix will be glossy and smooth and look a little like custard. Don’t carry on beating once all the egg is well mixed.
Now you can pipe the mixture onto your baking sheets but frankly unless you’re baking in a competition I don’t see the point. So take a teaspoon and dollop blobs of mixture onto the baking trays about 1inch apart. I made 25 profiteroles with my mixture but all depends how large or small you like them. If you go for really large ones then give them more space to breathe or they’ll turn into one large tray sized profiterole. I have no issue with this size of pudding but large profiteroles are more prone to chewy under baking. That I do have an issue with. Yuck.
Put your trays in the oven and set your phone/timer for 10 minutes. Check after this long and I’d advise swapping your trays around to allow both trays of profiteroles a chance at even baking. Then turn the heat up to Gas 7/220C and keep a bit of an eye on them. They need to be golden brown all over. Should take another 5 – 10 minutes. Don’t try to take your buns off the baking tray until they’re a good colour or they’ll stick.
When they look a good brown colour remove from the oven and use a ‘turner’ (flat edge thingy we all use to get oven chips off the tray) to push the buns onto a wire rack. Then take a pair of scissors and using the point, stab each bun to allow steam and heat to escape. I do this on the flat underneath side so I can hide it when serving but it doesn’t really matter where you do it. This stabbing part is important as if you don’t do it, you end up with soggy, chewy buns. Turn the oven down to Gas 4/180C. Wait for 10 minutes.
Put all the choux buns back onto the trays and into the oven for a final crisp up. I sometimes leave mine in there for another 15/20 minutes to get them really well baked but do keep an eye on them as they can go from crispy to a literal crisp texture (talking salt and vinegar variety here) in minutes. I personally cannot bear a choux bun with soggy pastry in the middle. If you’re filling your buns and then leaving them to sit about this is especially important as the pastry will start to absorb the cream.
Once crisp and well browned leave to cool. In the meantime make the cream filling. Take 150mls of the double cream (leaving 50mls behind) and whisk to firm peaks in a bowl using the electric hand held mixer. Then make up some coffee flavouring by mixing the instant coffee into the boiling water. (You can use Camp essence but I know it can be hard to get hold of.) Add this to the whipped cream and mix in with a wooden spoon. Then add the marscapone and mix that in. Add the remaining unbeaten double cream to loosen the mixture, then the icing sugar. Stir until combined.
To make the choc sauce it’s easy – just break the chocolate into small pieces and place in a glass bowl. Then add the double cream and heat over a saucepan of simmering water making sure the bowl does not touch the water. Stir until dissolved and molten, then set aside to cool a little.
To fill the buns you can get out the old piping bag and do it properly but I just don’t see the point of needless piping. Instead I split each choux bun down the side with a sharp knife and place a teaspoon of the coffee cream filling into the middle. Then spoon over the choc sauce and eat immediately. Preferably without an audience so you can hoover up in a piggy fashion.
Get the monthly newsletter...
and subscribe to get all recipes straight to your inbox!
I have a theory that from a certain age most people are difficult to buy surprise presents for. The emphasis is on surprise. I’m not talking about saying very loudly that you really admire those red Kitchen Aid mixers from ooh, about Jan 2nd onward and miraculously Santa appearing with one about 11.5 months later. That’s a wonderful present, but it’s engineered. You’ve worked for it. The present buyer spent a lot but didn’t have to think a lot. Be grateful, but not that grateful. You did the thinking.
I’m talking about the kind of surprise present the lucky soul didn’t even know they wanted until you actually gave it to them. As the present giver you should pat yourself on the back when this happens. As the present recipient you should take stock and thank your lucky stars for your creative friend/thoughtful family member. They’re keepers for sure.
Here’s a present most people don’t know they want or need. Then when they get it, they use it, then they hug you. Now in order for the lucky recepient to get a chance to use it, you need to gift it pre Xmas. So visit the lucky person, give them a jar or three and tell them to open it as soon as you’ve gone. Maybe even wrap up a nice baking tin to go with it. Now that would be a perfect present.
Quantity: Makes a truck load. Seriously. One huge 2100ml preserving jar plus a normal size jam jar. Or loads of small jars.
Ingredients:
1kg sultanas (as these will be doused in spices and booze I buy the value range ones)
500g Bramley apples, peeled and chopped into 1cm cubes
250g dried apricots, cut into sultana sized pieces with scissors
130g glace cherries, cut into quarters with scissors
50g dried cranberries
150g flaked almonds
350g demerara sugar
150g light muscovado sugar
3 tsp all spice
half of a whole nutmeg, freshly grated
the juice and zest of 2 tangerines
the juice and zest of 2 lemons
500g vegetable suet
200mls cherry brandy
100mls ginger wine (I used this)
This is a great recipe to get small people to help with as the hands on time is all about weighing, stirring and cutting with (toddler friendly) scissors. Before you start don’t forget you need some jars at the end of all this to put your mincemeat in. (You may laugh. I have made this mistake.)
Day 1:
Find a large bowl and check it fits in your oven. I’m talking a really big bowl. It needs to be oven proof too. I use a ceramic one but if you don’t have one a very large casserole dish would work just as well. Weigh out all the dried fruit and nuts into the bowl, then peel and chop your apples and add them too. Give the mixture a good stir. Add the sugars, spice and nutmeg. It really will make a difference if you use fresh nutmeg and grate yourself. Stir again. Add the juice and zest of the tangerines (the official smell of Christmas) and the lemons, being careful not to lose any lemon pips into the mixture. Stir again. Lastly, add the suet, stir again. Cover the mixture with clingfilm and leave overnight.
Day 2:
Preheat the oven to Gas 1/140C and place the bowl of mincemeat into the oven with the top covered in foil. Leave to slowly cook and baste for 3 hours. After this time carefully remove from the oven and give the contents a good stir to ensure all the fruit is covered in the fat from the suet. Sterilise your jars at this point (I use the dishwasher but you can use the old fashioned method of a good scrub with Fairy, a rinse in boiling water and drying out in a low oven for 30 minutes instead) and line them up.
Then when the mincemeat has cooled a little (bowl touchable warmth) add the brandy and the ginger wine. Be prepared for the alcohol to give off a certain amount of fumes. I stood a little too close and was nearly knocked out. Give the mixture a good stir then fill your jam jars up to the top. I use a skewer to poke the mincemeat down to ensure it fills up an air pockets. You could also use a knitting needle if you’re of the crafty variety. Don’t leave more than 1.5cm of a gap. Then pop the tops on and store in a cool and dark place for at least 4 weeks before you use it. It needs time to mature. Will keep for 6 months.
Ta da! The best surprise Christmas present.
Get the monthly newsletter...
and subscribe to get all recipes straight to your inbox!
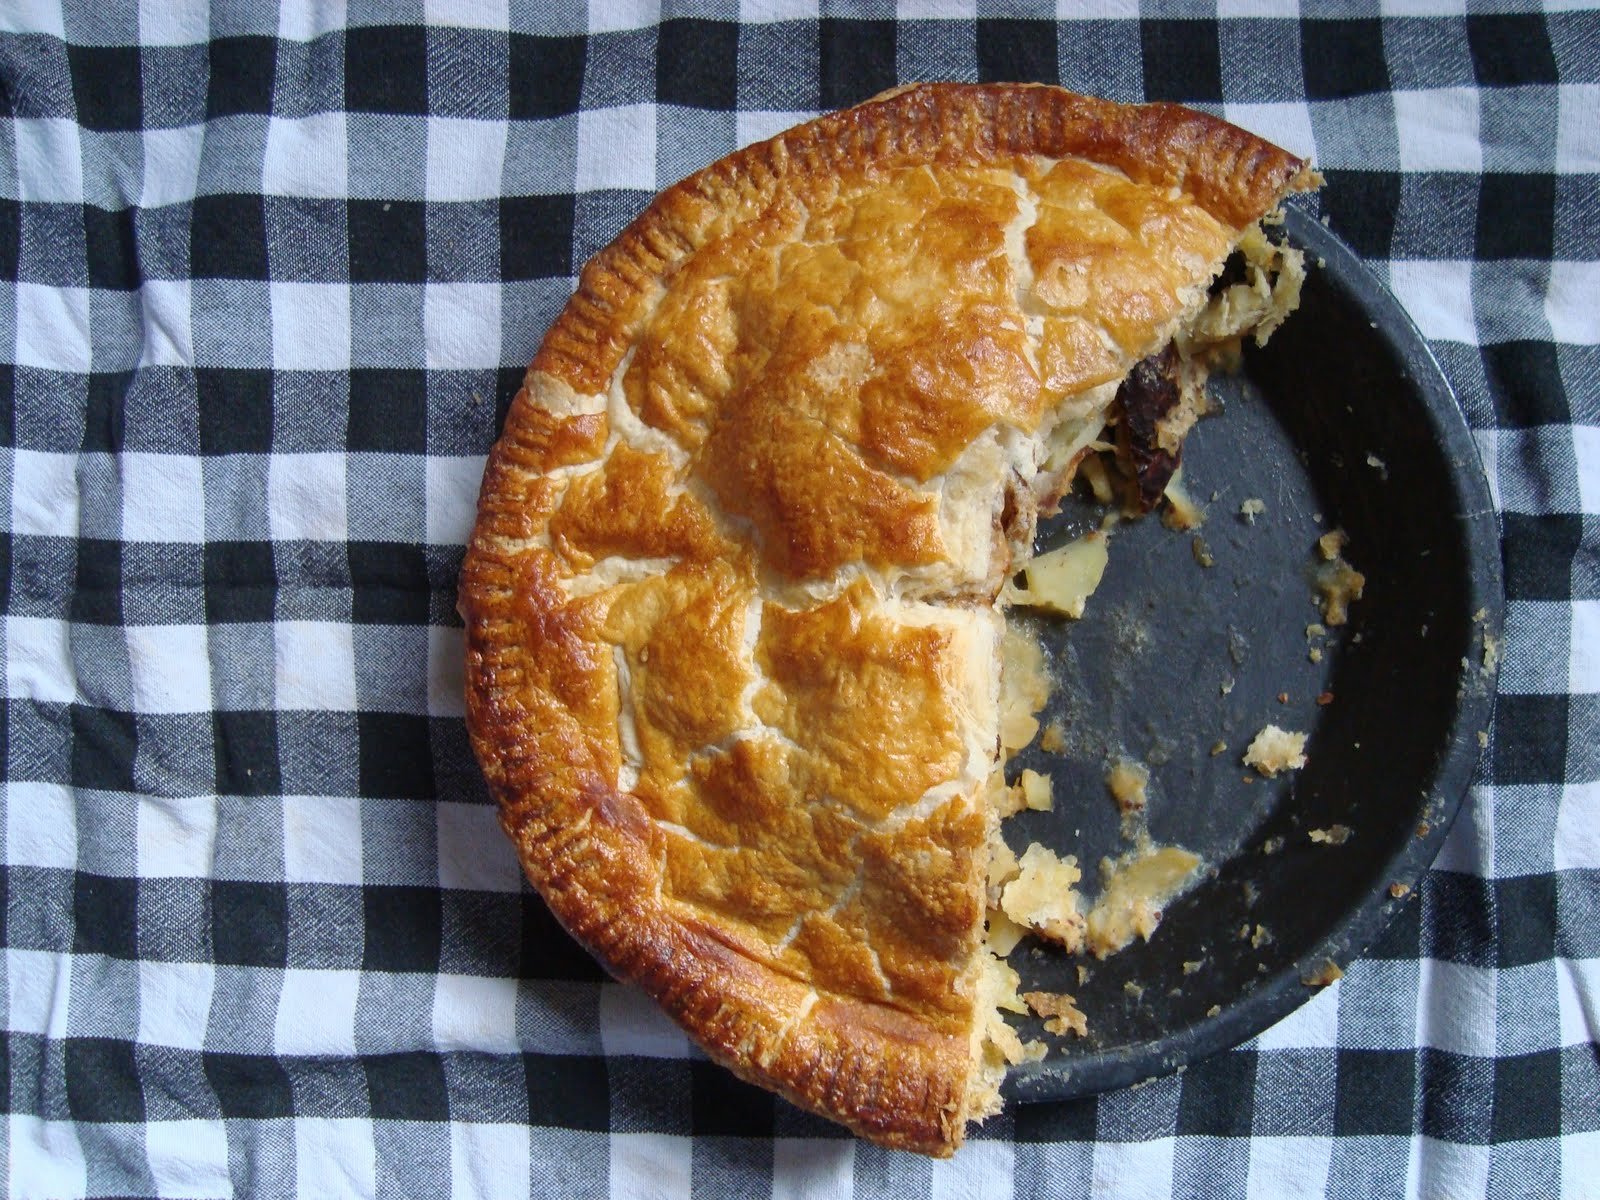
I love pies. I do not consider the insult ‘who ate all the pies’ to be a particularly harsh one. It implies the recipient is indeed of the rotund variety. However, it also implies that this very person chose a wonderful way to get to this state of waistband. If someone said ‘who ate all the mild, tasteless cheese?’ to me, I’d be incredibly offended. I can’t think of a worse food to squander precious calories on. Pie however, well, that’s a connoisseurs way to pile on the pounds.
This is the kind of pie I’d like to think Margo from The Good Life would have called an ‘assembly pie.’ In that the pie contents don’t do much cooking once they’re in the oven. That’s done before. So it’s a high maintenance pie. Lots of prepping. It’s very good though; in the way that most pies are good. You can feel the fatty goodness clinging to your waist and thighs as you eat it. Don’t let that put you off. Just enjoy it and eat salad tomorrow.
Ingredients:
For the pastry:
200g plain flour
75g soft lard
75g soft unsalted butter
1 tsp white wine vinegar
140mls very cold water
1 beaten egg for glazing and fixing the lid
For the filling:
8 of your favourite sausages
600g peeled Desiree potatoes – about 6 medium sized ones for me but depends how close to the skin you peel
200g peeled onions – about three medium ones for me
25g butter
1 tbsp caster sugar
1 tsp salt
For the creamy sauce:
140g creme fraiche
60mls double cream
40g wholegrain mustard
lots of freshly ground black pepper
lots more freshly ground black pepper for the layering
You need a metal pie dish for this baby. You could use a ceramic one but I can’t guarantee the puffiness of the pastry. You need said dish to heat up VERY quickly in the oven along with the pastry. Don’t say I didn’t warn you. My tin is 18cm in diameter at the base, by the way.
Make the flaky pastry first. Take the soft butter and lard, place in a bowl and beat the hell out of them with a fork until you have a creamy looking blob of fat. It needs to be well mixed. Then spread evenly over the bottom of the bowl and mark out quarters with a blunt knife.
Put the flour into a bowl and rub in one quarter of the fat you’ve just combined and marked out. Once you have a breadcrumb like consistency add the white wine vinegar and use a blunt knife to stir. Then add the water. Stir with a blunt knife until combined. The dough may be stickier than you’re used to. That’s okay. Turn the dough onto a very well floured work surface. Turn over so that the dough blob is completely covered in flour. Don’t worry about too much flour. You just brush it gently off your pastry every time you roll the dough. Don’t forget to do this.
Next, use your hands to shape the pastry into a rectangle with defined corners. Use a rolling pin to roll the pastry to about 1cm thick. The size dimensions should be roughly double the length to the width. (I use 2 hand spans by 1 hand span.) Lay it out, long side across, in front of you. Tease the corners back into place if they have disappeared. Put your hands under the pastry and allow the pastry to ‘shrink’ back a little. You don’t want the dough to have any tension and appear or feel stretched. If it does it’ll shrink in the oven and your lid won’t fit your pie!
Take your blunt knife and another quarter of the fat mixture and dot across the pastry leaving gaps in between dots. Be careful not to drag the pastry or in any way stab it. Be gentle. The fat needs to be soft to allow this. Then mentally divide the long pastry rectangle into thirds. Fold the right hand side third into the middle to meet the end of the first third. Then fold the first third over to meet the end of the second third. (If this doesn’t make sense then you may need to look on youtube. Sorry but it’s hard to describe this.) Make sure your pastry has defined corners, if not simply push and pull a little until you have right angles. Wrap your pastry block in clingfilm and place in the fridge. Set your timer/phone for 5 mins.
In the meantime grill your sausages until dark brown all over. I’d advise a dark colour as there’s nothing worse than an anaemic sausage in a pie. Leave to cool once cooked. You can also get on with peeling, slicing and cooking your onions at this point. Fry them in a pan on a lowish heat with 1 tsp salt, 1 tbsp caster sugar and the butter until starting to caramelise. Then set aside to cool a little.
Take the pastry out of the fridge and with the ‘open’ side of the pastry facing you (the bit with all the folds visible) roll out onto a well floured work surface again to the same dimensions as before then pop your fingers underneath to release any tension. Repeat the fat dotting and folding, then pop into clingfilm and back in the fridge for a minimum of 5 minutes.
Put the kettle on. Peel the potatoes and slice to about 3mm thickness. You can use a mandolin but beware that when you boil the potatoes they may turn to mush in minutes. Boil the potatoes in a big saucepan for about 8 minutes or until cooked but not mushy. Drain immediately and then leave on the side.
Take the pastry from the fridge and do the same drill with the last quarter of fat. Put back in the fridge, well wrapped of course. Then start to slice your sausage. Slice into 3/4mm thick slices, lengthways. I get four out of an average sized sausage.
Make the creamy sauce by combining all the ingredients. Set aside. At this point remove the pastry from the fridge and pop it back onto the well floured work surface. Roll into a rectangle as before and fold as before but without adding any dots of fat this time. Put back into the fridge. Set the timer for 30 minutes.
Take your pie tin and start the assembly. This is the order. Don’t deviate from it please:
1/3 of potatoes layered on the bottom of the pie dish
1/3 onions on top
1/2 sausage slices arranged pointing from the outside rim of the dish into the middle like a wigwam
1/3 creamy mixture dotted over the top
Lots of black pepper
1/3 of potatoes
1/3 onion
1/2 sausage
1/3 cream
Lots of black pepper
1/3 potatoes
1/3 onions
1/3 cream
Lots of black pepper
Then place this tin in the fridge. The filling should appear peaked in the centre in a bonfire fashion, like a proper pie should. At this point make sure there is only one rack in your oven, bang in the centre. Then preheat the oven to Gas 7. Take your egg, beat it and set aside with a brush for egg washing. You should also locate a fork, a sharp knife and also some scissors.
After the 30 mins is up, take the pastry from the fridge as well as the filled pie dish. Roll the pastry into a square (well floured work bench la la la etc) until it’s about 3cm wider and taller than the edges of the pie dish. Then cut off two sides of the square producing two long strips about 1.5cm wide. Egg wash the rim of the tin and fix these strips onto it. You want the whole rim to be covered. Then egg wash the strips please.
Now check the remaining pastry square is at least 2.5cm wider and longer than the tin by hovering the tin above the pastry gently and checking by eye. If you’re happy then gently fold the pastry into quarters. (Don’t press it into quarters. This is for ease of moving the pastry.) If not happy with the size, roll until you are. Don’t go mad though and roll too thin or your pastry won’t do its flaky thing.
Take your square folded pastry and place gently over the pie dish with the innermost corner in the centre. Then unfold, gently. Do not stretch the pastry at all. In fact, try to release some tension by pushing the pastry into the middle. Then press the pastry gently onto the pastry rim. Trim the pastry about 0.5cm larger than the edge of the pie tin using scissors. Try not to drag the pastry at all. Then dip your fork into the remaining flour on the work bench and use it to indent around the rim of the tin. Keep re-flouring your fork to stop any dragging.
Nearly there… take a blunt knife and ‘knock up’ (stop sniggering) the edges of the pastry. Basically you’re using the knife to fluff up the pastry of the rim and the lid until they are fluffed up together, meaning they don’t come apart when baking. Also meaning the side of the pie has a nice thick layered appearance. Then just egg wash the whole pie really well and then cut a cross in the top to allow any steam to escape and ensure a really crisp and flaky lid. Pop in the oven for 20 mins, then turn the heat down to Gas 4 and bake for another hour. Serve with green beans/peas/baked beans or whatever else does it for you.
Get the monthly newsletter...
and subscribe to get all recipes straight to your inbox!
I’m a crier. I cry at the news. I cried when I left London. I cry when friends say they’re pregnant. I cry reading sad magazine articles. Hell, I cried when Charlene and Scott got married in Neighbours. And goodness, give me an episode of One Born Every Minute and I’m a heap of snivelling snot and salt water. (See, there’s a reason I stopped midwifery training after one paltry year.)
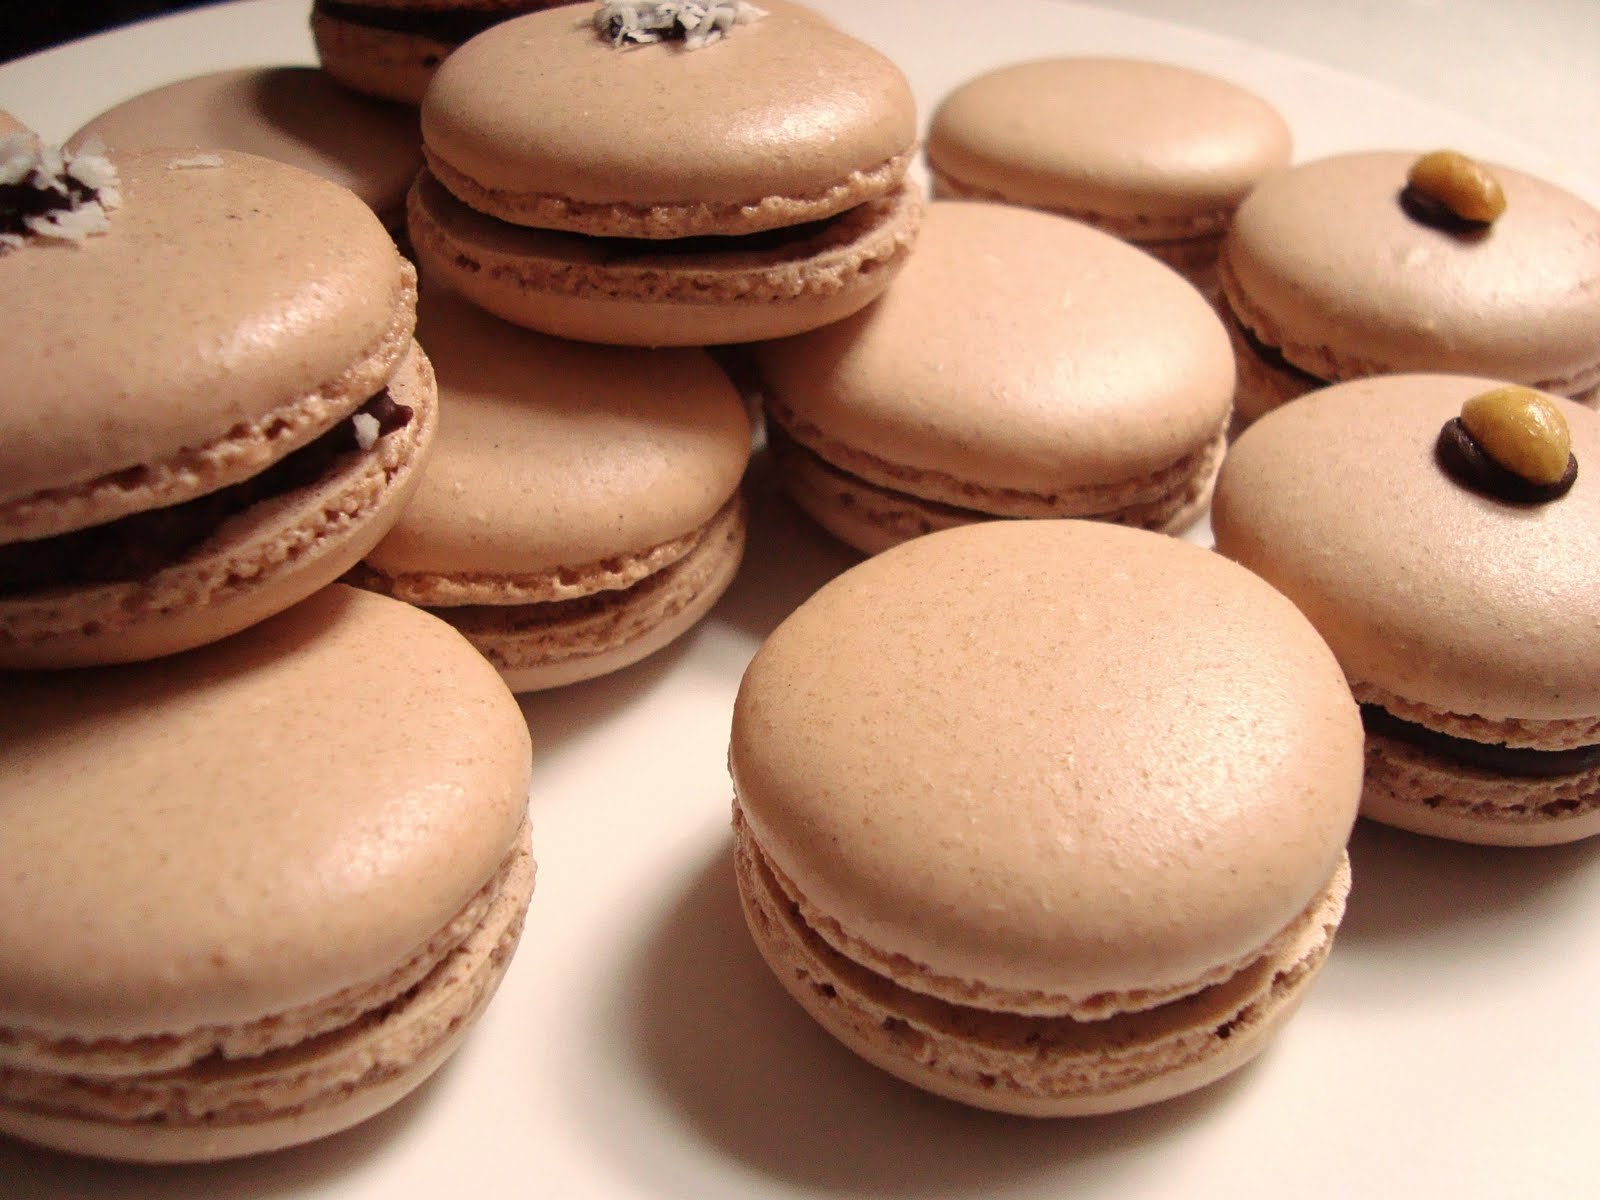
So it should come as no surprise then that the combination of egg whites and icing sugar and caster sugar and water and almonds have reduced me to tears. In short, macaroons/macarons (however you like to say it) were my nemesis. No longer though. I laugh in the face of them now. One of my fave flavour combinations is ginger and dark chocolate so I thought I’d blog about that recipe.
Here’s how I do it:
(Disclaimer: this works in my oven, which is a gas fan oven. Temperature is all with macaro(o)ns so please don’t hunt me down if your first batch fail, or your second come to think of it. I made ooh, about 1000 before I could rely on them working everytime. It was all down to getting to know my oven and tweaking the temperature. Dedicated? Yes. A bit nuts and obsessive? Yes. If you can’t be arsed I won’t hold it against you. Just order them from posh shops. Or make friends with me and I’ll hand deliver them on your birthday.)
Another note before starting – you need to invest if you want to make macaro(o)ns the way I make them. I didn’t say this was going to be easy or cheap or even good for your teeth. So here’s a list of special equipment you will need and may not have:
– a jam thermometer
– a small saucepan that won’t topple when the thermometer is placed in it – I use a milk pan
– a freestanding mixer with the whisk attachment
– a food processor with the blade attachment
– the top of a plastic milk bottle
– a piping bag (I use Lakeland disposable ones)
– a 5mm wide plain nozzle
– lots of cheap baking trays. I use 4/5 of these from Sainsburys
– reliable non stick greaseproof paper. I use this from Sainsburys
– a piece of card cut to fit the tray size. Light colour best. I use white.
– digital scales
– a fan oven – I have a regular and fan oven and have much better results in the fan.
Ingredients:
For the shells:
180g ground almonds (I use Sainsbos as they’re finely ground to start with.)
180g icing sugar
144g aged egg whites (Separated and left in the fridge for 4 days.)
6g cocoa powder
180g caster sugar
45g/mls cold water
For the centres:
200mls double cream
200g dark chocolate
a few pieces of crystallised ginger cut into rough squares about 1cm by 1cm. You need 30.
This recipe makes about 30 paired macaro(o)ns, so 60 shells altogether. Though depends how large you make them of course. Why make so many? Well it’s hard to boil sugar syrup with small quantities of sugar and still read the temp with the jam thermometer and frankly, these little things are a pain to make so I always think best to make in a batch large enough to bestow some lucky pal with a gift. However if they do fail the feeling of misery will be worse when making 60 shells than 20. That’s my warning to you as someone who knows that pain.
I am going to write the stages in numbered steps to try and keep things simple.
1.) Take the egg whites out of the fridge. Leave on the side to get to somewhere near room temperature before you start.
2.) Boring bit. Cut greaseproof paper to fit all your baking trays. You will need four or five covered dependent on how large the trays are. Place the paper onto the trays curly side down and stack on top of each other. The place something flat on the very top of the stack. We’re trying to achieve flat greaseproof paper here folks.
3.) Make your template by taking the card you’ve already cut to fit the trays and drawing around a milk top (I use the plastic milk top from a supermarket 4 pinter) with a black pen. Use the milk top as a guide to space the circles out. (So draw one circle, then leave a space the same size, then draw one, etc – I get 16 on my trays in a 4 x 4 formation.) Do not forget to leave a space at the sides too or you will have burnt macaro(o)n edges. And beware, don’t try to cram as many circles onto the card as possible thinking it will save time. You need the space for both spreading and also so that the macs don’t steam each other when baking.
4.) Weigh the icing sugar and place in the food processor. Weigh the almonds and place on top of the icing sugar in the food processor. Do the same with the cocoa. Do it in this order of you may risk making almond butter in the corners of your machine. You don’t want to release almond oil from the nuts. Whizz up for about 90 seconds using the blade attachment. Then have a good dig about with a sharp knife to dislodge any icing sugar, cocoa and almondy bits, pop the lid back on and whizz again for 60 seconds. Set aside.
5.) Weigh out half the egg whites (72g) and place in a large bowl. Must be large as you’ll be adding all sorts later. Put the other half of the egg whites into the very clean bowl of the freestanding mixer. The clean bit is important. If you last made a cake in this mixture give it a good scrub and even think about wiping the sides with a lemon to remove any hint of grease. Grease buggers up your egg white volume.
6.) Sieve the almond, cocoa and icing sugar mixture into the large bowl with half your raw egg whites already in it. I use a medium grain sieve (grain – is that even the right term??) and if you have any large almondy bits left over throw them away. Please don’t use a very fine sieve as you’ll end up throwing away half your nuts. Don’t force them through the sieve either. If you skip this step then you won’t have shiny shelled macaro(o)ns. Up to you. Use a spatula to combine. It might look like there isn’t enough liquid but there is. Keep mixing. You do not need to fold or do anything special at this stage. Just mix until combined and have a good scrape at the bottom of the bowl to ensure no powder left.
7.) Weigh the water into the small saucepan, then weigh the caster sugar onto the top. If you do it this way round you can have an accident with pouring the water without having to throw loads of sugar away. (Speaking from experience of over zealous water pouring.) Place your jam thermometer into the pan and place on your smallest hob ring.
8.) At the same time that you turn the hob onto a medium heat to boil the sugar and water also start to whisk the egg whites in the freestanding mixer. Do the whisking on a medium speed. (NB: I sometimes have to slightly tip my whole mixer to get the whisk to ‘pick up’ the egg whites. Sure this is not recommended by Kenwood but it works for me.) Once the egg whites reach stiff peaks stop whisking.
9.) NB: Remove kids and animals from the kitchen at this point if they haven’t already wandered off in boredom. Now watch your sugar syrup like a hawk. It might have a lump in the middle where the sugar hasn’t dissolved yet. If this has happened, give the pan a little shake from side to side whilst still over the heat to dislodge the sugar, being sure to hold onto the thermometer tight. Boil the sugar and water mixture until it reaches 115C. At this point turn the freestanding mixer back on, whisking your already stiff egg whites on a low speed. They might have broken up a little since you turned the machine off but worry not. Just whisk until they come back together.
10.) When the sugar reaches 118C turn the hob off and pour the boiling sugar in a steady stream into the egg whites with the machine still running. I find the best way to do this is to start off holding the pan low, just above the bowl of the mixer, make sure the stream is going to hit the egg whites, (not the side of the bowl) then pull upwards as I pour to achieve a thin and long stream of boiling sugar. This is clearly not for the faint hearted. You must get the sugar to flow straight onto the whisking eggs and not down the side of the mixing bowl. If it all hits the bowl first then it will solidify on contact with the cold bowl and you won’t end up making meringue. Your egg whites will essentially be without enough sugar. Worry not if it does leave some blobs of molten sugar on the bowl. They look like they’ll never come off but they will. Very hot water and Fairy does the trick. Turn the mixer onto a medium speed at this point and leave to whizz until the mixer bowl feels cool. Takes about 7 minutes.
11.) Once your Italian meringue (for that is what we’ve been making in the mixer) looks all white and glossy and holds peaks and is cool enough for you to touch the bowl you’re ready to start the hard bit. Now please don’t despair if you can see little grains of sugar that look like specks in the meringue. This is not a problem at all though it’s a bit upsetting I know. Turn the mixer off and scrape the meringue into the large bowl holding your raw egg white and almondy mixture. Then take a spatula (I use a silicone one) and start to gently mix and beat the contents together. Don’t fold the mixture; you’re trying to remove air, not add it. The aim here is to have a mass of macaro(o)n batter that’s glossy and homogeneous. Search the bottom of the bowl for bits that aren’t combined. They hide there.
12.) Now you need to press the spatula against the side of the bowl, keep the end on the bottom of the bowl and sweep to the other side of the bowl in a firm, steady movement. You should see a parting of the macaro(o)n batter sea. Now start counting. After 30 seconds the ‘sea’ should disappear back into a mound of batter. If this does not happen, stir the batter again. Don’t be shy. It needs firm handling. Give it 3 more turns and then part the sea again. If you still have a stiff batter then give it one turn and try again. Keep going. It can take a while. Don’t be tempting to beat the hell out of it in desperation. If you do then it’s curtains. I know as I’ve done it. (Temper? Me? Well yes.)
13.) Find a pint glass or measuring jug. Put the nozzle into the bottom of the icing bag, cut the bottom of it off to expose just the end of the nozzle, then twist the bag above the nozzle and place the whole thing into the pint glass nozzle end down. Curl the open end of the piping bag over the pint glass edges. This is the easiest way I know to fill a piping bag. Add a spoonful or two of batter. Take a plate and pipe one macaro(o)n shell onto it. The way I pipe is to hold the bag at a right angle to the surface, place the nozzle over the middle of where I want the macaro(o)n to be, about 4mm from the tray/plate and push the batter out with the other hand at the top of the piping bag. I stop piping when I’m 2mm from where I want the edge of the circle of batter to be. This allows for spreading. But please do it how you like. Youtube is full of examples of piping wizardry. One tip I’ve found useful is to keep the nozzle at the same point throughout, even though some of the batter will then splurge up the sides of the nozzle. If you pull it upwards in a flourish as you finish off you will have a nipple effect that’s hard to sort out.
14.) Now wait 30 seconds. Have a good look at the shell you have just piped. It should have no nipple effect or a very tiny one that is easily smoothed with your finger. (Don’t dip your finger in water – this has made my macs explode in the oven – not sure why!) If you have a huge nipple effect then pipe the rest of the batter back into the bowl and go back to stage 12. Repeat this and stages 13 and 14 until you have a batter where the nipple disappears after 30 seconds. Sorry for banging on about nipples in an unsavoury fashion but this bit’s important if you want perfectly smooth shells. And ALWAYS better to under turn the mixture than over turn. You can’t un-turn the batter and what tends to happen with over turned batter are macaro(o)ns that spread into odd shapes and ‘feet’ that are very very short. If you’re not obsessed by macaro(o)n feet and want to know more just google it. People write tomes on feet.
NB: I know this stage is dull, dull, dull but please stick with it. If you get this bit wrong all your hard work will have been for nothing. I have lost my patience and temper many a time at this point and ended up throwing huge bowls of batter in the bin whilst swearing and crying. Most undignified.
15.) Once the batter is perfect, pop the template under the greaseproof paper on the first tray and, with a half full icing bag, pipe those macaro(o)n shells! Keep going (and refilling the bag and repositioning the template on new trays) until you have no batter left. Slam the macaro(o)n covered trays onto your work surface with a good ‘bash’ to bring any air bubbles to the top. I do this about 3 times with each tray. I used to take a toothpick to my macs to burst bubbles but have found leaving them for 30 mins minimum to produce a shell means this step is redundant. Then simply leave the shells to form a skin. You need somewhere coolish, though not the fridge and not steamy. So for me that’s on top of the stereo and speakers in the dining room. Just don’t tell Mr. B. Wait for 30 minutes. I often number my trays in the order they were piped to make sure they each get their 30 minute rest. Don’t worry if they get longer than 30 minutes though. An hour won’t hurt them at all. Or longer even.
16.) Remove all racks from the oven other than one left in the middle. Preheat the fan oven to Gas 3/160C and once it’s preheated (15 minutes in my book) place one tray of macs into the oven. I always place mine towards the front and away from the back left hand side as I have a massive hot spot there. If you know you have hot spots then do the same. Do not be tempted to save time by whacking a load of trays in at a time. The air needs to circulate. Plus the top and bottom of the oven are hotter and colder than the temp you want. Set your timer/phone for 12 minutes.
17.) After 12 minutes open the oven door. You should have a line of macaro(o)ns with perfect feet that have risen at right angles with flat tops to the shells. Push the top of the macaro(o)n nearest to you very gently. It should not ‘wobble’ – ie/ it should feel firmly attached to the feet. If you are able to gently push it a little to the side then close the door and leave 2 more mins. Then check again. Once the ‘wobble’ has gone then take them out. Place on a wire rack and put the next batch in.
18.) Let the macs cool for 5 minutes. Please don’t try and peel them off the paper before then or they’re liable to break up. Carefully peel one of the central macs (central important here as middle ones are last to bake) off the paper. If it won’t come off then it’s undercooked and you need to pop it back in the oven for a few minutes. No harm done.
19.) Make the ganache for the filling. Chop the dark chocolate. Put the cream into a small pan. Place on a medium heat until it just starts to boil. Remove from the heat and add the chocolate and then stir using a metal spoon until completely combined and smooth. It must be smooth otherwise you will have problems pushing lumps of choc through the nozzle when piping. Set aside and leave to cool at room temperature. You can speed it up by thickening in the fridge if you’re short of time but you risk the ganache near the edges of the pan solidifying before the middle does. Voila – lumps! If you leave at room temperature it will thicken as it cools – give it a stir every 5 mins of so to stop lumps forming. (NB: If it thickens too much pre filling the macs worry not – just gently, very gently, reheat on the hob until slightly molten again. Stir and let thicken to piping consistency again.)
20.) Once all the macaro(o)n shells are cooked and peeled start to pair them up into matching sizes. Despite using the template there will still be lots of different sizes. Then when the ganache is thick to the point where it’s almost set (but not so thick it won’t pipe – think cream cheese consistency) place it in a piping bag (as before) and pipe circles of ganache around the outside of one half of each pair of shells. Leave a hole in the middle and place a square of crystallised ginger in it. Then place the matching shell on top of the one with the filling on it and press down gently. Place on a plate and leave in the fridge for 2 days before eating them. The almond meringue melts into the filling and makes for an altogether more dreamy macaro(o)n eating experience.
You might have some ganache left over. If you do simply let it solidify then roll into balls and dip in crushed hazelnuts/popping candy/crushed pistachios for some homemade truffles. Yum.
If you’re still with me at this point please accept my sincere apologies for the longest blog post known to man. I salute you for staying with me.
Get the monthly newsletter...
and subscribe to get all recipes straight to your inbox!
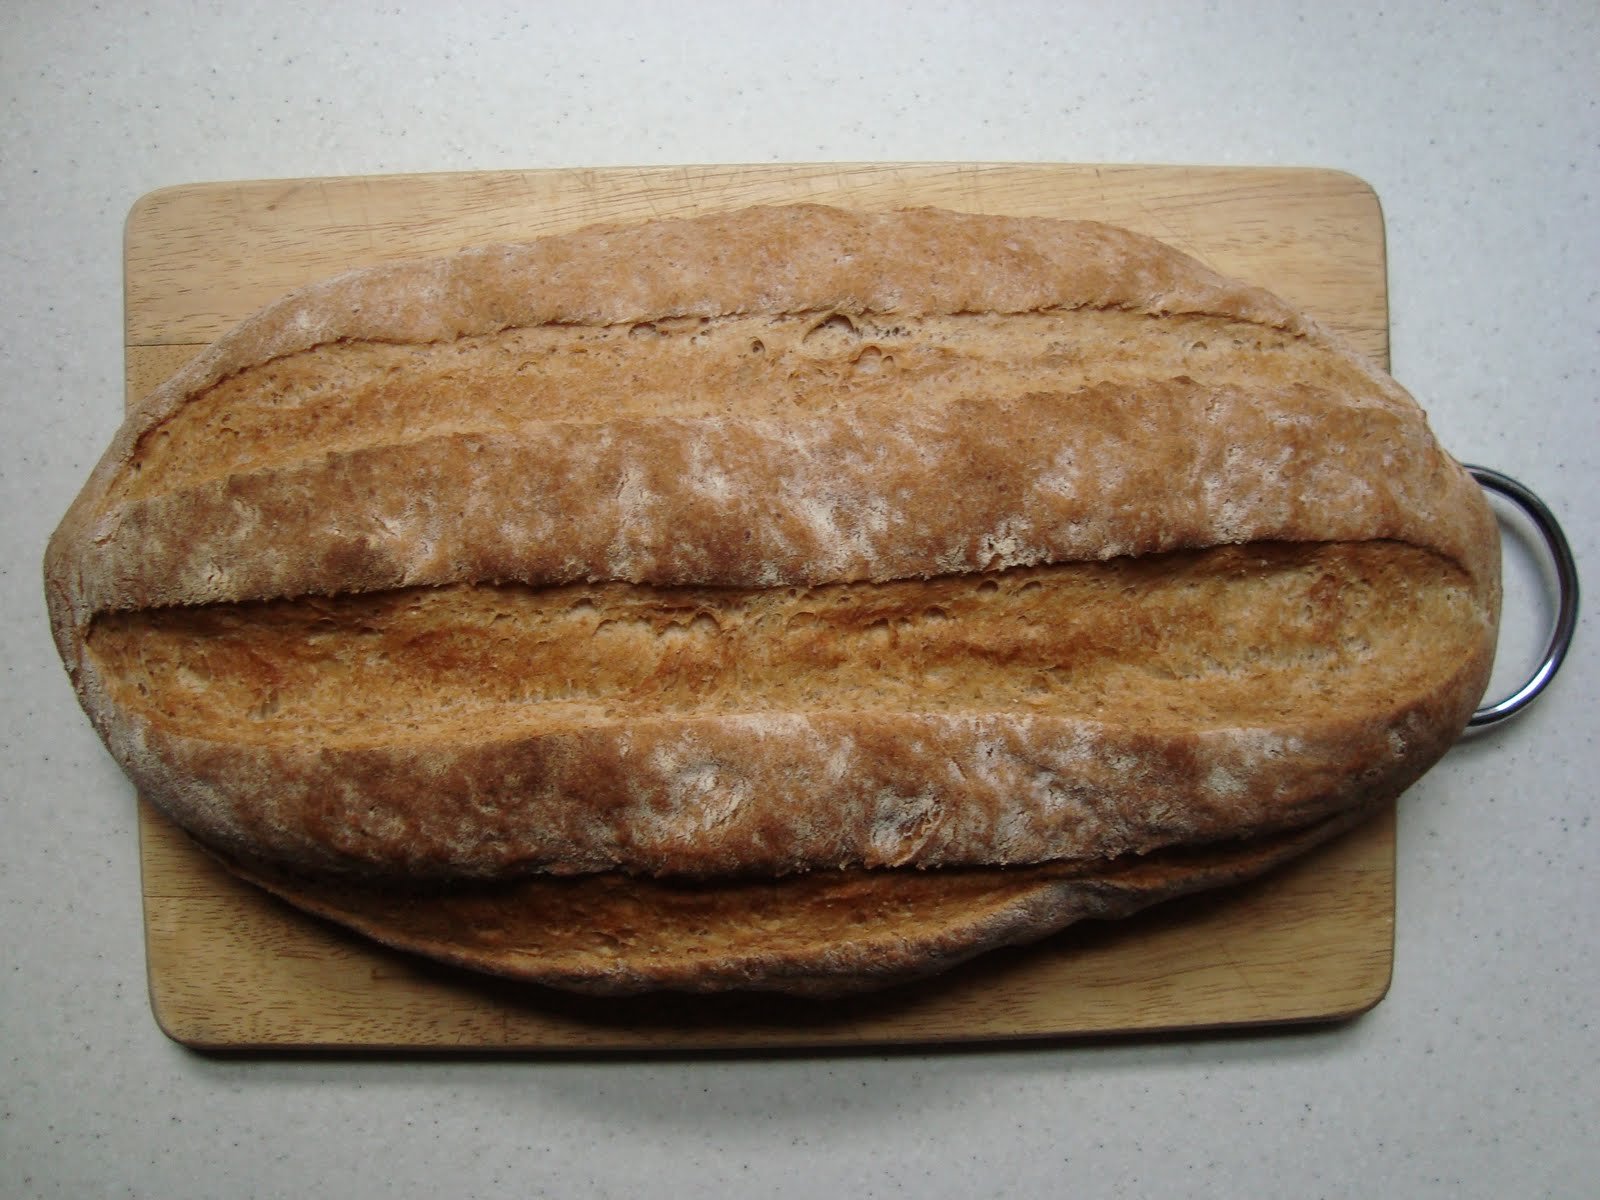
I love rye bread. It reminds me of a school ski trip where we travelled by coach. Don’t ask me why we travelled by coach to a European snowy country. Madness. Also, don’t ask me which countries we passed through or where we went. I have no idea. I was too busy trying to woo inappropriate males who probably didn’t even know my name. Oh for those unrequited teenage years…
The things I do remember are wearing a large cross around my neck in homage to Madonna, trying neat vodka for the first time, applying a trowel full of make up before I slept (just in case the boy of the week were to look at me as I snoozed open mouthed against a window) and continental service station rye bread. The bread is the only habit I cared to continue with. Though I do admit to sometimes forgetting to remove my make up before bed.
This rye bread won’t break your teeth or your bowels. Try it. Even my toddler son loves it. He eats it with no adornment, though I wouldn’t advise it. For me it’s all about lashings and lashings of butter.
Makes one large beast of a loaf/baton thingy.
Ingredients:
200g rye flour (I use Doves)
500g strong white bread flour (plus extra for dredging)
10g table salt
7g sachet of easy blend yeast
460g baby bath temperature water
100g soft unsalted butter
Pop the flours, salt and yeast into a large bowl, mix a little, then add the water. Use one hand to pull the mixture together and then once it’s combined into a shaggy mess, tip onto a work surface and start to knead. I use no flour or oil. But that’s just me. Do whatever you like but beware adding shed loads of flour and ending up with a brick of bread.
The way I know the kneading is done is when the bits of dough on my hands are starting to be picked up by the big ball of dough. It should also feel elastic and start to take on a shine. It should not be sticking to the work surface. If it is, you need to carry on kneading. (NB: Do not be put off by the grey appearance of the dough. That’s the rye flour. It’ll come good. Promise.)
Pop the dough back into the bowl and cover with clingfilm or a tea towel and leave until it’s doubled in size. Once it has, tip it onto the work surface again and give it a 2 minute knead to squeeze air bubbles out of it. Then knead the butter into it. I do this by making a kind of well in the middle (more like thumping an indent to be honest) and then putting the butter in it. Then kneading until you have a slippery buttery dough – this takes a while and as first you’ll worry you have ruined the dough. It might even start to break up. Worry not. Keep kneading. It’ll come together. When it does, shape the dough by rolling into a baton shape, dredge with some extra white flour and then place on a baking sheet and cover loosely with a flour covered tea towel.
When you think your loaf has almost doubled, quickly slash it with a very sharp knife, then pop the oven onto Gas 7 and check the rack is just above the middle of the oven. Leave the oven to heat up for 15 minutes, then place the loaves in and bake for about 30 minutes, until well risen, brown and hollow sounding when tapped underneath. Feel free to finish off directly on the rack for a truly crisp bottom. Then cool on a wire rack.
Get the monthly newsletter...
and subscribe to get all recipes straight to your inbox!
There are some things in life that take a while to get right. They’re often the kind of things that are worth it. Finding a good husband springs to mind. Chasing down the perfect pair of flat black knee high boots. Achieving the perfect eyebrow shape. Teaching your young son to aim well – both in and out of the bathroom.
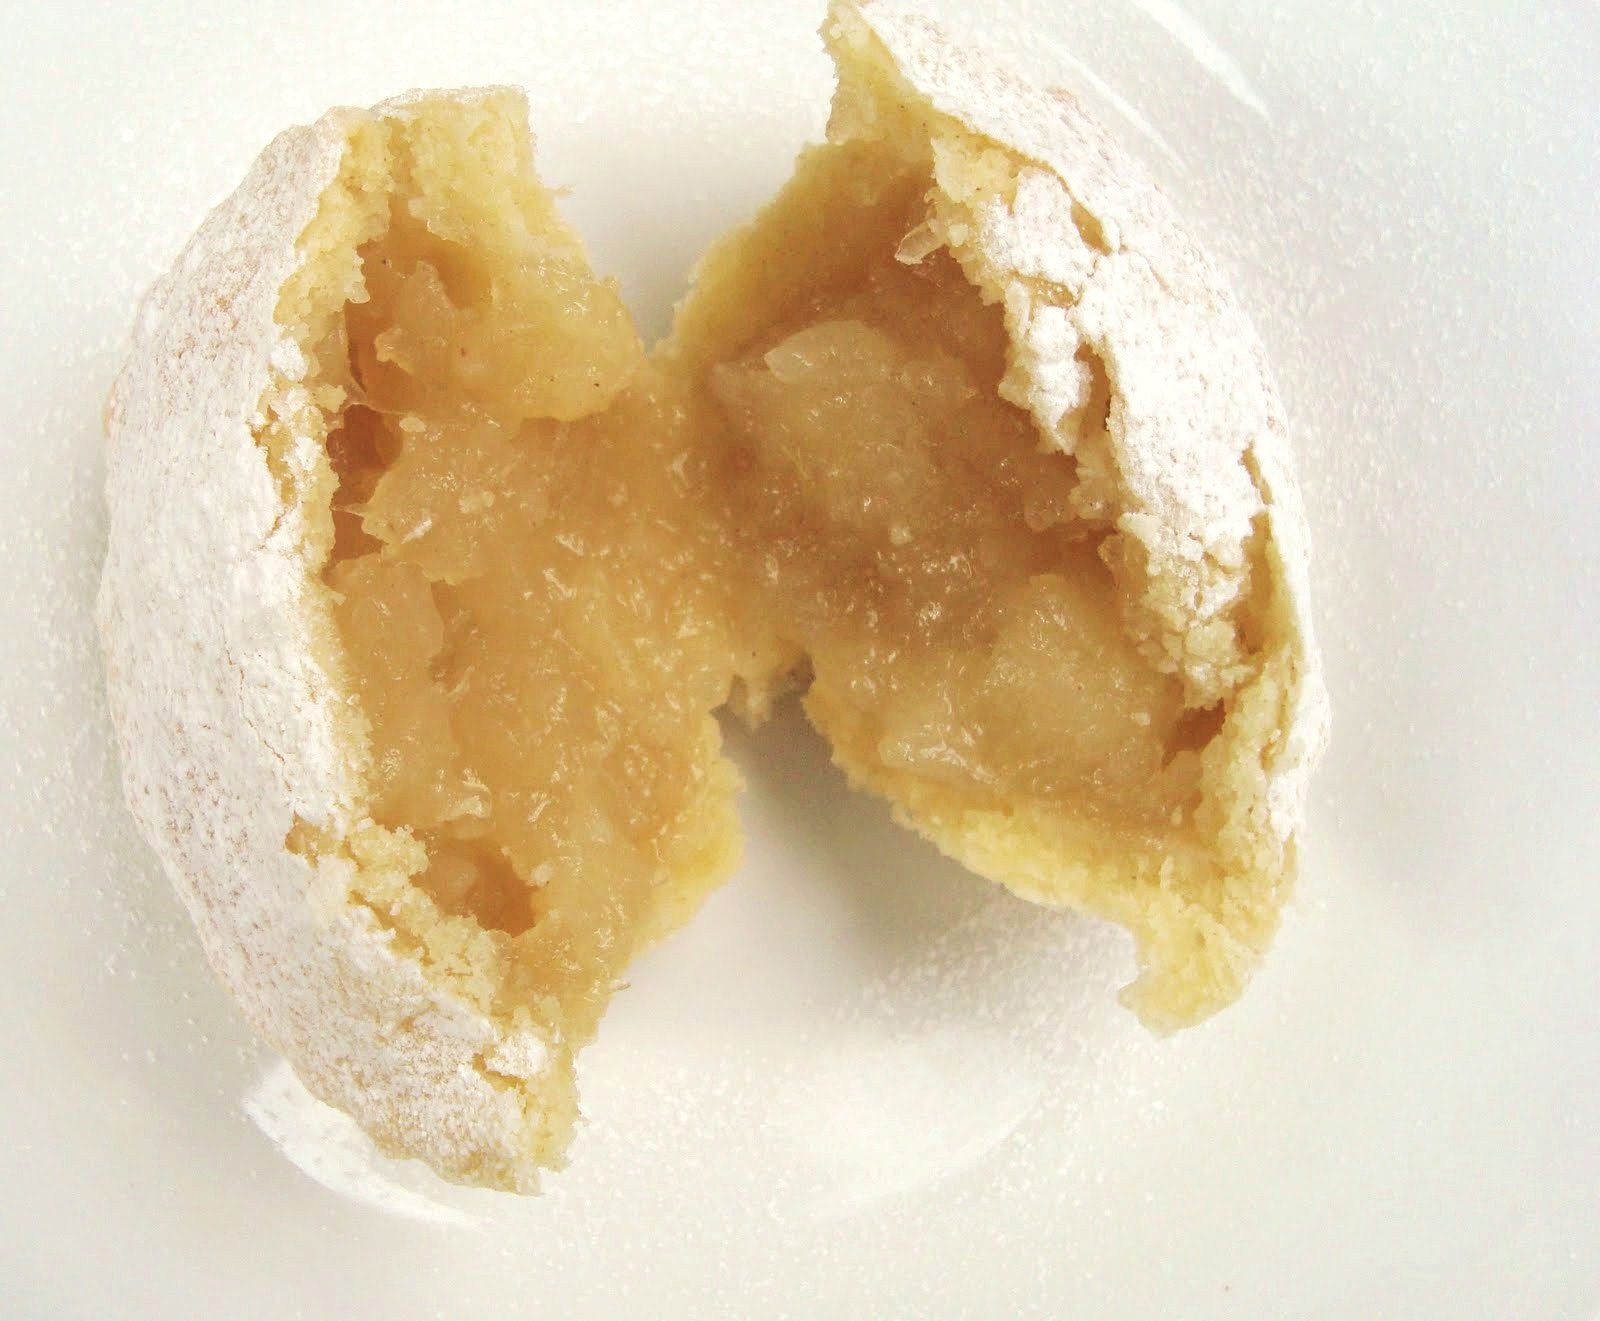
All these things will help towards happiness, however, to experience true and unadulterated joy you need to make and eat the perfect apple pie. But it’s going to take time. These little buggers are a labour of love, in that they take a while to make. They’re not difficult, just laborious. Are you game? Tender, sweet crumb pastry with just a hint of almond, apples still tart with a little bite (but not too much) and a sweet bumble bee hit of honey. What’s not to like? Here’s how:
Makes 12.
Ingredients:
For the filling:
4 large cooking apples, peeled, cored and chopped into thumb nail pieces (total 583g using my grandmother’s apples)
15mls lemon juice
60mls honey
a tiny smidgen of mixed spice.
1 tbsp cornflour mixed into 1 tbsp boiling water
For the pastry:
250g plain flour
50g icing sugar (plus about another 50g for rolling later on)
50g ground almonds
150g unsalted very cold butter cut into 1cm cubes
2 large eggs
Best to start these off in the morning. There are a lot of steps. Pies can be a bit high maintenance like that.
Breakfast time:
Step 1. Take the bits of apple and toss in the lemon juice. I use my hands to get them well covered. Then place in a saucepan (that has a fitted lid) and add the honey and mixed spice. Stir then pop the lid on the saucepan and stew over a low heat for about 7 – 10 minutes until the apples are soft and are starting to break up. What you’re looking for are some chunks left but the rest like purée. So keep an eye on the apples and stir if you feel the need. No vigorous beating or you’ll be left with mush. Then take them off the heat and add the cornflour pre mixed with boiling water. Stir well and pour into a bowl. Cover and refrigerate.
Step 2. Next make the pastry. Put the flour, icing sugar and almonds in a bowl and mix with your hands. Then add the very cold cubes of butter and rub in until you have a fine breadcrumb like mixture. If the butter isn’t cold you’ll get a squidgy mess. Then crack the eggs into the bowl, on top of the bread crumb mixture. Use a blunt knife to stir the yolks up into the whites then stir the whole lot together until you have a sticky pastry like mess. The pastry will seem stickier than regular pastry. Don’t worry. Take a sheet of clingfilm and scoop the lot up into a blob and place in the middle. Squash into a flat round shape, wrap well and place in the fridge. Then leave for a minimum of 2 hours. Don’t attempt to roll it before then. It will just stick to everything and be a nightmare. It needs to firm up and rest.
Lunchtime:
Step 3. Once your pastry has suitably relaxed in the fridge you need to roll it out onto a work surface absolutely covered in icing sugar. A good thick dredging is what’s required. Place your unwrapped pastry into the middle and cover again with icing sugar. Then roll out until the pastry is about 3mm thick. Take a cutter and punch out 12 rounds for the base of your tin and 12 rounds for the tops. Only you know the dimensions you need as it’s all dependent on your tin. You can re roll any off cuts without fear of tough as old boots pastry by the way.
As an aside: About tins – I use this tart tin which I actually got from Lakeland not that long ago for not much money. It’s an amazing tin. Nothing sticks to it. I don’t even grease it. If the thought of gingerly teasing pastry from a tin makes you feel irritable then invest.
Step 4. Take a teacup and fill with cold water. Place next to your tart tin. Place the bigger rounds of pastry into the tart pan and push down gently. Then put a good tablespoon of apple sauce mixture into the middle. Be careful not to pile it up into a mound or when it steams in the oven the lids will pop off. I tell you this as someone who may have overfilled her apple pies from time to time. Then take the pastry lid, dip your finger into the water and wet all the way around the outside. Pop on top of the apple sauce filled pastry circles and press down around the edges with your fingertips. Then dredge the top of the lid with more icing sugar and pierce with a small, sharp knife. Repeat until all 12 are finished. Place in the fridge. Leave for another 2 hours to re-firm the pastry.
Dinner time:
Step 5. Preheat the oven to Gas 6. Make sure the rack is in the middle of the oven. Then bake for 40 minutes until golden brown and delicious looking. Cool a little in the tin. For maybe 10 minutes. Then carefully use a knife and a spoon to lift onto a cooling rack. Cover with more icing sugar if you think tart apples need the edge taking off them. I’m not sure they do.
Step 6: Enjoy hot with ice cream or cold with warm custard. Or any which way you like.
NB: Please eat these on the day you made them or the day after. The pastry does not like to be kept for three days. It goes a bit soft. You could refresh in the oven though.
Get the monthly newsletter...
and subscribe to get all recipes straight to your inbox!
Please forgive me the 80s style lemon segment adornments. I know they’re bad taste, but I like them. And more importantly my son likes them. I’m on the lookout for some angelica and the horror will be complete.
These are zingy in a lemon drizzle way and creamy in a meringuey way. I think the offset works. As with most cupcakes it’s all in the timing – just a minute too long and the cake is dry. And there are few things I dislike more than a dry cupcake. I’d go as far as to say I’d prefer no cup cake. Now that is serious.
Makes 9 cupcakes – a few to eat and a few to give away to your fave people
Ingredients:
Cake:
2 large eggs weighed in their shells
the same weight of Stork margarine
the same weight of plain flour
the same weight of caster sugar
the zest of one lemon
2 tbsp whole milk
Drizzle:
the juice of one lemon weighed
the same weight of caster sugar
Icing:
40g egg white (this is about 1 large egg white though you should use the Two Chicks carton stuff if you worry about salmonella and other chicken related illnesses)
80g caster sugar
25g cold water
130g unsalted butter, very soft
Preheat the oven to Gas 4. Make sure the rack is in the centre of the oven. Place all the cake ingredients in a bowl and whizz together with a handheld electric mixer until lighter than when you started and creamy. Spoon into cupcake cases already nestling in a tin and level with your finger. Place in the oven and set the timer for 15 minutes. It’s at this point you need to start checking for springiness. If the cake looks very light brown and ‘done’ then open the door and check for bounce-back. If the sponge does bounces back when gently pushed with a finger then remove them from the oven quickly and gingerly release the cakes from the tin and cool on a wire rack.
To make the drizzle simply heat the lemon juice and sugar in a small pan on a low heat until the sugar dissolves. Best to do this whilst the cakes are baking. Then once your little cupcakes have cooled for 5 minutes you can pierce them all over with a toothpick (careful not to puncture the bottom) and spoon 2 teaspoons of the lemony drizzle over the top. Do this carefully and slowly so that it has time to soak through. Then leave the cakes to cool completely. You will probably have some lemony drizzle left over (depending on the size of your lemon) but please resist the temptation to pour the lot over the cakes. I know it’s wasteful but either throw it away or save for stirring into gin and tonic or indeed for making glace icing if the meringue stuff is too much of a faff.
Next make the Italian meringue buttercream. You need a sugar thermometer and a free standing mixer for this. If you don’t have either then don’t bother and make some delicious lemon glace icing instead by mixing the left over drizzle with water and icing sugar. If you do then here’s how. I think it’s worth it.
Whisk the egg white to soft peaks in your free standing mixer. Now my mixer doesn’t whisk one egg white very well – it has problems picking it up, so to speak – and as this icing doesn’t keep it’s foolish to make loads unless you’re baking for a crowd. Instead I get my trusty hand held out and whisk it in the bowl of the freestanding mixer. Beware; you do still need a freestanding mixer.
Add 10g of the caster sugar (2 x teaspoons) to the egg whites and whisk again to incorporate. Fit the bowl into the freestanding mixer and fit the whisk attachment. Then place the cold water and rest of the sugar into a small pan (I use a milk pan) with a sugar thermometer and heat until it reaches 121 degrees C. Then turn the mixer onto a medium speed and pour the boiling sugar syrup into the mixer in one continuous stream. Do not worry if your mixer looks a mess and has boiled sugar attached to the side of the bowl and the whisk. It comes off with hot soapy water. Promise.
Leave the mixer running until it’s cold to the touch. You are essentially making Italian meringue here; simply cooking the egg whites with the hot sugar. After about 5 – 7 minutes you can start to add the butter in pieces about the size of a pound coin. Add one every 5 seconds with the whisk on medium. Once it’s all in turn the speed to high. Don’t worry if the mixture looks most unappetising. It’ll be fine. Stop the mixer every minute or so to scrape the sides and the whisk and ensure any blobs of butter are getting beaten properly.
When it all looks creamy and well mixed without any blobs you can pop a blob onto each cupcake and use a knife to spread. You could pipe swirls if you like, in which case you need to make double. I don’t often do the swirly thing as I’m not great with masses of icing. Adorn with something tasteless like a lemon segment sweet or yellow Smarties in a flower pattern.
NB: Important! Do not store in the fridge! If you do this icing hardens and is not good to eat at all.
Get the monthly newsletter...
and subscribe to get all recipes straight to your inbox!
I’m a mum of 3 boys, a cookbook writer and also a finalist on the 2011 Great British Bake Off.
I’ve decided to record the recipes I use, partly to save them somewhere and partly in case someone else might like to use them...
[Read more]
Just sign up to receive my latest blog posts straight to your inbox: Simply click here.
P.S. To sign up for my free monthly newsletter just click here. It has a baking SOS, recommendations on bits of kit I can’t live without, my kitchen catastrophe of the month, a sneak preview of a recipe coming up on this blog and a letter from me telling you what I’ve been up to.
Remember to check your inbox for a confirmation email and also to add my email recipesfromanormalmum@gmail.com to your contacts. Otherwise I could go to spam.


 Holly Bell