
When pregnant with my first son, making homemade Christmas tree decorations is something I really thought I’d do every year as a family tradition. I also thought I’d use bamboo nappies and make my own yoghurt. What can I say, I am not that mother. Not that I judge those women who do. We all use out time as we wish.
So, every year I’ve watched Pinterest in the run up to Christmas and felt a slight tug at my heartstrings when the folk style homemade, edible decorations start to appear. This year I decided no more, we invested an afternoon in baking and making and you know what, it was fun. We all enjoyed it very much. But you know what else? I’ll still be adding some garish foil covered chocolate tree decorations too. Because that’s our family tradition and well, we like it.
If you do fancy making your own decorations, then these are beautiful. More to follow next week.
Lots of great recipes like this in my books, Recipes from a Normal Mum and The Power of Frozen.
One year ago: St Clement’s Shortbread Stars, Homemade Burgers, Brined Spiced Turkey, Easy Tortilla Pizza, Apple and Chilli Jam plus Homemade Chicken Nuggets.
Two years ago: PBJ brownies, Sweet potato, carrot and coriander soup, Pressure cooker beef rogan josh and Coconut and cinnamon tea loaf.
Three years ago: Black forest brownies, Double orange choc chip bundt cake, Sunshine cake and Bonfire cupcakes.
Four years ago: Hazelnut cupcakes with Nutella buttercream, Red root reblochon bake and a Simple banana cake.
Five years ago: Cherry tomato frittata, Lemon brioche and Death by chocolate cake.
Six years ago: Tiramisu profiteroles, Drunken cherry brandy mincemeat and Macarons.
Seven years ago: Easy cheesy pasta, Almond coated chicken and Mince pies for mince pie haters.
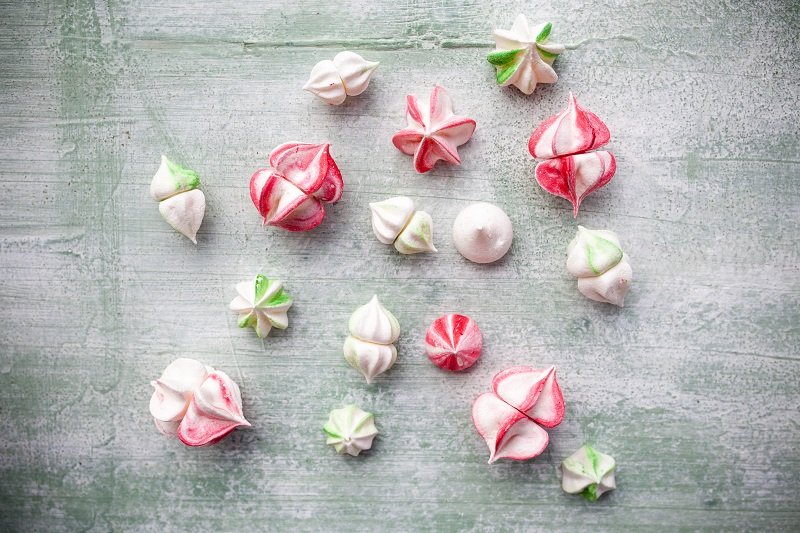
Meringue kisses
Makes 30 – 60 paired kisses dependant on the size of the nozzle(s) used
Ingredients:
· 1 large egg white, at room temperature
· 90g caster sugar
· Extra-strong red and green gel food colouring
· Ready to use white icing tube
Preheat the oven to gas mark ¼, 110C, fan 90C. In a spotlessly clean bowl whisk the egg white until frothy. Add the caster sugar 1 tsp at a time, whisking well after each addition. Once all the sugar has been incorporated, whisk for a further 2 mins until the meringue is smooth and very glossy.
Secure baking paper to two baking trays using a little meringue under each corner of the paper as ‘glue’. Fit a disposable piping bag with a star tipped nozzle, then trim the bag to 10cm in length (this makes it easier to paint inside).
Using a small paintbrush, brush thin lines of red food colouring inside the bag. Place 2 tbsp of the meringue into the bag and carefully push down until it reaches the end of the nozzle. Pipe small meringue ‘kisses’ in various sizes, 2cm apart, until you have used all of the meringue in the piping bag.
Repeat with more meringue using a round tipped nozzle and a fresh piping bag striped with food colouring. Finally pipe kisses with both the round tip and star tip, in a clean bag without any colouring. Bake for 1 hour, or until the meringues come away cleanly from the paper. The smaller kisses will bake faster than larger ones so remove the meringues as they are done, then return the trays to the oven for another 10 mins and check again. (Opening the oven after 40 minutes will not result in flopped meringues). Cool the meringues on a wire rack.
Once cool, use a little icing to stick together similar sized meringue kisses. Once dry you can string to the Christmas tree using cotton tied around the join.
Photography by Scott Choucino
Board by Woodrow Studios
This recipe first appeared in Back to School magazine.

Get the monthly newsletter...
and subscribe to get all recipes straight to your inbox!