
I am still waiting to give birth and nothing would please me more than feeling that first contraction. Not that I’m some kind of sadist, just that I’m big and slow and just a little fed up now. Come on Baby Bell II! We’re all waiting for you.
The one day I prayed the pain wouldn’t start was yesterday. It was Charlie’s 2nd birthday and whilst he is very keen to meet his baby brother/sister I can’t see him liking sharing a birthday forever more. Lucky for him there was no sibling gatecrasher at his party.
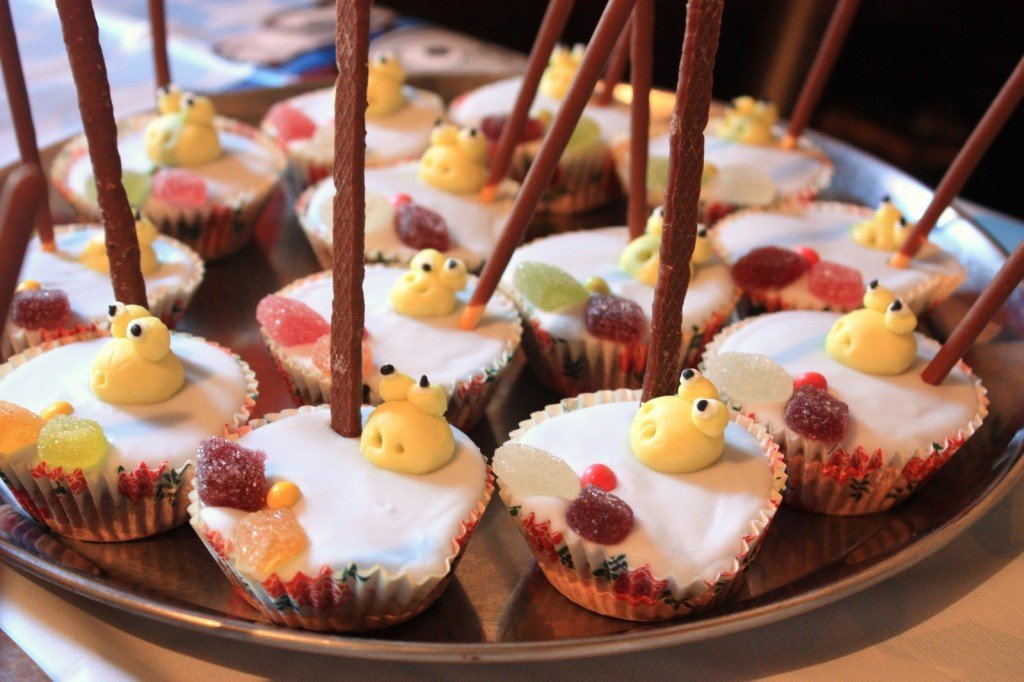
I usually love catering for a party, especially one where sugary treats are welcomed, but this year due to aches, pains and being just full of baby all our lovely guests were rather under catered for. Just a cupcake each and a cup of tea. I’ll make up for it next year. Promise.
These cupcakes were loved by Charlie. I wasn’t sure if he’d like the idea of eating a frog but he did so with gusto and then demanded my frog and his fathers. The birthday boy gets what the birthday boy wants. A tummy full of sugary frogs and a lot of plastic toys.
Ingredients:
- 2 large eggs, beaten
- 125g self raising flour
- 125g margarine
- 125g castor sugar
- 10g cocoa powder
- jelly diamonds
- chocolate beans
- royal icing, ready made (You only need half a small pack but it keeps if wrapped up well.)
- green food colouring
- blue food colouring
- 3 large handfuls of icing sugar
- black and white icing ‘pens’ (Little tubes easily found in supermarkets usually sold in a pack.)
- Matchmakers and Mikado sticks
This makes about 20. First pop the oven onto Gas 6 and then put some fairy cake cases into metal/plastic trays. If you’re using plastic siliconey trays be sure to make them stand level in the oven. I didn’t so a lot of my cakes and kind of lopsided.
Put the eggs, flour, margarine, sugar and cocoa powder into a free standing mixer and beat furiously for 4/5 minutes until light and creamy and combined. You can obviously use a hand held mixer or a wooden spoon too. Pop a large teaspoons worth into each case – don’t be tempted to overfill as you want them to rise just short of the case. Pop in the oven for 20 mins. They’ll be light and springy when cooked. Leave to cool on a wire rack.
Whilst they’re cooking you can make the green froggy paste. Take a palm sized lump of the royal icing and add a teaspoon of the green food colouring. Knead until combined and add more green-ness if you think you need it then pop in the fridge.
Make the pond icing by taking your icing sugar, popping it in a bowl and adding two teaspoons of the blue food colouring, then add a small drop of boiling water and whisk. Keep adding water until the mixture combines to a thick paste that just drops off a spoon when held at a height. Now you need to get your production line going.
To each cooled cupcake you need to add a teaspoon of pond icing, letting it seep to the edges of the fairy case to make an even pond surface. Then roll a ball of the green froggy paste, prick with a skewer twice for nostrils and pop on the top of the pond icing. (I actually used a corkscrew to make nostrils, being without skewers myself.) Then add two jelly diamonds with a chocolate bean in the middle onto the side of the fairy cake for a lily type pad.
When this is done to the first cake, move onto the next one. Don’t be tempted to add the pond icing to all cakes at once as it starts to set making the decorations ‘crack’ the icing as they’re added. (If the pond icing starts to set in your original bowl simply give it a good whisk.)
Once all the cupcakes have their first stage of decoration you can move onto the next stage. If the froggy paste is sticky give it a blast in the fridge or even freezer. Also remember to wipe your hands in between making any new froggy part with the mixture as the stickier they are the harder it is to make the froggy features look smooth.
Take the froggy paste and roll two small ‘eyelids’ for each cake and put on top of the froggy head. Once these have all been added you can pipe a white eye ball onto each eyelid, then a black pupil. Leave to dry overnight if possible, then just before serving add the reeds (Mikado or Matchmakers) by spearing behind the frog, straight into the cake. That’s it! Lots of froggy cakes fit for a birthday!

Get the monthly newsletter...
and subscribe to get all recipes straight to your inbox!